N300 Wireless ADSL2+ Modem Router DGN2200v4 User M anual 350 East Plumeria Drive San Jose, CA 95134 USA December 2012 202-11157-01 v1.
N300 Wireless ADSL2+ Modem Router DGN2200v4 ©2012 NETGEAR, Inc. All rights reserved. No part of this publication may be reproduced, transmitted, transcribed, stored in a retrieval system, or translated into any language in any form or by any means without the written permission of NETGEAR, Inc. Technical Support Thank you for choosing NETGEAR. To register your product, get the latest product updates, or get support online, visit us at http://support.netgear.com.
Contents Chapter 1 Hardware Setup Unpack Your Modem Router . . . . . . . . . . . . . . . . . . . . . . . . . . . . . . . . . . . . 8 Hardware Features. . . . . . . . . . . . . . . . . . . . . . . . . . . . . . . . . . . . . . . . . . . . 8 Front Panel . . . . . . . . . . . . . . . . . . . . . . . . . . . . . . . . . . . . . . . . . . . . . . . . 9 Back Panel . . . . . . . . . . . . . . . . . . . . . . . . . . . . . . . . . . . . . . . . . . . . . . . 11 Label. . . . . . . . . . . . . . . . . . . . . . . .
N300 Wireless ADSL2+ Modem Router DGN2200v4 Guest Network Wireless Security Options . . . . . . . . . . . . . . . . . . . . . . . 36 Chapter 4 NETGEAR genie Advanced Home NETGEAR genie Advanced Home Screen . . . . . . . . . . . . . . . . . . . . . . . . 38 Setup Wizard . . . . . . . . . . . . . . . . . . . . . . . . . . . . . . . . . . . . . . . . . . . . . . . 38 WPS Wizard . . . . . . . . . . . . . . . . . . . . . . . . . . . . . . . . . . . . . . . . . . . . . . . . 39 Setup Menu . . . . . . . . . . .
N300 Wireless ADSL2+ Modem Router DGN2200v4 Edit or Delete a Port Forwarding Entry . . . . . . . . . . . . . . . . . . . . . . . . . .75 Set Up Port Triggering . . . . . . . . . . . . . . . . . . . . . . . . . . . . . . . . . . . . . . . .75 Schedule Blocking . . . . . . . . . . . . . . . . . . . . . . . . . . . . . . . . . . . . . . . . . . . 77 Security Event Email Notifications . . . . . . . . . . . . . . . . . . . . . . . . . . . . . . .78 Chapter 8 Administration Upgrade the Modem Router Firmware .
N300 Wireless ADSL2+ Modem Router DGN2200v4 Activate a VPN Tunnel . . . . . . . . . . . . . . . . . . . . . . . . . . . . . . . . . . . . . 120 Verify the Status of a VPN Tunnel . . . . . . . . . . . . . . . . . . . . . . . . . . . . 122 Deactivate a VPN Tunnel . . . . . . . . . . . . . . . . . . . . . . . . . . . . . . . . . . . 123 Delete a VPN Tunnel . . . . . . . . . . . . . . . . . . . . . . . . . . . . . . . . . . . . . . 124 Set Up VPN Tunnels in Special Circumstances. . . . . . . . . . . . . . . .
1. Hardware Setup Get ting to know your mo dem router 1 The N300 Wireless ADSL2+ Modem Router DGN2200v4 provides you with an easy and secure way to set up a wireless home network with fast access to the Internet over a high-speed digital subscriber line (DSL).
N300 Wireless ADSL2+ Modem Router DGN2200v4 Unpack Your Modem Router Your box should contain the following items: N300 Modem Router Phone Filter Line ADSL Phone The filter or splitter provided depends on the region. Filter/splitter Installation guide Splitter CD with documentation (German only)? Power adapter Phone cable Ethernet cable Figure 1. Package contents If any parts are incorrect, missing, or damaged, contact your NETGEAR dealer.
N300 Wireless ADSL2+ Modem Router DGN2200v4 Front Panel The modem router front panel has the status LEDs and icons shown in the figure. Note that the Wireless and WPS icons are buttons. WPS button WiFi On/Off button Internet DSL WAN network USB LAN ports (1-4) Power Figure 2. Front panel LEDs and icons The following table describes the LEDs, icons, and buttons on the front panel from left to right. Table 1. Front panel icons for buttons and LEDs Icon Description WPS button • Solid green.
N300 Wireless ADSL2+ Modem Router DGN2200v4 Table 1. Front panel icons for buttons and LEDs (continued) Icon Description Internet • Solid green. You have an Internet connection. If this connection is dropped due to an idle time-out but the DSL connection is still present, the LED stays green. If the Internet connection is dropped for any other reason, the LED turns off. • Solid red. The Internet (IP) connection failed.
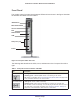
N300 Wireless ADSL2+ Modem Router DGN2200v4 Back Panel The back panel has the buttons and port connections as shown in the following figure. ADSL port Ethernet LAN ports USB port Reset button On/Off button Power adapter input Figure 3. Back panel connections and buttons Label The label on the bottom of the modem router shows the Restore Factory Settings button, preset login information, MAC address, and serial number. MAC address Serial number Wi-Fi network name and password Figure 4.
N300 Wireless ADSL2+ Modem Router DGN2200v4 Position Your Modem Router The modem router lets you access your network from virtually anywhere within the operating range of your wireless network. However, the operating distance or range of your wireless connection can vary significantly depending on the physical placement of your modem router. For example, the thickness and number of walls the wireless signal passes through can limit the range.
N300 Wireless ADSL2+ Modem Router DGN2200v4 One-Line ADSL Microfilter Plug the ADSL microfilter into the wall outlet and plug your phone equipment into the jack labeled Phone. The modem router plugs directly into a separate DSL line. Plugging the modem router into the phone jack blocks the Internet connection. If you do not have a separate DSL line for the modem router, the best thing to do is to use an ADSL microfilter with a built-in splitter (see Two-Line ADSL Microfilter on page 13).
N300 Wireless ADSL2+ Modem Router DGN2200v4 Cable Your Modem Router Internet Phone ADSL Line Figure 7. Cable connections CAUTION: Incorrectly connecting a filter to your modem router blocks your DSL connection. This section includes the same information about the printed installation guide that came with the modem router. To cable the modem router: 1. Connect the ADSL. a. Install an ADSL microfilter between the phone line and the phone. 1 b.
N300 Wireless ADSL2+ Modem Router DGN2200v4 2. Add power to the modem router. 2 a. Connect the power adapter to the router and plug the power adapter into an outlet. b. Wait for the WiFi LED on the front panel to turn on. If none of the LEDs on the front panel are on, press the On/Off button on the rear panel of the modem router. 3. Connect the computer. You can use an Ethernet cable or connect wirelessly. 3 • Use the yellow Ethernet cable to connect your computer to an Ethernet port on your router.
N300 Wireless ADSL2+ Modem Router DGN2200v4 4. Open a browser. If the genie screen does not display, close and reopen the browser and enter http://routerlogin.net in the address bar. 5. Connect any additional wired computers to your modem router by inserting an Ethernet cable from a computer into one of the three remaining LAN ports.
2. Getting Started with NETGEAR genie Con ne ct to the modem router This chapter explains how to use NETGEAR genie to set up your modem router after you complete cabling as described in the installation guide and in the previous chapter.
N300 Wireless ADSL2+ Modem Router DGN2200v4 Modem Router Setup Preparation You can set up your modem router with the NETGEAR genie automatically, or you can use the genie menus and screens to set up your modem router manually. Before you start the setup process, get your ISP information and make sure the computers and devices in the network have the settings described here.
N300 Wireless ADSL2+ Modem Router DGN2200v4 NETGEAR genie Setup NETGEAR genie runs on any device with a web browser. Installation and basic setup takes about 15 minutes to complete. To use NETGEAR genie to set up your modem router: 1. Turn the modem router on by pressing the On/Off button. 2. Make sure that your computer or wireless device is connected to the modem router with an Ethernet cable (wired) or wirelessly with the preset security settings listed on the bottom label. 3.
N300 Wireless ADSL2+ Modem Router DGN2200v4 If the modem router does not connect to the Internet: 1. Review your settings to be sure that you have selected the correct options and typed everything correctly. 2. Contact your ISP to verify that you have the correct configuration information. 3. Read Chapter 11, Troubleshooting. If problems persist, register your NETGEAR product and contact NETGEAR technical support.
N300 Wireless ADSL2+ Modem Router DGN2200v4 Upgrade the Firmware When you set up your modem router and are connected to the Internet, the modem router automatically checks for you to see if newer firmware is available. If it is, a message is displayed on the top of the screen. See Upgrade the Modem Router Firmware on page 81 for more information about upgrading firmware. Click the message when it shows up and click Yes to upgrade the modem router with the latest firmware.
N300 Wireless ADSL2+ Modem Router DGN2200v4 • ReadySHARE. If you connected a USB storage device to the modem router, then it is displayed here. • Guest Network. Set up a guest network to allow visitors to use your modem router’s Internet connection. • Advanced tab. Set the modem router up for unique situations such as when remote access by IP or by domain name from the Internet is needed. See Chapter 9, Advanced Settings. You need a solid understanding of networking protocols to use this tab.
N300 Wireless ADSL2+ Modem Router DGN2200v4 NETGEAR genie App and Mobile genie App The genie app is the easy dashboard for managing, monitoring, and repairing your home network. See the NETGEAR genie App User Manual for details about the genie apps. Retrieve wireless password About genie Language Menu Dashboard (Click to view details) Support The genie app can help you with the following: • Automatically repair common wireless network problems.
3.
N300 Wireless ADSL2+ Modem Router DGN2200v4 Basic Home Screen The genie Basic Home screen is shown in the following figure: Internet Setup The Internet Setup screen is where you view or change basic ISP information. Note: You can use the Setup Wizard to detect the Internet connection and automatically set up the modem router. See Setup Wizard on page 38.
N300 Wireless ADSL2+ Modem Router DGN2200v4 To view or change the basic Internet setup: 1. From the Home screen, select Internet. The following screen displays: Scroll to view more settings The fields that display in the Internet Setup screen depend on whether your Internet connection requires a login. • Yes. Select the encapsulation method and enter the login name. If you want to change the login time-out, enter a new value in minutes. • No. Enter the account and domain names, only if needed. 2.
N300 Wireless ADSL2+ Modem Router DGN2200v4 • Password. The password that you use to log in to your ISP. • Idle Timeout (In minutes). If you want to change the login timeout, enter a new value in minutes. This setting determines how long the modem router keeps the Internet connection active after there is no Internet activity from the LAN. A value of 0 (zero) means never log out. Internet IP Address. • Get Dynamically from ISP. Your ISP uses DHCP to assign your IP address.
N300 Wireless ADSL2+ Modem Router DGN2200v4 Attached Devices Use the Attached Device screen to view all computers or devices that are currently connected to your network. To go to the Attached Devices screen: From the Basic Home screen, select Attached Devices to display the following screen: Wired devices are connected to the modem router with Ethernet cables. Wireless devices have joined the wireless network. • # (number). The order in which the device joined the network. • IP Address.
N300 Wireless ADSL2+ Modem Router DGN2200v4 Parental Controls The first time you select Parental Controls from the Basic Home screen, your browser goes to the Parental Controls website. You can learn more about Live Parental Controls or download the application. To set up Live Parental Controls: 1. Select Parental Controls on the Dashboard screen. 2. Click either the Windows Users or Mac Users button. 3.
N300 Wireless ADSL2+ Modem Router DGN2200v4 Because Live Parental Controls uses free OpenDNS accounts, you are prompted to log in or create a free account. 5. Select the radio button that applies to you and click Next. • If you already have an OpenDNS account, leave the Yes radio button selected. • If you do not have an OpenDNS account, select the No radio button. If you are creating an account, the following screen displays: • Fill in the fields and click Next.
N300 Wireless ADSL2+ Modem Router DGN2200v4 6. Select the radio button for the filtering level that you want and click Next. 7. Click the Take me to the status screen button. Parental controls are now set up for the router. The Dashboard shows Parental Controls as Enabled. ReadySHARE USB Storage You can view information about a USB storage device that is connected to the modem router’s USB port here.
N300 Wireless ADSL2+ Modem Router DGN2200v4 name (account name) for All – no password is guest. The password for admin is the same one that you use to log in to the modem router. By default, it is password. Folder Name. Full path of the network folder. Volume Name. Volume name from the storage device (either USB drive or HDD). Total/Free Space. Shows the current utilization of the storage device. • Edit. Click the Edit button to edit the Available Network Folders settings. • Safely Remove a USB Device.
N300 Wireless ADSL2+ Modem Router DGN2200v4 1. Select Basic > Wireless to display the Wireless Settings screen. The screen sections, settings, and procedures are explained in the following sections. 2. Make any changes that are needed and click Apply to save your settings. 3. Set up and test your wireless devices and computers to make sure that they can connect wirelessly.
N300 Wireless ADSL2+ Modem Router DGN2200v4 check box is selected by default. To turn off the SSID broadcast, clear the Allow Broadcast of Name (SSID) check box, and click Apply. Name (SSID). The SSID is also known as the wireless network name. Enter a 32-character (maximum) name in this field. This field is case-sensitive. The default SSID is randomly generated, and NETGEAR strongly recommends that you do not change this setting. Channel. This setting is the wireless channel the gateway uses.
N300 Wireless ADSL2+ Modem Router DGN2200v4 Guest Networks Adding a guest network allows visitors at your home to use the Internet without giving them your wireless security key. You can add a guest network to each wireless network: 2.4 GHz b/g/n and 5.0 GHz a/n. To set up a guest network: 1. Select Basic > Guest Network to display the following screen: 2. Select any of the following wireless settings: Enable this wireless network.
N300 Wireless ADSL2+ Modem Router DGN2200v4 Guest Network Wireless Security Options A security option is the type of security protocol applied to your wireless network. The security protocol in force encrypts data transmissions and ensures that only trusted devices receive authorization to connect to your network. Wi-Fi Protected Access (WPA) has several options including pre-shared key (PSK) encryption.
4. NETGEAR genie Advanced Home Spe cif ying custom set ti ngs This chapter contains the following sections: • NETGEAR genie Advanced Home Screen • Setup Wizard • WPS Wizard • Setup Menu • WAN Setup • LAN Setup • Quality of Service (QoS) Setup Some selections on the Advanced Home screen are described in separate chapters: • USB Storage. See Chapter 5, USB Storage. • Security. See Chapter 7, Security. • Administration. See Chapter 8, Administration. • Advanced Setup.
N300 Wireless ADSL2+ Modem Router DGN2200v4 NETGEAR genie Advanced Home Screen The genie Advanced Home dashboard presents status information. The content is the same as what is on the Router Status screen available from the Administration menu.The genie Advanced Home screen is shown in the following figure: This screen is also displayed through the Administration menu. Setup Wizard You can use the Setup Wizard to detect your Internet settings and automatically set up your router.
N300 Wireless ADSL2+ Modem Router DGN2200v4 3. Select Yes and click Next. The Setup Wizard searches your Internet connection for servers and protocols to determine your ISP configuration. The following screen displays: WPS Wizard The WPS Wizard helps you add a WPS-capable client device (a wireless device or computer) to your network. On the client device, either press its WPS button or locate its WPS PIN. To use the WPS Wizard: 1. Select Advanced > WPS Wizard. 2. Click Next.
N300 Wireless ADSL2+ Modem Router DGN2200v4 • To use the PIN method, select the PIN Number radio button, enter the client security PIN, and click Next. Within 2 minutes, go to the client device and use its WPS software to join the network without entering a password. The modem router attempts to add the WPS-capable device. The WPS LED on the front of the modem router blinks green.
N300 Wireless ADSL2+ Modem Router DGN2200v4 WAN Setup The WAN Setup screen lets you configure a DMZ (demilitarized zone) server, change the Maximum Transmit Unit (MTU) size, and enable the modem router to respond to a ping on the WAN (Internet) port. To view or change the WAN settings: Select Advanced > Setup > WAN Setup The following settings are available: • Disable Port Scan and DoS Protection.
N300 Wireless ADSL2+ Modem Router DGN2200v4 NAT provides a much less secured firewall, but allows almost all Internet applications to function. • Disable SIP ALG. The Session Initiation Protocol (SIP) Application Level Gateway (ALG) is enabled by default to optimize VoIP phone calls that use the SIP. Select the Disable SIP ALG check box to disable the SIP ALG. Disabling the SIP ALG might be useful when running certain applications. • Disable IGMP Proxying.
N300 Wireless ADSL2+ Modem Router DGN2200v4 The best MTU setting for NETGEAR equipment is often just the default value. In some situations, changing the value fixes one problem but causes another. Leave the MTU unchanged unless one of these situations occurs: • You have problems connecting to your ISP or other Internet service, and the technical support of either the ISP or NETGEAR recommends changing the MTU setting.
N300 Wireless ADSL2+ Modem Router DGN2200v4 To change the MTU size: 1. Select Advanced > Setup > WAN Setup. 2. In the MTU Size field, enter a value from 64 to 1500. 3. Click Apply to save the settings. LAN Setup The LAN Setup screen allows configuration of LAN IP services such as Dynamic Host Configuration Protocol (DHCP) and Routing Information Protocol (RIP). The modem router is shipped preconfigured to use private IP addresses on the LAN side and to act as a DHCP server.
N300 Wireless ADSL2+ Modem Router DGN2200v4 2. Enter the settings that you want to customize. These settings are described in the following section, LAN Setup Screen Settings. 3. Click Apply to save your changes. LAN Setup Screen Settings LAN TCP/IP Setup • IP Address. The LAN IP address of the modem router. • IP Subnet Mask. The LAN subnet mask of the modem router.
N300 Wireless ADSL2+ Modem Router DGN2200v4 Use the Modem Router as a DHCP Server By default, the modem router acts as a DHCP server. The router assigns IP, DNS server, and default gateway addresses to all computers connected to the LAN. The assigned default gateway address is the LAN address of the modem router. The modem router assigns IP addresses to the attached computers from a pool of addresses specified in this screen.
N300 Wireless ADSL2+ Modem Router DGN2200v4 4. Click Apply to enter the reserved address into the table. The reserved address is not assigned until the next time the computer contacts the modem router’s DHCP server. Reboot the computer, or access its IP configuration and force a DHCP release and renew. To edit or delete a reserved address entry, select the radio button next to the reserved address you want to edit or delete. Then click Edit or Delete.
N300 Wireless ADSL2+ Modem Router DGN2200v4 • Individual Ethernet LAN ports of the modem router • A specific device by MAC address To specify prioritization of traffic, create a policy for the type of traffic and add the policy to the QoS Policy table in the QoS Setup screen. For convenience, the QoS Policy table lists many common applications and online games that can benefit from QoS handling. QoS for Applications and Online Gaming To create a QoS policy for applications and online games: 1.
N300 Wireless ADSL2+ Modem Router DGN2200v4 6. You can select an existing item from the list, or you can scroll and select Add a New Application or Add a New Game, as applicable. 7. If prompted, in the Connection Type list, select either TCP, UDP, or both (TCP/UDP). Specify the port number or range of port numbers that the application or game uses. 8. From the Priority list, select the priority for Internet access for this traffic relative to other applications and traffic.
N300 Wireless ADSL2+ Modem Router DGN2200v4 3. From the Priority Category list, select MAC Address to display the following screen: 4. If the device to be prioritized appears in the MAC Device List, select its radio button. The information from the MAC Device List populates the policy name, MAC Address, and Device Name fields. If the device does not appear in the MAC Device List, click Refresh. If it still does not appear, then fill in these fields manually. 5.
5. USB Storage Accessing and configuring a USB storage drive 5 This chapter describes how to access and configure a USB storage drive attached to your modem router. The USB port on the modem router can be used only to connect USB storage devices like flash drives or hard drives, or a printer. Do not connect computers, USB modems, CD drives, or DVD drives to the modem router USB port.
N300 Wireless ADSL2+ Modem Router DGN2200v4 USB Drive Requirements The modem router works with 1.0 and 1.1 (USB Full Speed) and 2.0 (USB High Speed) standards. The approximate USB bus speeds are shown in the following table. Actual bus speeds can vary, depending on the CPU speed, memory, speed of the network, and other variables. Table 3. USB Drive Speeds Bus Speed/Sec USB 1.1 12 Mbits USB 2.0 480 Mbits The modem router works with most USB-compliant external flash and hard drives.
N300 Wireless ADSL2+ Modem Router DGN2200v4 File-Sharing Scenarios You can share files on the USB drive for a wide variety of business and recreational purposes. The files can be any PC, Mac, or Linux file type including text files, Word, PowerPoint, Excel, MP3, pictures, and multimedia. USB drive applications include: • Sharing multimedia with friends and family such as MP3 files, pictures, and other multimedia with local and remote users. • Sharing resources on your network.
N300 Wireless ADSL2+ Modem Router DGN2200v4 Sharing Large Files over the Internet Sending files that are larger than 5 MB can pose a problem for many email systems. The modem router allows you to share large files such as PowerPoint presentations or .zip files over the Internet. FTP can be used to download shared files from the modem router. Sharing files with a remote colleague involves the following considerations: • There are two user accounts: admin and guest.
N300 Wireless ADSL2+ Modem Router DGN2200v4 The ReadySHARE print feature allows you to share a printer that you connect to the USB port on your router. To use the ReadySHARE print feature on a Windows PC, you need to use the NETGEAR USB Control Center utility. For information about this feature, see Chapter 6, ReadySHARE Printer. To access your USB device: 1. Click the network device name or the share name in your computer’s network folders list. 2. For SMB://readyshare, click Connect.
N300 Wireless ADSL2+ Modem Router DGN2200v4 3. • To add a folder, click Create Network Folder. • To edit a folder, select its radio button, and then click Edit. can use this screen to select a folder, change the share name, or change the read access or write access from All – no password to . The user name (account name) for All – no password is guest. The password for admin is the same one that is used to log in to the modem router. By default, it is password. 4.
N300 Wireless ADSL2+ Modem Router DGN2200v4 • Workgroup. If you are using a Windows workgroup rather than a domain, the workgroup name is displayed here. The name works only in an operating system that supports NetBIOS, such as Microsoft Windows. • Access Method. The access methods are described here. Network Connection. Enabled by default, this connection allows all users on the LAN to have access to the USB drive. HTTP. Enabled by default. You can type http://readyshare.routerlogin.
N300 Wireless ADSL2+ Modem Router DGN2200v4 • Volume Name. Volume name from the storage device (either USB drive or HDD). • Total/Free Space. Shows the current utilization of the storage device. Safely Remove a USB Drive To remove a USB disk drive safely, select USB Storage > Basic Settings, and click the Safely Remove USB Device button. This takes the drive offline. Media Server Settings By default, the modem router is set up to act as a Ready DLNA Media server.
N300 Wireless ADSL2+ Modem Router DGN2200v4 2. Click the Approved Devices button. The USB Drive Approved Devices screen displays: This screen shows the approved USB devices and the available USB devices. You can remove or add approved USB devices. 3. To add an approved USB device, select it from the Available USB Devices list, and then click Add. 4. Select the Allow only approved devices check box. 5. Click Apply so that your change takes effect.
6. ReadySHARE Printer 6 ReadySHARE Printer is compatible with Macs and Windows PCs. It lets you connect a USB printer to the router’s USB port, and access it wirelessly. This chapter contains the following sections: • ReadySHARE Printer • USB Control Center Utility For additional about ReadySHARE features, see www.netgear.com/readyshare.
N300 Wireless ADSL2+ Modem Router DGN2200v4 ReadySHARE Printer You can connect a USB printer to the router’s USB port, and share it among Windows and Mac computers on the network. To set up ReadySHARE Printer: 1. Connect the USB printer to the router’s USB port with a USB printer cable. 2. Install the USB printer driver software on each computer that will share the printer.
N300 Wireless ADSL2+ Modem Router DGN2200v4 4. Follow the instructions to install the NETGEAR USB Control Center utility. 5. After you have installed the utility, select the language.
N300 Wireless ADSL2+ Modem Router DGN2200v4 6. The first time you access the utility, you are asked to select the printer and click the Connect button. Once the connection is established, the status changes to Manually connected by xxx. You can click the Disconnect button at any time to release the connection. The status then changes to Available. After you click the Connect button once on each computer in the network, the utility on each of them handles the printing queue and handling.
N300 Wireless ADSL2+ Modem Router DGN2200v4 • You can set the value for the default time-out time from the Tools > Configuration screen. • The USB Control Center utility must be running for the computer to be able to print to the USB printer attached to the router. If you exit the utility, printing does not work. • Some firewall software, such as Comodo, blocks the ReadySHARE Print utility from accessing the USB printer.
N300 Wireless ADSL2+ Modem Router DGN2200v4 USB Control Center Utility The USB Control Center Utility allows you to control a shared USB device from your computer that is connected to the USB port on your router. The utility allows you to control a printer, a scanner. You have to install the utility on each computer on your network from which you want to control the device. You can download this utility for PC and Mac at www.netgear.com/landing/en-us/readyshare.aspx.
N300 Wireless ADSL2+ Modem Router DGN2200v4 Control Center Configuration Select Tools >Configuration to display the following screen: Automatically execute when logging on Windows. Enable this utility to start automatically when you are logged in to Windows. Timeout. Specify the timeout value for holding the USB resource when it is not in use. Language. Select the display language for this utility. USB Printer The first time you use a printer, click Connect.
N300 Wireless ADSL2+ Modem Router DGN2200v4 Once the printer shows Available status, it is no longer grayed out in a Paused state in the Windows Printers window. This USB printer is ready. The utility does not need to hold the connection of this USB printer. Once there is any print job for this printer, the USB utility connects to this USB printer automatically then prints. After the print job is done, the printer status returns to the Paused state.
7. Security Keepi ng unwanted content out of your net work 7 This chapter explains how to use the basic firewall features of the modem router to prevent objectionable content from reaching the computers and devices on your network.
N300 Wireless ADSL2+ Modem Router DGN2200v4 Keyword Blocking of HTTP Traffic Use keyword blocking to prevent certain types of HTTP traffic from accessing your network. The blocking can be always or according to a schedule. To set up keyword blocking: 1. Select Advanced > Security > Block Sites to display the following screen: 2. Select one of the keyword blocking options: • Per Schedule. Turn on keyword blocking according to the Schedule screen settings. • Always.
N300 Wireless ADSL2+ Modem Router DGN2200v4 Firewall Rules to Control Network Access Your modem router has a firewall that blocks unauthorized access to your wireless network and permits authorized inbound and outbound communications. Authorized communications are established according to inbound and outbound rules. The firewall has the following two default rules. You can create custom rules to further restrict the outbound communications or more widely open the inbound communications: • Inbound.
N300 Wireless ADSL2+ Modem Router DGN2200v4 5. Click Apply to save your settings. Port Triggering to Open Incoming Ports Some application servers (such as FTP and IRC servers) send replies to multiple port numbers. Using the port triggering function of your router, you can tell the router to open additional incoming ports when a particular outgoing port originates a session. An example is Internet Relay Chat (IRC). Your computer connects to an IRC server at destination port 6667.
N300 Wireless ADSL2+ Modem Router DGN2200v4 Port Forwarding to Permit External Host Communications In both of the preceding examples, your computer initiates an application session with a server computer on the Internet. However, you might need to allow a client computer on the Internet to initiate a connection to a server computer on your network. Normally, your router ignores any inbound traffic that is not a response to your own outbound traffic.
N300 Wireless ADSL2+ Modem Router DGN2200v4 How Port Forwarding Differs from Port Triggering The following points summarize the differences between port forwarding and port triggering: • Port triggering can be used by any computer on your network, although only one computer can use it at a time. • Port forwarding is configured for a single computer on your network. • With port triggering, the router does not need to know the computer’s IP address in advance. The IP address is captured automatically.
N300 Wireless ADSL2+ Modem Router DGN2200v4 3. Click Add, and the following screen displays: 4. From the Service list, select the service or game that you will host on your network. If the service does not appear in the list, see Add a Custom Service on page 74. 5. In the Send to LAN Server field, enter the last digit of the IP address of your local computer that will provide this service. 6. Click Apply. The service appears in the list on the Port Forwarding screen.
N300 Wireless ADSL2+ Modem Router DGN2200v4 7. In the Server IP Address field, enter the IP address of your local computer that will provide this service. 8. Click Apply. The service appears in the list in the Port Forwarding/Port Triggering screen. Edit or Delete a Port Forwarding Entry To edit or delete a port forwarding entry: 1. In the table, select the radio button next to the service name. 2. Click Edit Service or Delete Service.
N300 Wireless ADSL2+ Modem Router DGN2200v4 Note: If you use applications such as multiplayer gaming, peer-to-peer connections, real-time communications such as instant messaging, or remote assistance (a feature in Windows XP), you should also enable Universal Plug and Play (UPnP). To configure port triggering, you need to know which inbound ports the application needs, and the number of the outbound port that will trigger the opening of the inbound ports.
N300 Wireless ADSL2+ Modem Router DGN2200v4 1. On the Port Triggering screen, click Add Service. The following screen displays: 2. In the Service Name field, type a descriptive service name. 3. In the Service User list, select Any (the default) to allow any computer on the Internet to use this service. Otherwise, select Single address, and enter the IP address of one computer to restrict the service to a particular computer. 4. Select the service type, either TCP or UDP or both (TCP/UDP).
N300 Wireless ADSL2+ Modem Router DGN2200v4 2. Set up the schedule for blocking keywords and services. • Days to Block. Select days on which you want to apply blocking by selecting the appropriate check boxes, or select Every Day to select the check boxes for all days. • Time of Day to Block. Select a start and end time in 24-hour format, or select All Day for 24-hour blocking. 3. Select your time zone from the list.
N300 Wireless ADSL2+ Modem Router DGN2200v4 6. You can have email alerts sent immediately when someone attempts to visit a blocked site, and you can specify that logs are sent automatically. If you select the Weekly, Daily, or Hourly option and the log fills up before the specified period, the log is emailed to the specified email address. After the log is sent, the log is cleared from the modem router’s memory. If the modem router cannot email the log file, the log buffer might fill up.
8. Administration 8 M anaging your net work This chapter describes the modem router settings for administering and maintaining your modem router and home network. See Remote Management on page 97 for information about upgrading or checking the status of your modem router over the Internet. See Traffic Meter on page 100 for information about monitoring Internet traffic.
N300 Wireless ADSL2+ Modem Router DGN2200v4 Upgrade the Modem Router Firmware The modem router firmware (routing software) is stored in flash memory. You can update the firmware from the Administration menu on the Advanced tab. You might see a message at the top of the genie screens when new firmware is available for your product. You can use the Check button on the Router Update screen to check and update to the latest firmware for your product if new firmware is available.
N300 Wireless ADSL2+ Modem Router DGN2200v4 View Router Status To view modem router status and usage information: Select Advanced Home or select Administration > Router Status to display the following screen: Scroll to view more settings Router Information Hardware Version. The modem router model. Firmware Version. The version of the modem router firmware. It changes if you upgrade the modem router firmware. GUI Language Version. The localized language of the user interface. LAN Port. • MAC Address.
N300 Wireless ADSL2+ Modem Router DGN2200v4 IP Address. The IP address used by the Internet (WAN) port of the modem router. If no address is shown or the address is 0.0.0, the modem router cannot connect to the Internet. Connection. This shows if the modem router is using a fixed IP address on the WAN. If the value is DHCP Client, the modem router obtains an IP address dynamically from the ISP. IP Subnet Mask. The IP subnet mask used by the Internet (WAN) port of the modem router. Domain Name Server.
N300 Wireless ADSL2+ Modem Router DGN2200v4 Connection Status Button To view the Internet connection status: On the Router Status screen in the Internet Connection pane, click the Connection Status button to view connection status information. The Release button returns the status of all items to 0. The Renew button refreshes the items. The Close Window button closes the Connection Status screen. IP Address. The IP address that is assigned to the modem router. Subnet Mask.
N300 Wireless ADSL2+ Modem Router DGN2200v4 Mode. The wireless communication mode: Up to 54 Mbps, Up to 217 Mbps (default), and Up to 1300 Mbps. Wireless AP. Indicates whether the radio feature of the modem router is enabled. If this feature is not enabled, the Wireless LED on the front panel is off. Broadcast Name. Indicates whether the modem router is broadcasting its SSID. Wireless Isolation.
N300 Wireless ADSL2+ Modem Router DGN2200v4 Manage the Configuration File The configuration settings of the modem router are stored within the modem router in a configuration file. You can back up (save) this file to your computer, restore it, or reset it to the factory default settings. Back Up Settings To back up the modem router’s configuration settings: 1. Select Advanced > Administration > Backup Settings to display the following screen: 2.
N300 Wireless ADSL2+ Modem Router DGN2200v4 You can use the Restore Factory Settings button on the back of the modem router (see Factory Settings on page 142), or you can click the Erase button in this screen. Erase sets the user name to admin, the password to password, and the LAN IP address to 192.168.1.1, and enables the modem router’s DHCP. Set Password This feature let you change the default password that is used to log in to the modem router with the user name admin.
9. Advanced Settings 9 This chapter describes the advanced features of your modem router. The information is for readers with advanced networking knowledge who want to set the modem router up for unique situations such as when remote access from the Internet by IP or domain name is needed. Note: The Port Forwarding/Port Triggering screen can be accessed both through the Advanced Setup menu and through the Firewall Rules screen.
N300 Wireless ADSL2+ Modem Router DGN2200v4 Advanced Wireless Settings To go to the Advanced Wireless Settings screen: Select Advanced > Advanced Setup > Wireless Settings to display the following screen: The following settings are available in this screen: Enable Wireless Router Radio. You can completely turn off the wireless portion of the wireless modem router by clearing this check box. Select this check box again to enable the wireless portion of the modem router.
N300 Wireless ADSL2+ Modem Router DGN2200v4 Restrict Wireless Access by MAC Address You can set up a list of computers and wireless devices that are allowed to join the wireless network. This list is based on the unique MAC address of each computer and device. Each network device has a MAC address, which is a unique 12-character physical address, containing the hexadecimal characters 0–9, a–f, or A–F only, and separated by colons (for example, 00:09:AB:CD:EF:01).
N300 Wireless ADSL2+ Modem Router DGN2200v4 Wireless Repeating Function (WDS) You can set the N300 Wireless ADSL2+ Modem Router up to be used as a wireless access point (AP). Doing this enables the modem router to act as a wireless repeater. A wireless repeater connects to another wireless modem router as a client where the network to which it connects becomes the ISP service. Wireless repeating is a type of Wireless Distribution System (WDS).
N300 Wireless ADSL2+ Modem Router DGN2200v4 The DGN2200v4 modem router is always in dual band concurrent mode, unless you turn off one radio.If you enable the wireless repeater in either radio band, the wireless base station or wireless repeater cannot be enabled in the other radio band. However, if you enable the wireless base station in either radio band and use the other radio band as a wireless modem router or wireless base station, dual band concurrent mode is not affected.
N300 Wireless ADSL2+ Modem Router DGN2200v4 Repeater IP Address. If your modem router is the repeater, enter the IP address of the other access point. Base Station MAC Address. If your modem router is the repeater, enter the MAC address for the access point that is the base station. • Wireless Base Station. If your modem router is the base station, select this check box. Repeater MAC Address (1 through 4). If your modem router is the base station, it can act as the “parent” of up to 4 other access points.
N300 Wireless ADSL2+ Modem Router DGN2200v4 Set Up a Repeater Unit Use a wired Ethernet connection to set up the repeater unit to avoid conflicts with the wireless connection to the base station. Note: If you are using the DGN2200v4 base station with a different router product as the repeater, you might need to change additional configuration settings. In particular, you should disable the DHCP server function on the wireless repeater AP. To configure the modem router as a repeater unit: 1.
N300 Wireless ADSL2+ Modem Router DGN2200v4 provider, logs in to your account, and registers your new IP address. If your host name is hostname, for example, you can reach your modem router at http://hostname.dyndns.org. To set up Dynamic DNS: 1. Select Advanced > Advanced Setup > Dynamic DNS to display the following screen: 2. Register for an account with one of the Dynamic DNS service providers whose names appear in the Service Provider list. For example, for DynDNS.org, select www.dyndns.org. 3.
N300 Wireless ADSL2+ Modem Router DGN2200v4 request to the ISP. The ISP forwards your request to the company where you are employed, and the request is likely to be denied by the company’s firewall. In this case you have to define a static route, telling your modem router that 134.177.0.0 should be accessed through the ISDN modem router at 192.168.1.100. In this example: • The Destination IP Address and IP Subnet Mask fields specify that this static route applies to all 134.177.x.x addresses.
N300 Wireless ADSL2+ Modem Router DGN2200v4 Remote Management The remote management feature lets you upgrade or check the status of your N300 Wireless ADSL2+ Modem Router over the Internet. To set up remote management: 1. Select Advanced > Advanced Setup > Remote Management. Note: Be sure to change the modem router’s default login password to a secure password. The ideal password contains no dictionary words from any language and contains upper-case and lower-case letters, numbers, and symbols.
N300 Wireless ADSL2+ Modem Router DGN2200v4 4. Specify the port number for accessing the management interface. Normal web browser access uses the standard HTTP service port 80. For greater security, enter a custom port number for the remote web management interface. Choose a number from 1024 to 65535, but do not use the number of any common service port. The default is 8080, which is a common alternate for HTTP. 5. Click Apply so that your changes take effect. 6.
N300 Wireless ADSL2+ Modem Router DGN2200v4 Advertisement Period. The advertisement period is how often the modem router broadcasts its UPnP information. This value can range from 1 to 1440 minutes. The default period is 30 minutes. Shorter durations ensure that control points have current device status at the expense of additional network traffic. Longer durations can compromise the freshness of the device status, but can significantly reduce network traffic. Advertisement Time to Live.
N300 Wireless ADSL2+ Modem Router DGN2200v4 Traffic Meter Traffic metering allows you to monitor the volume of Internet traffic that passes through your modem router’s Internet port. With the Traffic Meter utility, you can set limits for traffic volume, set a monthly limit, and get a live update of traffic usage. To monitor Internet traffic: 1. Click Advanced > Advanced Setup > Traffic Meter to display the following screen: Scroll to view more settings 2.
N300 Wireless ADSL2+ Modem Router DGN2200v4 Change the Device Mode The modem includes a built-in router. If you want to configure the modem as a “pure bridge” in Modem mode, first set up the Internet connection and then change the Device Mode setting to Modem mode. In Modem mode, the device acts as a “pure bridge” or DSL modem. When the device is in Modem mode, features that are not available are grayed out. To change the device mode: 1. Select Advanced > Device Mode.
10. Virtual Private Networking 10 This chapter describes how to use the virtual private networking (VPN) features of the modem router. VPN communications paths are called tunnels. VPN tunnels provide secure, encrypted communications between your local network and a remote network or computer. See Appendix B, VPN Configuration to learn more about VPNs.
N300 Wireless ADSL2+ Modem Router DGN2200v4 Overview of VPN Configuration Two common scenarios for VPN tunnels are between a remote PC and a network gateway; and between two or more network gateways. The DGN2200v4 supports both types. The DGN2200v4 supports up to five concurrent tunnels. Client-to-Gateway VPN Tunnels Client-to-gateway VPN tunnels provide secure access from a remote PC, such as a telecommuter connecting to an office network.
N300 Wireless ADSL2+ Modem Router DGN2200v4 A VPN between two or more NETGEAR VPN-enabled routers is a good way to connect branch or home offices and business partners over the Internet. VPN tunnels also enable access to network resources across the Internet. In this case, use gateways on each end of the tunnel to form the VPN tunnel end points. See Set Up a Gateway-to-Gateway VPN Configuration on page 116 for information about how to set up this configuration.
N300 Wireless ADSL2+ Modem Router DGN2200v4 page 148) can allow a VPN endpoint with a dynamic IP address to initiate or respond to a tunnel request. Otherwise, the side using a dynamic IP address has to always be the initiator. • Which method will you use to configure your VPN tunnels? - The VPN Wizard using VPNC defaults (see Table 5, Parameters Recommended by the VPNC and Used in the VPN Wizard on page 105).
N300 Wireless ADSL2+ Modem Router DGN2200v4 • See Use Manual Policy to Configure VPN Tunnels on page 131 when the VPN Wizard and its VPNC defaults are not appropriate for your special circumstances and you have to specify each phase of the connection. You manually enter all the authentication and key parameters.
N300 Wireless ADSL2+ Modem Router DGN2200v4 The following worksheet identifies the parameters used in this procedure, which are highlighted in blue. For a blank worksheet, see Plan a VPN on page 104. Table 6.
N300 Wireless ADSL2+ Modem Router DGN2200v4 2. Click Next. 3. Fill in the Connection Name and pre-shared key fields. The connection name is for convenience and does not affect how the VPN tunnel functions. 4. Select the radio button for A remote VPN client (single PC), and click Next. 5. Enter the remote IP address and subnet mask, and click Next. The Summary screen displays: Note: To view the VPNC-recommended authentication and encryption settings used by the VPN Wizard, click the here link.
N300 Wireless ADSL2+ Modem Router DGN2200v4 6. Click Done. The VPN Policies screen displays, showing that the new tunnel is enabled: To view or modify the tunnel settings, select its radio button and click Edit. See Use Auto Policy to Configure VPN Tunnels on page 124 for information about how to enable the IKE keep-alive capability on an existing VPN tunnel. Step 2: Configure the VPN Client This section describes how to configure the NETGEAR ProSafe VPN Client on a remote PC.
N300 Wireless ADSL2+ Modem Router DGN2200v4 b. From the Edit menu of the Security Policy Editor, select Add, and then click Connection. A New Connection listing appears in the list of policies. c. Rename the new connection so that it matches the Connection Name field in the VPN Settings screen of the modem router on LAN A. Choose connection names that make sense to the people using and administering the VPN.
N300 Wireless ADSL2+ Modem Router DGN2200v4 3. Configure the security policy in the NETGEAR ProSafe VPN Client software: a. In the Network Security Policy list, expand the new connection by double-clicking its name or clicking the + symbol. My Identity and Security Policy subheadings appear below the connection name. b. Click the Security Policy subheading to view the Security Policy settings. Security Policy settings, Client-to-Gateway A c.
N300 Wireless ADSL2+ Modem Router DGN2200v4 d. In the Internet Interface section of the screen, select the adapter that you use to access the Internet. If you have a dial-up Internet account, select PPP Adapter in the Name field. If you have a dedicated cable or DSL line, select your Ethernet adapter. If you will be switching between adapters or if you have only one adapter, select Any. e. In the My Identity section of the screen, click the Pre-Shared Key button. The Pre-Shared Key screen displays: f.
N300 Wireless ADSL2+ Modem Router DGN2200v4 d. In the Encrypt Alg drop-down list, select the type of encryption that is configured for the Encryption Protocol in the modem router in Table 4 on page 104. This example uses Triple DES. e. In the Hash Alg drop-down list, select SHA-1. f. In the SA Life drop-down list, select Unspecified. g. In the Key Group drop-down list, select Diffie-Hellman Group 2. 6. Configure the VPN client key exchange proposal.
N300 Wireless ADSL2+ Modem Router DGN2200v4 To check the VPN connection, you can initiate a request from the remote PC to the modem router’s network by using the Connect option in the NETGEAR ProSafe menu bar. The NETGEAR ProSafe client reports the results of the attempt to connect. Since the remote PC has a dynamically assigned WAN IP address, it has to initiate the request. To perform a ping test using our example, start from the remote PC: a. Establish an Internet connection from the PC. b.
N300 Wireless ADSL2+ Modem Router DGN2200v4 To launch this function, click the Windows Start button, then select Programs > NETGEAR ProSafe VPN Client > Log Viewer. The Log Viewer screen for a successful connection is shown in this figure: Note: Use the active VPN tunnel information and pings to determine whether a failed connection is due to the VPN tunnel or some reason outside the VPN tunnel. 9.
N300 Wireless ADSL2+ Modem Router DGN2200v4 Set Up a Gateway-to-Gateway VPN Configuration This section describes how to use the VPN Wizard to set up the VPN tunnel using the VPNC default parameters listed in Table 5 on page 105. If you have special requirements not covered by these VPNC-recommended parameters, see Set Up VPN Tunnels in Special Circumstances on page 124 for information about how to set up the VPN tunnel.
N300 Wireless ADSL2+ Modem Router DGN2200v4 Table 7. Gateway-to-Gateway VPN Tunnel Configuration Worksheet Parameter Value to Be Entered Field Selection Gateway_A GW_A 192.168.0.1 255.255.255.0 14.15.16.17 Gateway_B GW_B 192.168.3.1 255.255.255.0 22.23.24.25 The LAN IP address ranges of each VPN endpoint have to be different. The connection will fail if both are using the NETGEAR default address range of 192.168.0.x. To configure a gateway-to-gateway VPN tunnel using the VPN Wizard: 1.
N300 Wireless ADSL2+ Modem Router DGN2200v4 4. Fill in the Connection Name field and pre-shared key fields. Select the radio button for A remote VPN Gateway, and click Next. 5. Fill in the IP address or FQDN for the target VPN endpoint WAN connection, and click Next. The Step 3 screen displays. 6. Fill in the IP Address and Subnet Mask fields for the target endpoint that can use this tunnel, and click Next. 7. Specify the local LAN address and subnet mask, and click Next.
N300 Wireless ADSL2+ Modem Router DGN2200v4 8. Click Done on the Summary screen. 9. The VPN Policies screen displays, showing that the new tunnel is enabled. Note: See Use Auto Policy to Configure VPN Tunnels on page 124 for information about how to enable the IKE keepalive capability on an existing VPN tunnel. 10. Repeat these steps for the gateway on LAN B, and pay special attention to the following network settings: • WAN IP of the remote VPN gateway (for example, 14.15.16.
N300 Wireless ADSL2+ Modem Router DGN2200v4 VPN Tunnel Control Activate a VPN Tunnel There are three ways to activate a VPN tunnel: • Use the VPN Status screen. • Ping the remote endpoint. • Start using the VPN tunnel. Note: See Use Auto Policy to Configure VPN Tunnels on page 124 for information about how to enable the IKE keep-alive capability on an existing VPN tunnel. Use the VPN Status Screen to Activate a VPN Tunnel 1.
N300 Wireless ADSL2+ Modem Router DGN2200v4 To perform a ping test using our example, start from the remote PC: a. Establish an Internet connection from the PC. b. On the Windows taskbar, click the Start button, and then select Run. c. Type ping -t 192.168.3.1, and then click OK. Running a ping test to the LAN from the PC This causes a continuous ping to be sent to the first DGN2200v4. Within 2 minutes, the ping response should change from timed out to reply. Note: You can use Ctrl-C to stop the pinging.
N300 Wireless ADSL2+ Modem Router DGN2200v4 Start Using a VPN Tunnel to Activate It To use a VPN tunnel, use a Web browser to go to a URL whose IP address or range is covered by the policy for that VPN tunnel. Verify the Status of a VPN Tunnel 1. Select Advanced > Advanced - VPN > VPN Status. The VPN Status/Log screen displays: This log shows the details of recent VPN activity, including the building of the VPN tunnel.
N300 Wireless ADSL2+ Modem Router DGN2200v4 • SLifeTime (Secs). The remaining soft lifetime for this SA in seconds. When the soft lifetime becomes 0 (zero), the SA (security association) is re-negotiated. • HLifeTime (Secs). The remaining hard lifetime for this SA in seconds. When the hard lifetime becomes 0 (zero), the SA (security association) is terminated. (It is re-established if required.) Deactivate a VPN Tunnel Sometimes a VPN tunnel has to be deactivated for testing purposes.
N300 Wireless ADSL2+ Modem Router DGN2200v4 Delete a VPN Tunnel To deactivate a VPN tunnel: 1. Select Advanced > Advanced - VPN > VPN Policies to display the VPN Policies screen. 2. In the Policy Table, select the radio button for the VPN tunnel to be deleted and click Delete. Set Up VPN Tunnels in Special Circumstances When the VPN Wizard and its VPNC defaults (see Table 5 on page 105) are not appropriate for your circumstances, use one of these alternatives: • Auto Policy.
N300 Wireless ADSL2+ Modem Router DGN2200v4 Select Advanced > Advanced - VPN > VPN Policies, and click the Add Auto Policy button to display the VPN - Auto Policy screen: The DGN2200v4 VPN tunnel network connection fields are defined in the following sections. VPN Auto Policy General Settings • Policy Name. Enter a unique name. This name is not supplied to the remote VPN endpoint. It is used only to help you manage the policies. • Remote VPN Endpoint.
N300 Wireless ADSL2+ Modem Router DGN2200v4 • Single/Start IP Address. Enter the IP address for a single address, or the starting address for an address range. A single address setting is used when you want to make a single server on your LAN available to remote users. A range has to be an address range used on your LAN. Any. The remote VPN endpoint might be at any IP address. • Finish IP Address. For an address range, enter the finish IP address. This needs to be an address range used on your LAN.
N300 Wireless ADSL2+ Modem Router DGN2200v4 • Remote Identity Type. Select the option that matches the Local Identity Type setting on the remote VPN endpoint. - IP Address. The Internet IP address of the remote VPN endpoint. - Fully Qualified Domain Name. The domain name of the remote VPN endpoint. - Fully Qualified User Name. The name, email address, or other ID of the remote VPN endpoint. - Remote Identity Data. Enter the data for the remote identity type that you selected.
N300 Wireless ADSL2+ Modem Router DGN2200v4 Example of Using Auto Policy Gateway B Gateway A IP: 192.168.0.1 VPN Tunnel IP:192.168.3.1 22.23.24.25 14.15.16.17 Figure 14. Auto Policy for a Gateway-to-Gateway tunnel The following settings are assumed for this example:. Table 8.
N300 Wireless ADSL2+ Modem Router DGN2200v4 The VPN Auto Policy screen displays: 3. Enter these policy settings: Auto Policy Field Description General Policy Name GtoG Remote VPN Endpoint Address Type Fixed IP Address Remote VPN Endpoint Address Data 22.23.24.25 Local LAN Remote LAN IKE Parameters Use the default settings. IP Address Select Subnet address from the drop-down list. Single/Start IP Address 192.168.3.1 Subnet Mask 255.255.255.
N300 Wireless ADSL2+ Modem Router DGN2200v4 4. Click Apply. The VPN Policies screen displays: 5. Repeat these steps for the DGN2200v4 on LAN B. Pay special attention to the following network settings: • General, Remote Address Data (for example, 14.15.16.17) • Remote LAN, Start IP Address - IP Address (for example, 192.168.0.1) - Subnet Mask (for example, 255.255.255.0) - Pre-shared Key (for example, 12345678) 6.
N300 Wireless ADSL2+ Modem Router DGN2200v4 Use Manual Policy to Configure VPN Tunnels As an alternative to IKE, you can use manual keying, in which you need to specify each phase of the connection. A manual VPN policy requires all settings for the VPN tunnel to be manually input at each end (both VPN endpoints).
N300 Wireless ADSL2+ Modem Router DGN2200v4 • Single/Start IP Address. The IP address for a single address, or the starting address for an address range used on the LAN. If you want to make a single server on your LAN available to remote users, use a single address Any settings. The remote VPN endpoint can be at any IP address. • Finish IP Address. For an address range, enter the finish IP address. This has to be an address range used on your LAN. • Subnet Mask. Enter the network mask.
11. Troubleshooting Diag nose and Solve P roblem s 11 This chapter provides information to help you diagnose and solve problems you might have with your modem router. If you do not find the solution here, check the NETGEAR support site at http://support.netgear.com for product and contact information.
N300 Wireless ADSL2+ Modem Router DGN2200v4 Troubleshooting with the LEDs When you turn the power on, the power, LAN, and DSL LEDs should light as described here. If they do not, refer to the sections that follow for help. 1. When power is first applied, the Power LED lights. 2. After approximately 10 seconds, the LAN and DSL LEDs light as follows: a. The LAN port LEDs light for any local ports that are connected. b. The DSL link LED lights to indicate that there is a link to the connected device. c.
N300 Wireless ADSL2+ Modem Router DGN2200v4 If the Power LED turns red to indicate a modem router fault, turn the power off and on to see if the modem router recovers. If the power LED is still red 1 minute after power-up: • Turn the power off and on one more time to see if the modem router recovers. • Clear the modem router’s configuration to factory defaults as explained in Factory Settings on page 142. This sets the modem router’s IP address to 192.168.0.1.
N300 Wireless ADSL2+ Modem Router DGN2200v4 Troubleshooting the Internet Connection If your modem router is unable to access the Internet, check the ADSL connection, then the WAN TCP/IP connection. ADSL Link If your modem router is unable to access the Internet, first determine whether you have an ADSL link with the service provider. The state of this connection is indicated with the Internet LED. ADSL Link LED Is Green If your ADSL link LED is green, then you have a good ADSL connection.
N300 Wireless ADSL2+ Modem Router DGN2200v4 Internet LED Is Red If the Internet LED is red, the device was unable to connect to the Internet. Verify the following: • Check that your login credentials are correct, or that the information you entered on the Basic Settings screen is correct. • Check with your ISP to verify that the multiplexing method, VPI, and VCI settings on the ADSL settings screen are correct.
N300 Wireless ADSL2+ Modem Router DGN2200v4 3. Click the Connection Status button. 4. If all of the steps indicate OK, then your PPPoE or PPPoA connection is up and working. 5. If any of the steps indicates Failed, you can attempt to reconnect by clicking Connect. The modem router continues to attempt to connect indefinitely. If you cannot connect after several minutes, you might be using an incorrect service name, user name, or password. There also might be a provisioning problem with your ISP.
N300 Wireless ADSL2+ Modem Router DGN2200v4 2. In the field provided, type ping followed by the IP address of the modem router, as in this example: ping 192.168.0.1 3. Click OK.
N300 Wireless ADSL2+ Modem Router DGN2200v4 • If your ISP assigned a host name to your PC, enter that host name as the account name in the Basic Settings screen. • Your ISP could be rejecting the Ethernet MAC addresses of all but one of your PCs. Many broadband ISPs restrict access by allowing traffic only from the MAC address of your modem, but some additionally restrict access to the MAC address of a single PC connected to that modem.
A. Supplemental Information A This appendix includes the factory default settings and technical specifications for the N300 Wireless ADSL2+ Modem Router DGN2200v4, and instructions for wall-mounting the unit.
N300 Wireless ADSL2+ Modem Router DGN2200v4 Factory Settings You can return the modem router to its factory settings. On the bottom of the modem router, use the end of a paper clip or some other similar object to press and hold the Restore Factory Settings button for at least 7 seconds. The modem router resets, and returns to the factory settings. Your device will return to the factory configuration settings shown in the following table. Table 9.
N300 Wireless ADSL2+ Modem Router DGN2200v4 Table 9. Factory Default Settings (Continued) Feature Wireless Default Behavior Wireless communication Enabled SSID name Can be found on the label on the bottom of the unit. Security Can be found on the label on the bottom of the unit.
N300 Wireless ADSL2+ Modem Router DGN2200v4 Specifications Specification Description Network protocol and standards compatibility TCP/IP, RIP-1, RIP-2, DHCP, PPPoE or PPPoA, RFC 1483 Bridged or Routed Ethernet, and RFC 1577 Classical IP over ATM Power adapter North America: 120V, 60 Hz, input UK, Australia: 240V, 50 Hz, input Europe: 230V, 50 Hz, input All regions (output): 12V @ 1A output Physical Dimensions: 6.80 in. x 5.03 in. x 1.28 in. (173 mm x 128 mm x 33 mm) Weight: 0.65 lbs.
B. VPN Configuration B I PS e c V P N t u n nel This appendix is a case study on how to configure a secure IPSec VPN tunnel from a NETGEAR DGN2200v4 to a FVL328. This case study follows the VPN Consortium interoperability profile guidelines (found at http://www.vpnc.org/InteropProfiles/Interop-01.html). Configuration Profile The configuration in this appendix follows the addressing and configuration mechanics defined by the VPN Consortium. Gather necessary information before you begin configuration.
N300 Wireless ADSL2+ Modem Router DGN2200v4 Step-by-Step Configuration 1. Use the VPN Wizard to configure Gateway A (DGN2200v4) for a gateway-to-gateway tunnel (see Set Up a Gateway-to-Gateway VPN Configuration on page 116), being certain to use appropriate network addresses for the environment. The LAN addresses used in this example are as follows: Unit WAN IP LAN IP LAN Subnet Mask DGN2200v4 14.15.16.17 10.5.6.1 255.255.255.0 FVL328 22.13.24.25 172.23.9.1 255.255.255.0 a.
N300 Wireless ADSL2+ Modem Router DGN2200v4 4. On Gateway B router menu, under VPN, select VPN Policies, and click the Edit button to display the VPN Auto Policy screen: 5. Test the VPN tunnel by pinging the remote network from a PC attached to Gateway A (modem router). a. Open the command prompt (Start > Run > cmd). b. Type ping 172.23.9. If the pings fail the first time, try the pings a second time.
N300 Wireless ADSL2+ Modem Router DGN2200v4 Modem Router with FQDN to Gateway B This section is a case study on how to configure a VPN tunnel from a NETGEAR modem router to a gateway using a fully qualified domain name (FQDN) to resolve the public address of one or both routers. This case study follows the VPN Consortium interoperability profile guidelines (found at http://www.vpnc.org/InteropProfiles/Interop-01.html).
N300 Wireless ADSL2+ Modem Router DGN2200v4 retrieved. Now, a gateway can be configured to use a third-party service instead of a permanent and unchanging IP address to establish bi-directional VPN connectivity. To use DDNS, you need to register with a DDNS service provider. Some DDNS service providers include: • DynDNS: www.dyndns.org • TZO.com: netgear.tzo.com • ngDDNS: ngddns.iego.net In this example, Gateway A is configured using a sample FQDN provided by a DDNS service provider.
N300 Wireless ADSL2+ Modem Router DGN2200v4 d. Click Show Status. The resulting screen should show Update OK: good: 3. On Gateway B, configure the Dynamic DNS settings. Assume a correctly configured DynDNS account. a. From the main menu, select Dynamic DNS. b. Select the DynDNS.org radio button to display the following screen: c. Fill in the fields with the account and host name settings. • In the Host and Domain Name field enter fvl328.dyndns.org. • In the User Name field, enter the account user name.
N300 Wireless ADSL2+ Modem Router DGN2200v4 The resulting screen should show Update OK: good: 4. Configure the DGN2200v4 as in the gateway-to-gateway procedures using the VPN Wizard (see Set Up a Gateway-to-Gateway VPN Configuration on page 116), being certain to use appropriate network addresses for the environment. The LAN addresses used in this example are as follows: Device LAN IP Address LAN Subnet Mask DGN2200v4 10.5.6.1 255.255.255.0 FVL328 172.23.6.1 255.255.255.0 a.
N300 Wireless ADSL2+ Modem Router DGN2200v4 b. Type ping 172.23.9.1 If the pings fail the first time, try the pings a second time. Configuration Summary (Telecommuter Example) The configuration in this section follows the addressing and configuration mechanics defined by the VPN Consortium. Gather the necessary information before you begin configuration. Verify that the firmware is up to date, and make sure you have all the addresses and parameters to be set on both sides.
N300 Wireless ADSL2+ Modem Router DGN2200v4 Setting Up Client-to-Gateway VPN Configuration Setting up a VPN between a remote PC running the NETGEAR ProSafe VPN Client and a network gateway involves two steps: • Step 1: Configure Gateway A (Router at the Main Office) on page 153. • Step 2: Configure Gateway B (Router at the Regional Office) on page 154 describes configuring the NETGEAR ProSafe VPN Client endpoint. Step 1: Configure Gateway A (Router at the Main Office) 1. Log in to the VPN router.
N300 Wireless ADSL2+ Modem Router DGN2200v4 3. Click Apply when you are finished to display the VPN Policies screen. 4. To view or modify the tunnel settings, select the radio button next to the tunnel entry, and then click Edit. Step 2: Configure Gateway B (Router at the Regional Office) This procedure assumes that the PC running the client has a dynamically assigned IP address.
N300 Wireless ADSL2+ Modem Router DGN2200v4 e. Double-click the system tray icon to open the Security Policy Editor. toGW_A 2. Add a new connection. a. Run the NETGEAR ProSafe Security Policy Editor program, and create a VPN Connection. b. From the Edit menu of the Security Policy Editor, select Add > Connection. A New Connection listing appears in the list of policies. c. Rename the new connection to match the connection name you entered in the VPN settings of Gateway A.
N300 Wireless ADSL2+ Modem Router DGN2200v4 f. In this example, type 192.168.0.1 in the Subnet field as the network address of the modem router. g. Enter 255.255.255.0 in the Mask field as the LAN subnet mask of the modem router. h. Select All in the Protocol drop-down list to allow all traffic through the VPN tunnel. i. Select the Connect using Secure Gateway Tunnel check box. j. Select Domain Name in the ID Type drop-down list, and enter fromGW_A.com (in this example). k.
N300 Wireless ADSL2+ Modem Router DGN2200v4 a. In the Network Security Policy list on the left side of the Security Policy Editor window, click My Identity. b. Select None in the Select Certificate field. c. Select Domain Name in the ID Type field, and enter toGW_A.com (in this example). Select Disabled in the Virtual Adapter field. d.
N300 Wireless ADSL2+ Modem Router DGN2200v4 b. Expand the Authentication subheading by double-clicking its name or clicking the + symbol. Then select Proposal 1 below Authentication. c. In the Authentication Method drop-down list, select Pre-Shared Key. d. In the Encrypt Alg drop-down list, select the type of encryption. In this example, use Triple DES. e. In the Hash Alg drop-down list, select SHA-1. f. In the SA Life drop-down list, select Unspecified. g.
N300 Wireless ADSL2+ Modem Router DGN2200v4 d. Select the Encapsulation Protocol (ESP) check box. e. In the Encrypt Alg drop-down list, select the type of encryption. In this example, use Triple DES. f. In the Hash Alg drop-down list, select SHA-1. g. In the Encapsulation drop-down list, select Tunnel. h. Leave the Authentication Protocol (AH) check box cleared. 7. Save the VPN Client settings. From the File menu at the top of the Security Policy Editor window, select Save.
N300 Wireless ADSL2+ Modem Router DGN2200v4 a. Establish an Internet connection from the PC. b. On the Windows taskbar, click the Start button, and then select Run. c. Type ping -t 192.168.0.1, and then click OK. This causes a continuous ping to be sent to the VPN router. Within 2 minutes, the ping response should change from timed out to reply. Once the connection is established, you can open the browser on the PC and enter the LAN IP address of the VPN router.
N300 Wireless ADSL2+ Modem Router DGN2200v4 The Connection Monitor screen displays: While the connection is being established, the connection name listed in this screen shows SA before the name of the connection. When the connection is successful, the SA changes to the yellow key symbol. Note: While your PC is connected to a remote LAN through a VPN, you might not have normal Internet access. If this is the case, you need to close the VPN connection to have normal Internet access.
N300 Wireless ADSL2+ Modem Router DGN2200v4 2. To view the VPN tunnels status, click VPN Status.
C. Notification of Compliance NETGEAR Wireless Routers, G ateways, APs C Regulatory Compliance Information Note: This section includes user requirements for operating this product in accordance with National laws for usage of radio spectrum and operation of radio devices. Failure of the end-user to comply with the applicable requirements may result in unlawful operation and adverse action against the end-user by the applicable National regulatory authority.
N300 Wireless ADSL2+ Modem Router DGN2200v4 Español [Spanish] Por medio de la presente NETGEAR Inc. declara que el Radiolan cumple con los requisitos esenciales y cualesquiera otras disposiciones aplicables o exigibles de la Directiva 1999/5/CE. Ελληνική [Greek] ΜΕ ΤΗΝ ΠΑΡΟΥΣΑ NETGEAR Inc. ΔΗΛΩΝΕΙ ΟΤΙ Radiolan ΣΥΜΜΟΡΦΩΝΕΤΑΙ ΠΡΟΣ ΤΙΣ ΟΥΣΙΩΔΕΙΣ ΑΠΑΙΤΗΣΕΙΣ ΚΑΙ ΤΙΣ ΛΟΙΠΕΣ ΣΧΕΤΙΚΕΣ ΔΙΑΤΑΞΕΙΣ ΤΗΣ ΟΔΗΓΙΑΣ 1999/5/ΕΚ. Français [French] Par la présente NETGEAR Inc.
N300 Wireless ADSL2+ Modem Router DGN2200v4 Íslenska [Icelandic] Hér með lýsir NETGEAR Inc. yfir því að Radiolan er í samræmi við grunnkröfur og aðrar kröfur, sem gerðar eru í tilskipun 1999/5/EC. Norsk [Norwegian] NETGEAR Inc. erklærer herved at utstyret Radiolan er i samsvar med de grunnleggende krav og øvrige relevante krav i direktiv 1999/5/EF. This device is a 2.
N300 Wireless ADSL2+ Modem Router DGN2200v4 • For product available in the USA market, only channel 1~11 can be operated. Selection of other channels is not possible. • This device and its antenna(s) must not be co-located or operation in conjunction with any other antenna or transmitter.