
User's Manual

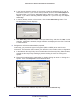

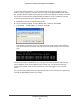


Table Of Contents
- N300 Wireless ADSL2+ Modem Router DGN2200v4
- Contents
- 1. Hardware Setup
- 2. Getting Started with NETGEAR genie
- 3. NETGEAR genie Basic Settings
- 4. NETGEAR genie Advanced Home
- 5. USB Storage
- 6. ReadySHARE Printer
- 7. Security
- 8. Administration
- 9. Advanced Settings
- 10. Virtual Private Networking
- 11. Troubleshooting
- A. Supplemental Information
- B. VPN Configuration
- C. Notification of Compliance

Virtual Private Networking
115
N300 Wireless ADSL2+ Modem Router DGN2200v4
To launch this function, click the Windows Start button, then select Programs >
NETGEAR ProSafe VPN Client > Log Viewer. The Log Viewer screen for a successful
connection is shown in this figure:
Note: Use the active VPN tunnel information and pings to determine whether
a failed connection is due to the VPN tunnel or some reason outside the VPN
tunnel.
9. The Connection Monitor screen for this connection is shown in the following figure:
In this example you can see these settings:
• The modem router has a GW address (public IP W
AN address) of 22.23.24.25.
• The modem router has a remote address (LAN IP address) of 192.168.3.1.
• The VPN client PC has a local address (dynamically assigned address) of
192.168.2.2.
While the connection is being established, the Connection Name field in this screen displays
SA before the name of the connection. When the connection is successful, the SA changes
to the yellow key symbol shown in the previous figure.
Note: While your PC is connected to a remote LAN through a VPN, you
might not have normal Internet access. If this is the case, you have
to close the VPN connection to have normal Internet access.