
User's Manual

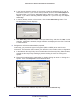


Table Of Contents
- N300 Wireless ADSL2+ Modem Router DGN2200v4
- Contents
- 1. Hardware Setup
- 2. Getting Started with NETGEAR genie
- 3. NETGEAR genie Basic Settings
- 4. NETGEAR genie Advanced Home
- 5. USB Storage
- 6. ReadySHARE Printer
- 7. Security
- 8. Administration
- 9. Advanced Settings
- 10. Virtual Private Networking
- 11. Troubleshooting
- A. Supplemental Information
- B. VPN Configuration
- C. Notification of Compliance

Virtual Private Networking
120
N300 Wireless ADSL2+ Modem Router DGN2200v4
VPN Tunnel Control
Activate a VPN Tunnel
There are three ways to activate a VPN tunnel:
• Use the VPN Status screen.
• Ping the remote endpoint.
• Start using the VPN tunnel.
Note: See Use Auto Policy to Configure VPN Tunnels on page 124 for
information about how to enable the IKE keep-alive capability on an
existing VPN tunnel.
Use the VPN Status Screen to Activate a VPN Tunnel
1. Select Advanced > Advanced - VPN > VPN Status, and click the VPN Status button
to display the Current VPN Tunnels (SAs) screen:
2. Click Connect for the VPN tunnel that you want to activate.
Activate the VPN Tunnel by Pinging the Remote Endpoint
Note: This section uses 192.168.3.1 for sample remote endpoint LAN IP
address.
To activate the VPN tunnel by pinging the remote endpoint (for example, 192.168.3.1),
perform the following steps depending on whether your configuration is client-to-gateway or
gateway-to-gateway:
• Client-to-gateway configuration.
To check the VPN connection, you can initiate a
request from the remote PC to the DGN2200v4’s network by using the Connect option in
the NETGEAR ProSafe menu bar. The NETGEAR ProSafe client reports the results of
the attempt to connect. Since the remote PC has a dynamically assigned WAN IP
address, it has to initiate the request.