
User's Manual


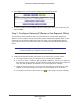


Table Of Contents
- N300 Wireless ADSL2+ Modem Router DGN2200v4
- Contents
- 1. Hardware Setup
- 2. Getting Started with NETGEAR genie
- 3. NETGEAR genie Basic Settings
- 4. NETGEAR genie Advanced Home
- 5. USB Storage
- 6. ReadySHARE Printer
- 7. Security
- 8. Administration
- 9. Advanced Settings
- 10. Virtual Private Networking
- 11. Troubleshooting
- A. Supplemental Information
- B. VPN Configuration
- C. Notification of Compliance

VPN Configuration
160
N300 Wireless ADSL2+ Modem Router DGN2200v4
a. Establish an Internet connection from the PC.
b. On the Windows taskbar
, click the Start button, and then select Run.
c. T
ype ping -t 192.168.0.1, and then click OK.
This causes a continuous ping to be sent to the VPN router. Within 2 minutes, the ping
response should change from timed out to reply.
Once the connection is established, you can open the browser on the PC and enter the LAN
IP address of the VPN router. After a short wait, you should see the login screen of the VPN
router (unless another PC already has the VPN router management interface open).
Note: You can use the VPN router diagnostics to test the VPN connection
from the VPN router to the client PC. To do this, select Diagnostics
on the modem router main menu.
Monitoring the VPN Tunnel
To view information about the progress and status of the VPN client connection, open the Log
Viewer. In Windows, click Start, and select Programs > N300 Wireless ADSL2+ Modem
Router DGN2200v4 > Log Viewer.
Note: Use the active VPN tunnel information and pings to determine
whether a failed connection is due to the VPN tunnel or some reason
outside the VPN tunnel.