Quick Start AirCard 785S Mobile Hotspot
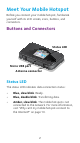
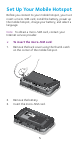
Meet Your Mobile Hotspot Before you connect your mobile hotspot, familiarize yourself with its LCD screen, icons, buttons, and connectors. Buttons and Connectors Status LED Micro USB port Antenna connector Status LED The status LED indicates data connection status: • • • Blue, slow blink. Ready. Blue, double blink. Transferring data. Amber, slow blink. The mobile hotspot is not connected to the network. For more information, visit “Why can’t my mobile hotspot connect to the Internet?” on page 13.
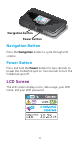
Navigation button Power button Navigation Button Press the Navigation button to cycle through LCD screens. Power Button Press and hold the Power button for two seconds to power the mobile hotspot on, five seconds to turn the mobile hotspot off. LCD Screen The LCD screen displays icons, data usage, your WiFi name, and your WiFi password.
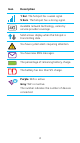
Icon Description 1 bar. The hotspot has a weak signal. 5 bars. The hotspot has a strong signal. Available network technology, varies by service provider coverage. Solid arrows display when the hotspot is transmitting data. You have system alerts requiring attention. You have new SMS messages. The percentage of remaining battery charge. The battery has less than 5% charge. Purple. WiFi is active. Gray. WiFi is inactive. The number indicates the number of devices connected.
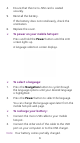
Set Up Your Mobile Hotspot Before you connect to your mobile hotspot, you must insert a micro-SIM card, install the battery, power up the mobile hotspot, charge your battery, and select a language. Note: To obtain a micro-SIM card, contact your Internet service provider. ¾¾ To insert the micro-SIM card: 1. Remove the back cover using the thumb catch on the corner of the mobile hotspot. 2. Remove the battery. 3. Insert the micro-SIM card.
4. Ensure that the micro-SIM card is seated securely. 5. Reinstall the battery. If the battery does not install easily, check the orientation. 6. Replace the cover. ¾¾ To power on your mobile hotspot: Press and hold the Power button until the LCD screen lights up. A language selection screen displays. ¾¾ To select a language: 1. Press the Navigation button to cycle through the language options until your desired language is highlighted. 2. Press the Power button to select the language.
¾¾ To connect to your mobile hotspot: 1. Ensure that WiFi is enabled on your computer or other device. 2. On your computer or other device, search for wireless networks: • For Windows devices, click the Internet Access icon. • For Mac devices, from the WiFi menu, select the network. • For tablets, look for a settings option. 3. Select the WiFi name displayed on your LCD screen. 4. Enter the WiFi password exactly as it appears on the LCD screen. Passwords are case-sensitive.
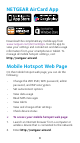
NETGEAR AirCard App Download the complimentary mobile app from www.netgear.com/AirCardApps. Use this app to view your settings and connection and data usage information from your smartphone or tablet. To manage all mobile hotspot settings, visit http://netgear.aircard.
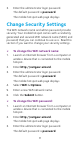
3. Enter the administrator login password. The default password is password. The mobile hotspot web page displays. Change Security Settings The WiFi network name and admin password provide security. Your mobile hotspot comes with a randomly generated and secured WiFi network name (SSID) and password that you can continue to use as is. Read this section if you want to change your security settings. ¾¾ To change the WiFi network name: 1.
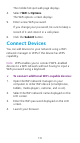
The mobile hotspot web page displays. 4. Select WiFi > Options. The WiFi options screen displays. 5. Enter a new WiFi password. If you change your password, be sure to keep a record of it and store it in a safe place. 6. Click the Submit button. Connect Devices You can add devices to your network using a WiFi network manager or WPS if the device has WPS capability. Note: WPS enables you to connect WPS-enabled devices to a WiFi network without having to input a WiFi password using a keyboard.
¾¾ To connect with devices using WPS: 1. Press the Power or Navigation button to awaken the LCD screen. 2. Press the Navigation button until WPS setup screen displays. 3. To activate WPS, press the Power button. 4. Within two minutes, press the WPS button on the device that you want to connect to your WiFi network. The mobile hotspot and the wireless device automatically communicate and establish a connection.
3. Enter the administrator login password. The default password is password. 4. Under Billing Cycle, enter the monthly start date when your monthly data usage will automatically reset. Frequently Asked Questions Should I change my access point name (APN)? You do not need to change or set up your APN if your mobile broadband service is working.
Why can’t my mobile hotspot connect to the Internet? Confirm that your device is able to connect to your mobile hotspot: • Verify that you are connecting with the correct WiFi SSID and password. • Check WiFi card stability by turning the WiFi on the computer or wireless device off and then back on. • Restart your computer and restart any wireless device that is connected to the mobile hotspot. • Connect with another computer or WiFi device.
• Your recharge credit might have expired. Check your account details with your Internet service provider. • You may need to add an APN. For more information, refer to the user manual. Why can’t I power on my mobile hotspot? Ensure that the battery is inserted in the mobile hotspot and that it is fully charged or is charging. Optional Accessories The availability of the following optional accessories varies depending on your market: Ethernet and antenna charging cradle.
Technical Specifications Technical Specifications Network and band frequency LTE Cat 4. FDD. 700/850/1900/2600/ AWS (1700/2100) MHz 3G. 850/1700/1900/2100 MHz 2G. 850/1900 MHz WiFi connections Up to 15 users Dimensions (W×H×D) 110 x 69 x 14.6 mm Weight 127 g External antenna ports TS9 Standby time Operating systems 4.3 x 2.7 x 5.75 inches Up to 300 hours Windows® 8.1, 8, Windows 7, Vista SP2, and XP SP3 Mac OS 10.6.
Technical Support Thank you for purchasing this NETGEAR product. Contact your Internet service provider for technical support. Trademarks NETGEAR, the NETGEAR logo, and Connect with Innovation are trademarks and/or registered trademarks of NETGEAR, Inc. and/or its subsidiaries in the United States and/or other countries. Information is subject to change without notice. © NETGEAR, Inc. All rights reserved. Compliance For regulatory compliance information, visit: http://www.netgear.com/about/regulatory/.