
User Manual
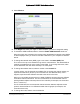
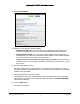
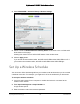
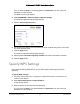
Table Of Contents
- User Manual
- Contents
- 1 Hardware Setup
- 2 Connect to the Network and Access the Modem Router
- 3 Specify Your Internet Settings
- 4 Control Access to the Internet
- 5 Share USB Devices Attached to the Modem Router
- USB Storage Device Requirements
- Connect a USB Storage Device to the Modem Router
- Access a USB Drive Connected to the Modem Router From a Windows Computer
- Map a USB Device to a Windows Network Drive
- Access a USB Storage Device That Is Connected to the Modem Router From a Mac
- Control Access to the USB Storage Device
- Use FTP Within the Network
- View or Change Network Folders on a USB Storage Device
- Add a Network Folder on a USB storage device
- Edit a Network Folder on a USB storage device
- Approve USB Devices
- Access the USB storage device Through the Internet
- Safely Remove a USB storage device
- 6 Share a USB Printer
- 7 Specify Network Settings
- View WAN Settings
- Set Up a Default DMZ Server
- Change the Modem Router’s Device Name
- Change the LAN TCP/IP Settings
- Specify the IP Addresses That the Modem Router Assigns
- Disable the DHCP Server Feature in the Modem Router
- Reserve LAN IP Addresses
- Improve Network Connections With Universal Plug and Play
- Use the WPS Wizard for WiFi Connections
- Specify Basic WiFi Settings
- Change the WiFi Security Option
- Set Up a Guest Network
- Control the Wireless Radios
- Set Up a Wireless Schedule
- Specify WPS Settings
- 8 Manage Your Network
- Change the Admin Password
- Set Up Password Recovery
- Recover the admin Password
- View Modem Router Status
- View Logs of Modem Router Activity
- View Event Logs
- Run the Ping Utility
- Run the Traceroute Utility
- Monitor Internet Traffic
- View Devices Currently on the Network
- Manage the Modem Router Configuration File
- View Wireless Access Points in Your Area
- View or Change the Modem Router Wireless Channel
- Dynamic DNS
- Remote Management
- 9 Specify Internet Port Settings
- 10 Troubleshooting
- A Supplemental Information

Nighthawk AC1900 WiFi Cable Modem Router
Specify Network Settings User Manual76
For 2.4 GHz, Up to 600 Mbps is the default setting. The other settings are Up to 289
Mbps and Up to 54 Mbps.
At 5 GHz, Up to 1300 Mbps is the default setting, which allows 802.11ac and 802.11a
wireless devices to join the network. The other settings are Up to 600 Mbps and Up to
289 Mbps.
10. Click the Apply button.
Your settings are saved.
If you connected wirelessly to the network and you changed the SSID, you are
disconnected from the network.
11. Make sure that you can connect to the WiFi network with the new settings.
If you cannot connect wirelessly, check the following:
• Is your computer or wireless device connected to another wireless network in your
area? Some wireless devices automatically connect to the first open network without
wireless security that they discover.
• Is your computer or wireless device trying to connect to your network with its old
settings (before you changed the settings)? If so, update the wireless network
selection in your computer or wireless device to match the current settings for your
network.
Change the WiFi Security Option
Your modem router comes with preset WPA2 or WPA security. The password that you enter
to connect to your network is unique to your modem router and is on the modem router label.
NETGEAR recommends that you use the preset security, but you can change them.
NETGEAR recommends that you do not disable security.
To change the WPA settings:
1. Launch a web browser from a computer or mobile device that is connected to the
modem router network.
2. Enter http://routerlogin.net or http://192.168.0.1.
A login window opens.
3. Enter the modem router user name and password.
The user name is admin. The default password is password. The user name and
password are case-sensitive.
The BASIC Home page displays.
4. Select Wireless.
5. Under Security Options, select a WPA option.