
User Manual
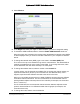
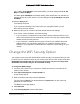
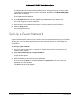
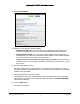
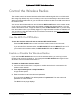
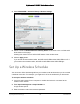
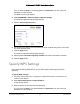
Table Of Contents
- User Manual
- Contents
- 1 Hardware Setup
- 2 Connect to the Network and Access the Modem Router
- 3 Specify Your Internet Settings
- 4 Control Access to the Internet
- 5 Share USB Devices Attached to the Modem Router
- USB Storage Device Requirements
- Connect a USB Storage Device to the Modem Router
- Access a USB Drive Connected to the Modem Router From a Windows Computer
- Map a USB Device to a Windows Network Drive
- Access a USB Storage Device That Is Connected to the Modem Router From a Mac
- Control Access to the USB Storage Device
- Use FTP Within the Network
- View or Change Network Folders on a USB Storage Device
- Add a Network Folder on a USB storage device
- Edit a Network Folder on a USB storage device
- Approve USB Devices
- Access the USB storage device Through the Internet
- Safely Remove a USB storage device
- 6 Share a USB Printer
- 7 Specify Network Settings
- View WAN Settings
- Set Up a Default DMZ Server
- Change the Modem Router’s Device Name
- Change the LAN TCP/IP Settings
- Specify the IP Addresses That the Modem Router Assigns
- Disable the DHCP Server Feature in the Modem Router
- Reserve LAN IP Addresses
- Improve Network Connections With Universal Plug and Play
- Use the WPS Wizard for WiFi Connections
- Specify Basic WiFi Settings
- Change the WiFi Security Option
- Set Up a Guest Network
- Control the Wireless Radios
- Set Up a Wireless Schedule
- Specify WPS Settings
- 8 Manage Your Network
- Change the Admin Password
- Set Up Password Recovery
- Recover the admin Password
- View Modem Router Status
- View Logs of Modem Router Activity
- View Event Logs
- Run the Ping Utility
- Run the Traceroute Utility
- Monitor Internet Traffic
- View Devices Currently on the Network
- Manage the Modem Router Configuration File
- View Wireless Access Points in Your Area
- View or Change the Modem Router Wireless Channel
- Dynamic DNS
- Remote Management
- 9 Specify Internet Port Settings
- 10 Troubleshooting
- A Supplemental Information

Nighthawk AC1900 WiFi Cable Modem Router
Specify Network Settings User Manual78
4. Select Guest Network.
5. Select any of the following wireless settings:
• Enable Guest Network. W
hen this check box is selected, the guest network is
enabled, and guests can connect to your network using the SSID of this profile.
• Enable SSID Broadcast. If th
is check box is selected, the wireless access point
broadcasts its name (SSID) to all wireless stations. Stations with no SSID can adopt
the correct SSID for connections to this access point.
• Allow guests to see each other and access my local network. I
f this check box is
selected, anyone who connects to this SSID can access your local network, not just
the Internet.
6. Give the guest net
work a name.
The guest network name is case-sensitive and can be
up to 32 characters. You then
manually configure the wireless devices in your network to use the guest network name in
addition to the main SSID.
7. Select a radio but
ton for a security option.
The WPA2 options use the newest standard for the strongest security, but some older
compute
rs and wireless devices cannot use WPA2. By default, the WPA2-PSK [AES]
radio button is selected.
8. Click the Appl
y button.
Your settings are saved.