Technical Support Package Contents Thank you for selecting NETGEAR products. The box should contain the following items. If any items are incorrect, missing, or damaged, contact your NETGEAR dealer. After installing your device, locate the serial number on the label of your product and use it to register your product at NETGEAR.com/register. Registration is required before you can use our telephone support service. Registration through our website is strongly recommended.
Compliance You can use this diagram to connect your modem router to ADSL or cable/fiber modem, or you can follow the instructions in this booklet. 4 Browser 1 ADSL or Cable/Fiber Modem 3 Computer 2 Power Note: A user manual is available online at http://downloadcenter.netgear.com or through a link in this modem router’s user interface. Declarations of Conformity For complete DoC please visit the NETGEAR EU Declarations of Conformity website at: support.netgear.com/app/answers/detail/a_id/11621/.
Contents Before You Begin (DSL Connection). . . . . . . . . . . . . . . . . . . . . 2 Install Your Modem Router . . . . . . . . . . . . . . . . . . . . . . . . . . . . . 3 1. Connect the router to your Internet service. . . . . . . . . . . 3 2. Power on your router. . . . . . . . . . . . . . . . . . . . . . . . . . . . 4 3. Connect a computer. . . . . . . . . . . . . . . . . . . . . . . . . . . . 5 4. Open a web browser. . . . . . . . . . . . . . . . . . . . . . . . . . . . 5 Preset Wireless Security . . .
Before You Begin (DSL Connection) If you are connecting to a DSL line, make sure that your DSL service is active before you install the modem router. You need the information listed here to install your DSL modem and connect to the Internet. Locate it and have it on hand before you start the installation procedure. • DSL user name and password. These are included in the welcome letter your DSL Internet service provider (ISP) sent you when you signed up for your service.
Install Your Modem Router Note: Keep your modem router in a vertical position. 1. Connect the router to your Internet service. You can connect either directly to a DSL line or to a fiber/cable modem. To connect to a DSL line: a. Install an ADSL microfilter between the phone line and the phone. b. Connect the ADSL port of the modem router to the ADSL port of the microfilter c. Use an ADSL microfilter for every phone line in the house if your modem router and telephone connect to the same phone line.
To connect to a cable/fiber modem: Connect one end of the yellow Ethernet cable to the WAN port on the router, and connect the other end to your cable/fiber modem. 2. Power on your router. a. Connect the power adapter to the router, and plug the power adapter into an outlet. b. Wait until the WiFi LED turns solid blue.
3. Connect a computer. You can use an Ethernet cable or connect wirelessly. • Use an Ethernet cable (not provided) to connect your computer to an Ethernet port on your router. • Or, connect wirelessly by using the preset wireless security settings on the label on the bottom of the router. 4. Open a web browser. The NETGEAR genie installation wizard displays.
If you do not see the genie screen, close and reopen the browser, and enter http://routerlogin.net in the address bar. See Troubleshooting on page 15. 5. Click Next to allow the genie to help you. Follow the steps to set up your Internet connection. Note for DSL: If your DSL Internet service requires a user name or password, you are prompted to enter this information. If you do not have this information, contact your Internet service provider (see Before You Begin (DSL Connection) on page 2).
Wireless Network Settings Record the default preset wireless settings that are printed on the label in the spaces here for easy reference. 2.4-GHz WiFi network name (SSID): 2.4-GHz network key (password): 5-GHz WiFi network name (SSID): 5-GHz network key (password): If you change the default settings, record them here for easy reference, and then store this booklet in a safe place: 2.4-GHz WiFi network name (SSID): 2.
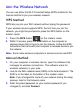
Join the Wireless Network You can use either the Wi-Fi Protected Setup (WPS) method or the manual method to join your wireless network. WPS Method WPS lets you join your WiFi network without typing the password. If your wireless device supports WPS, the first time you join the network, you might be prompted to press the WPS button on the modem router. 1. Press the WPS button on the modem router. 2.
Access the Router to Make Changes After you use genie to set up the modem router, you can log in to the modem router to view or change its settings. To log in to the modem router: 1. Launch a web browser from a computer or wireless device that is connected to the modem router. 2. Type www.routerlogin.net or www.routerlogin.com in the address field of the browser. A login screen displays: 3. Enter admin for the user name and password for the password.
NETGEAR genie App The genie app is your home network dashboard. It lets you easily view, manage, and control your entire home network, and helps you fix common network problems. You can use the genie app or the genie mobile app. Internet WiFi Connection Router Settings STATUS GOOD STATUS Connected Click here Network Map Parental Controls ReadySHARE Number of devices 16 Click here Click here genie app Visit the NETGEAR genie web page at: www.netgear.com/genie.
ReadySHARE Access After installation, you can insert a USB storage device into the USB ports on the modem router and share the contents with others on the network. (If your USB device has special drivers, it is not compatible.) USB port on the rear USB port on the side If your USB device needs a power supply, you have to use it when you connect the USB device to the USB port. It might take up to 2 minutes before the USB drive is ready for sharing after you connect it.
ReadySHARE Printer The USB Control Center utility allows you to control a shared USB device from your computer that is connected to the USB port on your router. The utility allows you to control a printer. Install the utility on each computer on your network from which you want to control the device. You can download this utility at www.netgear.com/landing/en-us/readyshare.aspx.
Control Center Configuration Select Tools > Configuration to display the following screen: Automatically execute when logging on Windows. Select this check box to have the utility start automatically when you are logged in to Windows. Timeout. Specify the time-out value for holding the USB resource when it is not in use. Language. Select the display language for this utility.
USB Printer The first time that you use a printer, you need to click Connect. You might be asked to install the driver for this printer. After the driver is installed, the printer status changes to Available. Note: Some USB printers (for example: HP and Lexmark printer) request that you do not connect the USB cable until the installation software prompts you to do so.
Scan with a Multifunction Printer You can use the scan feature of a multifunction printer. 1. Make sure that the printer status shows as Available. 2. Click the Network Scanner button. The scanning window activates so you can perform scans. Troubleshooting If the browser does not display the web page: • Make sure that the computer is connected to one of the four LAN Ethernet ports, or wirelessly to the router. • Make sure that the modem router has full power and that the WiFi LED is lit.
3. Power down your modem router, and then power it up again. a. Turn off the modem router. b. Unplug the power adapter cord and all other cables from the back of the modem router. c. Wait 30 seconds, then reconnect the cables and power adapter cord to your modem router, and turn it on. d. Make sure that the Power LED is on. If the LED is off, try plugging the power adapter cord into another power outlet. e. Wait for the WiFi LED to turn blue. 4. Open a web browser and try to access the Internet.
© 2012 NETGEAR, Inc. All rights reserved. No part of this publication may be reproduced, transmitted, transcribed, stored in a retrieval system, or translated into any language in any form or by any means without the written permission of NETGEAR, Inc. DO NOT stack equipment, or place equipment in tight spaces or in drawers. Be sure that your equipment is surrounded by at least 2 inches (5 cm) of air space.