AirCard® Smart Cradle Model DC112A User Manual January 2015 202-11417-01 350 East Plumeria Drive San Jose, CA 95134 USA
AirCard Smart Cradle Support Contact NETGEAR at 1 800 17 22 44 for technical support. Compliance For regulatory compliance information, visit http://www.netgear.com/about/regulatory. See the regulatory compliance document before connecting the power supply. Trademarks © NETGEAR, Inc. NETGEAR, Inc. NETGEAR, the NETGEAR Logo, ReadySHARE, and AirCard, are trademarks of NETGEAR, Inc. Information is subject to change without notice.
Contents Chapter 1 Hardware Setup Unpack Your AirCard Smart Cradle. . . . . . . . . . . . . . . . . . . . . . . . . . . . . . . . . . . . . . 8 Front Panel . . . . . . . . . . . . . . . . . . . . . . . . . . . . . . . . . . . . . . . . . . . . . . . . . . . . . . . . . . 8 Rear Panel . . . . . . . . . . . . . . . . . . . . . . . . . . . . . . . . . . . . . . . . . . . . . . . . . . . . . . . . . . 10 Attach the External WiFi Antennas . . . . . . . . . . . . . . . . . . . . . . . . . . . . . . . . . . . .
AirCard Smart Cradle Chapter 4 Control Internet Access Set Up Parental Controls . . . . . . . . . . . . . . . . . . . . . . . . . . . . . . . . . . . . . . . . . . . . . Allow or Block Access to Your Network . . . . . . . . . . . . . . . . . . . . . . . . . . . . . . . . . Manage Network Access Control Lists . . . . . . . . . . . . . . . . . . . . . . . . . . . . . . . Use Keywords to Block Internet Sites . . . . . . . . . . . . . . . . . . . . . . . . . . . . . . . . . .
AirCard Smart Cradle Change the WiFi Data Speed Rate Settings . . . . . . . . . . . . . . . . . . . . . . . . . . . 82 Change the WiFi Password or Security Level . . . . . . . . . . . . . . . . . . . . . . . . . . . . 83 Set Up a Guest Network . . . . . . . . . . . . . . . . . . . . . . . . . . . . . . . . . . . . . . . . . . . . . . 84 Control the Wireless Radios . . . . . . . . . . . . . . . . . . . . . . . . . . . . . . . . . . . . . . . . . . . 86 Set Up a Wireless Schedule . . . . . . . . . . . . . .
AirCard Smart Cradle Chapter 9 Access USB Devices Through the Internet Access USB Devices Through the Internet. . . . . . . . . . . . . . . . . . . . . . . . . . . . . . 128 Set Up FTP Access Through the Internet. . . . . . . . . . . . . . . . . . . . . . . . . . . . . 128 Access USB Devices Through the Internet with FTP . . . . . . . . . . . . . . . . . . . . . 130 Your Personal FTP Server. . . . . . . . . . . . . . . . . . . . . . . . . . . . . . . . . . . . . . . . . . . . 130 Dynamic DNS. . . . . . . .
1. 1 Hardware Setup The AirCard Smart Cradle allows you to transform your AirCard mobile hotspot into a powerful LTE router by combining the benefits of a home router and a WiFi signal booster. It charges your mobile hotspot battery, boosts the mobile hotspot’s 4G/3G signal, extends WiFi coverage, and expands your mobile hotspot connection to both wired and wireless devices. This AirCard Smart Cradle can also be used as a standalone 802.11ac dual-band WiFi router. Figure 1.
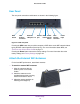
AirCard Smart Cradle Unpack Your AirCard Smart Cradle Your package contains the following items. External WiFi antennas (2) AirCard Smart Cradle Power adapter (appearance varies by region) Figure 2. Package contents Front Panel A USB port, an adjustable holder for the mobile hotspot, and the status LEDs and are located on the front of the cradle. Adjustable holder for the mobile hotspot USB 3.0 port LEDs Figure 3.
AirCard Smart Cradle Table 1. LED descriptions LED Description Power • • • • • Solid amber. The cradle is booting. Blinking amber. The firmware is upgrading, or someone pressed the Reset button. Solid green. The cradle powered on and ready. Blinking green. The firmware is corrupted. Contact your Internet service provider for technical support Off. Power is not supplied to the cradle. USB port • • • Solid green. A USB device is connected and is ready. Solid red.
AirCard Smart Cradle Rear Panel The rear panel connections and buttons are shown in the following figure. WPS button TS-9 antenna connector Ethernet Internet Reset Power button On/Off LAN ports 1–4 port button TS-9 Power antenna input connector Figure 4. Cradle rear panel Pressing the WPS button lets you add a computer or WiFi device to the WiFi network without typing the WiFi network password (security key). For more information about WPS, see Connect to the AirCard Smart Cradle on page 17.
AirCard Smart Cradle Dock the Mobile Hotspot in the Smart Cradle To dock the mobile hotspot in the Smart Cradle: 1. Slide the antenna covers on the bottom of the mobile hotspot to the open position. 2. Slide the Smart Cradle’s plastic holder back to allow enough room for the mobile hotspot. 3. Dock the mobile hotspot in the Smart Cradle. Docking the mobile hotspot for the first time aligns the connectors, so the unit might be stiff going in and out.
AirCard Smart Cradle 4. Slide the plastic holder forward to secure the mobile hotspot. Note: A gap of up to 1.5 mm between the plastic holder and the mobile hotspot is normal. Do not try to push the holder forward to fill the gap. When the Smart Cradle detects your mobile hotspot’s Internet connection, the Internet LED lights green and the Smart Cradle uses the mobile hotspot’s Internet connection. The mobile hotspot must have an active Internet service account.
AirCard Smart Cradle Undock the Mobile Hotspot from the Smart Cradle To undock the mobile hotspot from the Smart Cradle: 1. Lift the mobile hotspot out of the AirCard Smart Cradle. Docking the mobile hotspot for the first time aligns the connectors, so the unit might be stiff going in and out. 2. If the mobile hotspot is difficult to lift, gently wiggle it side to side to disconnect it from the AirCard Smart Cradle.
AirCard Smart Cradle • - Computers - Base of a cordless phone - 2.4 GHz cordless phone Place the cradle away from large metal surfaces, large glass surfaces, and insulated walls such as these: - Solid metal doors - Aluminum studs - Fish tanks - Mirrors - Brick - Concrete Install Your Smart Cradle To install your cradle: 1. Place the cradle in your preferred location. 2. Connect the Smart Cradle’s power adapter and plug it into an electrical outlet.
AirCard Smart Cradle The mobile hotspot disables its WiFi signal so that you can connect to the cradle’s stronger WiFi signal. Note: Some hotspots require a firmware update before they automatically disable WiFi when docked. If your mobile hotspot broadcasts its WiFi signal when docked, manually set up your mobile hotspot to disable WiFi when USB is connected. See the mobile hotspot user guide for more information. 5. Connect to the Smart Cradle’s WiFi network.
2.
AirCard Smart Cradle Connect to the AirCard Smart Cradle You can connect to the cradle’s network through a wired or WiFi connection. If you set up your computer to use a static IP address, change the settings so that it uses Dynamic Host Configuration Protocol (DHCP). Wired Connection You can connect your computer to the cradle using the supplied Ethernet cable and join the cradle’s local area network (LAN). To connect your computer to the cradle with an Ethernet cable: 1.
AirCard Smart Cradle Types of Logins Separate types of logins serve different purposes. It is important that you understand the difference so that you know which login to use. Types of logins: • Mobile broadband account login. The login that your ISP gave you at the time of purchase logs you in to your Internet service. Your service provider gave you this login information in a letter or some other way. If you cannot find this login information, contact your service provider.
AirCard Smart Cradle • For a wired connection, use an Ethernet cable to connect a computer to an Ethernet LAN port on the rear panel of the Smart Cradle. 2. Launch a web browser. 3. In the address field of the browser, enter http://netgear.cradle or http://192.168.100.1 A login prompt displays. 4. Enter the cradle user name and password. The user name is admin. The default password is password. The user name and password are case-sensitive. The BASIC Home screen displays.
3.
AirCard Smart Cradle Manage a Mobile Hotspot When you use a web browser to log in to the AirCard Smart Cradle, you can open a tab in the browser to configure a mobile hotspot. The mobile hotspot must be docked in the Smart Cradle. To manage a mobile hotspot: 1. Launch a web browser from a computer or wireless device that is connected to the Smart Cradle. 2. In the address field of the browser, enter http://netgear.cradle or http://192.168.100.1. A login prompt displays. 3.
AirCard Smart Cradle To set up a WAN Internet connection with backup failover to your mobile hotspot: 1. Use an Ethernet cable to connect your modem with Internet service to the Internet port on the rear panel of the Smart Cradle. Internet port 2. Launch a web browser from a computer or wireless device that is connected to the Smart Cradle. 3. In the address field of the browser, enter http://netgear.cradle or http://192.168.100.1. A login prompt displays. 4. Enter the cradle user name and password.
AirCard Smart Cradle Your settings are saved. If the mobile broadband connection is not working, the Smart Cradle will attempt to access the Internet through the modem that is connected to its Internet port. Specify the Broadband Failover Detection Method You can specify how the Smart Cradle verifies broadband Internet connectivity. By default, the Smart Cradle uses DNS lookup using a WAN DNS server. To change the broadband failover detection method: 1.
AirCard Smart Cradle Manually Set Up the Internet Connection You can view or change the cradle’s Internet connection settings. Specify an Internet Connection Without a Login To specify the Internet connection settings: 1. Launch a web browser from a computer or wireless device that is connected to the Smart Cradle. 2. In the address field of the browser, enter http://netgear.cradle or http://192.168.100.1. A login prompt displays. 3. Enter the cradle user name and password. The user name is admin.
AirCard Smart Cradle 7. If your Internet connection requires an account name or host name, type it in the Account Name (If Required) field. 8. If your Internet connection requires a domain name, type it in the Domain Name (If Required) field. For the other sections in this screen, the default settings usually work, but you can change them. 9. Select an Internet IP Address radio button: • Get Dynamically from ISP. Your ISP uses DHCP to assign your IP address. Your ISP automatically assigns these addresses.
AirCard Smart Cradle The BASIC Home screen displays. 4. Select Internet. Scroll to view more settings By default, in the Internet source section, the Only use mobile broadband (wireless network provider) radio button is selected. With this setting, the cradle only uses your mobile hotspot’s Internet connection. 5. In the Internet source section, select a radio button for an Ethernet WAN Internet connection. 6. In the Does your Internet connection require a login? section, select the Yes radio button.
AirCard Smart Cradle • Use Static IP Address. Enter the IP address, IP subnet mask, and the gateway IP address that your ISP assigned. The gateway is the ISP gateway to which your cradle connects. 14. Select a Domain Name Server (DNS) Address radio button: • Get Automatically from ISP. Your ISP uses DHCP to assign your DNS servers. Your ISP automatically assigns this address. • Use These DNS Servers. If you know that your ISP requires specific servers, select this option.
AirCard Smart Cradle Future cradle software releases will allow other IPv6 settings for mobile broadband connection besides pass through, and allow configuration of IPv6 on WAN Internet independent of the mobile broadband setting. To use a WAN Ethernet Internet connection, you must select an Internet source option in the Internet Setup screen that includes Ethernet WAN. See Use a WAN Internet Connection with Failover on page 21.
AirCard Smart Cradle • Set Up an IPv6 DHCP Internet Connection on page 36 • Set Up an IPv6 PPPoE Internet Connection on page 37 6. Click the Apply button. Your changes take effect. Requirements for Entering IPv6 Addresses IPv6 addresses are denoted by eight groups of hexadecimal quartets that are separated by colons. You can reduce any four-digit group of zeros within an IPv6 address to a single zero or omit it.
AirCard Smart Cradle The screen adjusts: The cradle automatically detects the information in the following fields: • Connection Type. This field indicates the connection type that is detected. • Router’s IPv6 Address on WAN. This field shows the IPv6 address that is acquired for the cradle’s WAN (or Internet) interface. The number after the slash (/) is the length of the prefix, which is also indicated by the underline (_) under the IPv6 address.
AirCard Smart Cradle 2. In the address field of the browser, enter http://netgear.cradle or http://192.168.100.1. A login prompt displays. 3. Enter the cradle user name and password. The user name is admin. The default password is password. The user name and password are case-sensitive. The BASIC Home screen displays. 4. Select ADVANCED > Advanced Setup > IPv6. The IPv6 screen displays. 5. In the Internet Connection Type list, select Auto Config.
AirCard Smart Cradle 8. Select an IP Address Assignment radio button: • Use DHCP Server. This method passes more information to LAN devices but some IPv6 systems might not support the DHCv6 client function. • Auto Config. This is the default setting. This setting specifies how the cradle assigns IPv6 addresses to the devices on your home network (the LAN). 9. (Optional) Select the Use This Interface ID check box and specify the interface ID to be used for the IPv6 address of the cradle’s LAN interface.
AirCard Smart Cradle The screen adjusts: The cradle automatically detects the information in the Router’s IPv6 Address on LAN field. This field shows the IPv6 address that is acquired for the cradle’s LAN interface. The number after the slash (/) is the length of the prefix, which is also indicated by the underline (_) under the IPv6 address. If no address is acquired, the field displays Not Available. 6. Select an IP Address Assignment radio button: • Auto.
AirCard Smart Cradle Note: To use a docked mobile hotspot with IPv6 data connection, the IPv6 Internet connection type should be set as pass through. Before you set up this connection, see Specify WAN Ethernet IPv6 Internet Connections on page 27 so that you understand how the connection is implemented. To set up a pass-through IPv6 Internet connection: 1. Launch a web browser from a computer or wireless device that is connected to the Smart Cradle. 2.
AirCard Smart Cradle 5. In the Internet Connection Type list, select Fixed. The screen adjusts: 6. Configure the fixed IPv6 addresses for the WAN connection: • IPv6 Address/Prefix Length. The IPv6 address and prefix length of the cradle WAN interface. • Default IPv6 Gateway. The IPv6 address of the default IPv6 gateway for the cradle’s WAN interface. • Primary DNS Server. The primary DNS server that resolves IPv6 domain name records for the cradle. • Secondary DNS Server.
AirCard Smart Cradle Your settings are saved. Set Up an IPv6 DHCP Internet Connection To set up an IPv6 Internet connection with a DHCP server: 1. Launch a web browser from a computer or wireless device that is connected to the Smart Cradle. 2. In the address field of the browser, enter http://netgear.cradle or http://192.168.100.1. A login prompt displays. 3. Enter the cradle user name and password. The user name is admin. The default password is password.
AirCard Smart Cradle Most people can leave this field blank, but if your ISP gave you a specific host name, enter it here. 7. (Optional) In the Domain Name (If Required) field, enter a domain name. You can type the domain name of your IPv6 ISP. Do not enter the domain name for the IPv4 ISP here. For example, if your ISP’s mail server is mail.xxx.yyy.zzz, type xxx.yyy.zzz as the domain name. If your ISP provided a domain name, type it in this field. 8.
AirCard Smart Cradle The screen adjusts: The cradle automatically detects the information in the following fields: • Router’s IPv6 Address on WAN. This field shows the IPv6 address that is acquired for the cradle’s WAN (or Internet) interface. The number after the slash (/) is the length of the prefix, which is also indicated by the underline (_) under the IPv6 address. If no address is acquired, the field displays Not Available. • Router’s IPv6 Address on LAN.
AirCard Smart Cradle This setting specifies how the cradle assigns IPv6 addresses to the devices on your home network (the LAN). 10. (Optional) Select the Use This Interface ID check box and specify the interface ID to be used for the IPv6 address of the cradle’s LAN interface. If you do not specify an ID here, the cradle generates one automatically from its MAC address. 11. Click the Apply button. Your settings are saved.
AirCard Smart Cradle A login prompt displays. 3. Enter the cradle user name and password. The user name is admin. The default password is password. The user name and password are case-sensitive. The BASIC Home screen displays. 4. Select ADVANCED > Setup > WAN Setup. 5. In the MTU Size field, enter a value from 64 to 1500. 6. Click the Apply button. Your settings are saved. If you suspect an MTU problem, a common solution is to change the MTU to 1400.
4.
AirCard Smart Cradle Set Up Parental Controls The first time that you select Parental Controls from the BASIC Home screen, your browser goes to the Live Parental Controls website, where you can learn more about Live Parental Controls and download the application. To set up Live Parental Controls: 1. Launch a web browser from a computer or wireless device that is connected to the Smart Cradle. 2. In the address field of the browser, enter http://netgear.cradle or http://192.168.100.1.
AirCard Smart Cradle After installation, Live Parental Controls automatically starts. 7. Click the Next button. 8. Read the note, and click the Next button again to proceed. Because Live Parental Controls uses free OpenDNS accounts, you are prompted to log in or create a free account. 9. Select the radio button that applies to you: • If you already created an OpenDNS account, leave the Yes radio button selected. • If you did not yet create an OpenDNS account, select the No radio button. 10.
AirCard Smart Cradle 11. Complete the fields and click the Next button. After you log on or create your account, the filtering level screen displays: 12. Select a filtering level and click the Next button. The Setup is complete screen displays. 13. Click the Take me to the status screen button. Parental controls are now set up for the Smart Cradle. The BASIC Home screen shows Parental Controls as Enabled.
AirCard Smart Cradle 4. Select ADVANCED > Security > Access Control. 5. Select the Turn on Access Control check box. You must select this check box before you can specify an access rule and use the Allow and Block buttons. When this check box is cleared, all devices are allowed to connect, even if the device is in the blocked list. 6. Select an access rule: • Allow all new devices to connect. With this setting, if you add a new device, it can access your network.
AirCard Smart Cradle Manage Network Access Control Lists You can use access control to block or allow access to your network. To manage devices that are allowed or blocked: 1. Launch a web browser from a computer or wireless device that is connected to the Smart Cradle. 2. In the address field of the browser, enter http://netgear.cradle or http://192.168.100.1. A login prompt displays. 3. Enter the cradle user name and password. The user name is admin. The default password is password.
AirCard Smart Cradle Use Keywords to Block Internet Sites You can use keywords to block certain Internet sites from your network. You can use blocking all the time or based on a schedule. To block Internet sites: 1. Launch a web browser from a computer or wireless device that is connected to the Smart Cradle. 2. In the address field of the browser, enter http://netgear.cradle or http://192.168.100.1. A login prompt displays. 3. Enter the cradle user name and password. The user name is admin.
AirCard Smart Cradle The keyword is added to the keyword list. The keyword list supports up to 32 entries. 8. Click the Apply button. Keyword blocking takes effect. Delete Keywords from the List to Be Blocked To delete keywords from the list: 1. Launch a web browser from a computer or wireless device that is connected to the Smart Cradle. 2. In the address field of the browser, enter http://netgear.cradle or http://192.168.100.1. A login prompt displays. 3. Enter the cradle user name and password.
AirCard Smart Cradle The user name is admin. The default password is password. The user name and password are case-sensitive. The BASIC Home screen displays. 4. Select ADVANCED > Security > Block Services. 5. Specify when to block the services: • To block the services all the time, select the Always radio button. • To block the services based on a schedule, select the Per Schedule radio button.
AirCard Smart Cradle 9. Select a filtering option: • Only This IP Address. Block services for a single computer. • IP Address Range. Block services for a range of computers with consecutive IP addresses on your network. • All lP Addresses. Block services for all computers on your network. 10. Click the Add button. Your changes are saved. Schedule When to Block Internet Sites and Services When you schedule blocking, the same schedule is used to block sites and to block services.
AirCard Smart Cradle • Days to Block. Select the check box for each day that you want to block the keywords or select the Every Day check box, which automatically selects the check boxes for all days. • Time of Day to Block. Select a start and end time in 24-hour format, or select All Day for 24-hour blocking. 6. Select your time zone from the list. 7. If you live in a region that observes daylight saving time, select the Automatically adjust for daylight savings time check box. 8.
AirCard Smart Cradle To set up email notifications: 1. Launch a web browser from a computer or wireless device that is connected to the Smart Cradle. 2. In the address field of the browser, enter http://netgear.cradle or http://192.168.100.1. A login prompt displays. 3. Enter the cradle user name and password. The user name is admin. The default password is password. The user name and password are case-sensitive. The BASIC Home screen displays. 4. Select ADVANCED > Security > E-mail. 5.
AirCard Smart Cradle 10. To send logs based on a schedule, specify these settings: • From Send logs according to this schedule list, select the schedule type. • From the Day list, select the day. • From the Time list, select the time, and select the am or pm radio button. 11. Click the Apply button. Your settings are saved. Logs are sent automatically according to the schedule that you set. If the log fills before the specified time, it is sent.
AirCard Smart Cradle 6. Select ADVANCED > Advanced Setup > Port Forwarding/Port Triggering. 7. Leave the Port Forwarding radio button selected as the service type. 8. From the Service Name list, select the service name. If the service that you want to add is not in the list, create a custom service. See Add a Custom Port Forwarding Service on page 54. 9. In the Server IP Address field, enter the IP address of the computer that will provide the service. 10. Click the Add button.
AirCard Smart Cradle 7. Click the Add Custom Service button. 8. In the Service Name field, enter a descriptive name. 9. In the Protocol list, select the protocol. If you are unsure, select TCP/UDP. 10. In the External Port Range field, enter the port range. If the application uses a single port, enter that port number. 11. Specify the internal ports by one of these methods: • Leave the Use the same port range for Internal port check box selected. • Type the port numbers in the Internal Port Range fields.
AirCard Smart Cradle 5. Leave the Port Forwarding radio button selected as the service type. 6. In the table, select the radio button next to the service name. 7. Click the Edit Service button. The Ports - Custom Services screen displays. 8. Change the settings as needed: 9. Click the Apply button. Your changes are saved. Delete a Port Forwarding Entry To delete a port forwarding entry: 1. Launch a web browser from a computer or wireless device that is connected to the Smart Cradle. 2.
AirCard Smart Cradle HTTP (port 80) is the standard protocol for web servers. 3. (Optional) Register a host name with a Dynamic DNS service and specify that name in the Dynamic DNS screen of the cradle. Dynamic DNS makes it much easier to access a server from the Internet because you can type the name in the Internet browser. Otherwise, you must know the IP address that the ISP assigned, which typically changes.
AirCard Smart Cradle Note: If you use applications such as multiplayer gaming, peer-to-peer connections, real-time communications such as instant messaging, or remote assistance (a feature in Windows XP), enable Universal Plug and Play (UPnP). See Improve Network Connections with Universal Plug and Play on page 68. Add a Port Triggering Service To add a port triggering service: 1. Launch a web browser from a computer or wireless device that is connected to the Smart Cradle. 2.
AirCard Smart Cradle 10. In the Triggering Port field, enter the number of the outbound traffic port that will open the inbound ports. 11. Complete the Connection Type, Starting Port, and Ending Port fields. 12. Click the Apply button. The service is now in the Portmap table. You must enable port triggering before the cradle uses port triggering. See Enable Port Triggering on page 59. Enable Port Triggering To enable port triggering: 1.
AirCard Smart Cradle Application Example: Port Triggering for Internet Relay Chat Some application servers, such as FTP and IRC servers, send replies to multiple port numbers. Using port triggering, you can tell the cradle to open more incoming ports when a particular outgoing port starts a session. An example is Internet Relay Chat (IRC). Your computer connects to an IRC server at destination port 6667.
5.
AirCard Smart Cradle Optimize Internet Gaming with Upstream QoS Upstream Quality of Service (QoS) assigns high priority to Internet traffic from your console gaming system. High priority traffic Internet Best effort traffic Figure 6. Upstream QoS assigns high priority to gaming traffic from your gaming console Best practice is for only gamers to enable the Upstream QoS feature. If you do not game and you turn on this feature, some applications might not perform as well as usual.
AirCard Smart Cradle 5. Select the Enable Upstream QoS (Optimized for Gaming) check box. 6. Specify the maximum uplink bandwidth for your Internet connection: • If you know what your uplink bandwidth is, type it in the Uplink bandwidth Maximum field. • If you are not sure, click the Speedtest button. Speedtest verifies the upstream speed of your Internet connection. The Uplink bandwidth Maximum field displays the result of the test. 7. Click the Apply button.
AirCard Smart Cradle 5. Click the Setup QoS rule button. 6. To add a priority rule, scroll down to the bottom of the QoS Setup screen and click the Add Priority Rule button. 7. In the QoS Policy for field, type the name of the application or game. 8. From the Priority Category list, select either Applications or Online Gaming. A list of applications or games displays. 9. Scroll and select Add a New Application, or Add a New Game, as applicable. 10.
AirCard Smart Cradle Set Up QoS for a LAN Port on the AirCard Smart Cradle To create a QoS policy for a device connected to one of the cradle’s LAN ports: 1. Launch a web browser from a computer or wireless device that is connected to the Smart Cradle. 2. In the address field of the browser, enter http://netgear.cradle or http://192.168.100.1. A login prompt displays. 3. Enter the cradle user name and password. The user name is admin. The default password is password.
AirCard Smart Cradle Set Up QoS for a MAC Address To create a QoS policy for traffic from a specific MAC address: 1. Launch a web browser from a computer or wireless device that is connected to the Smart Cradle. 2. In the address field of the browser, enter http://netgear.cradle or http://192.168.100.1. A login prompt displays. 3. Enter the cradle user name and password. The user name is admin. The default password is password. The user name and password are case-sensitive.
AirCard Smart Cradle This rule is saved. Edit an Upstream QoS Policy To edit a QoS policy: 1. Launch a web browser from a computer or wireless device that is connected to the Smart Cradle. 2. In the address field of the browser, enter http://netgear.cradle or http://192.168.100.1. A login prompt displays. 3. Enter the cradle user name and password. The user name is admin. The default password is password. The user name and password are case-sensitive. The BASIC Home screen displays. 4.
AirCard Smart Cradle 5. Click the Setup QoS Rule button. The QoS Priority Rules screen displays. 6. Select the radio button for the QoS policy. 7. Click the Delete button. The QoS Policy is removed from the list. Improve Network Connections with Universal Plug and Play Universal Plug and Play (UPnP) helps devices, such as Internet appliances and computers, access the network and connect to other devices as needed.
AirCard Smart Cradle 7. Type the advertisement time to live in hops. The time to live for the advertisement is measured in hops (steps) for each UPnP packet sent. Hops are the steps a packet takes between routers. The number of hops can range from 1 to 255. The default value for the advertisement time to live is 4 hops, which should be fine for most home networks. If you notice that some devices are not being updated or reached correctly, it might be necessary to increase this value. 8.
6.
AirCard Smart Cradle View WAN Settings You can view or configure wide area network (WAN) settings for the Internet port. You can set up a DMZ (demilitarized zone) server, change the maximum transmit unit (MTU) size, and enable the cradle to respond to a ping to its WAN (Internet) port. To view the WAN settings: 1. Launch a web browser from a computer or wireless device that is connected to the Smart Cradle. In the address field of the browser, enter http://netgear.cradle or http://192.168.100.1.
AirCard Smart Cradle • MTU Size (in bytes). The normal MTU (maximum transmit unit) value for most Ethernet networks is 1500 bytes, or 1492 bytes for PPPoE connections. Change the MTU only if you are sure that it is necessary for your ISP connection. See Change the MTU Size on page 39. • NAT Filtering. Network Address Translation (NAT) determines how the cradle processes inbound traffic.
AirCard Smart Cradle The user name is admin. The default password is password. The user name and password are case-sensitive. The BASIC Home screen displays. 4. Select ADVANCED > Setup > WAN Setup. The WAN Setup screen displays. 5. Select the Default DMZ Server check box. 6. Type the IP address. 7. Click the Apply button. Your change takes effect. Configure DMZ on an AirCard Mobile Hotspot The mobile hotspot must be docked in the Smart Cradle.
AirCard Smart Cradle Change the Cradle’s Device Name The cradle’s device name is DC112A. This device name displays in the file manager when you browse your network. To change the cradle’s device name: 1. Launch a web browser from a computer or wireless device that is connected to the Smart Cradle. 2. In the address field of the browser, enter http://netgear.cradle or http://192.168.100.1. A login prompt displays. 3. Enter the cradle user name and password. The user name is admin.
AirCard Smart Cradle 3. Enter the cradle user name and password. The user name is admin. The default password is password. The user name and password are case-sensitive. The BASIC Home screen displays. 4. Select ADVANCED > Setup > LAN Setup. 5. In the IP Address field, type the IP address. 6. In the IP Subnet Mask, type the subnet mask of the cradle. The IP address and subnet mask identify which addresses are local to a specific device and which must be reached through a gateway or cradle. 7.
AirCard Smart Cradle Your changes are saved. If you changed the LAN IP address of the cradle, you are disconnected when this change takes effect. 9. To reconnect, close your browser, relaunch it, and log in to the cradle. Specify the IP Addresses That the Cradle Assigns By default, the cradle acts as a Dynamic Host Configuration Protocol (DHCP) server. The cradle assigns IP, DNS server, and default gateway addresses to all computers connected to the LAN.
AirCard Smart Cradle 6. Specify the range of IP addresses that the cradle assigns: a. In the Starting IP Address field, type the lowest number in the range. This IP address must be in the same subnet as the cradle. b. In the Ending IP Address field, type the number at the end of the range of IP addresses. This IP address must be in the same subnet as the cradle. 7. Click the Apply button. Your settings are saved.
AirCard Smart Cradle Reserve LAN IP Addresses When you specify a reserved IP address for a computer on the LAN, that computer always receives the same IP address each time it accesses the cradle’s DHCP server. Assign reserved IP addresses to computers or servers that require permanent IP settings. Reserve an IP Address To reserve an IP address: 1. Launch a web browser from a computer or wireless device that is connected to the Smart Cradle. 2. In the address field of the browser, enter http://netgear.
AirCard Smart Cradle Edit a Reserved IP Address Entry To edit a reserved IP address entry: 1. Launch a web browser from a computer or wireless device that is connected to the Smart Cradle. 2. In the address field of the browser, enter http://netgear.cradle or http://192.168.100.1. A login prompt displays. 3. Enter the cradle user name and password. The user name is admin. The default password is password. The user name and password are case-sensitive. The BASIC Home screen displays. 4.
AirCard Smart Cradle Use the WPS Wizard for WiFi Connections The WPS Wizard helps you add a wireless computer or device to your WiFi network without typing the WiFi password. To use the WPS Wizard: 1. Launch an Internet browser from a computer or wireless device that is connected to the Smart Cradle. 2. In the address field of the browser, enter http://netgear.cradle or http://192.168.100.1 A login screen displays. 3. Enter the user name and password. The user name is admin.
AirCard Smart Cradle To specify basic wireless settings: 1. Launch a web browser from a computer or wireless device that is connected to the Smart Cradle. 2. In the address field of the browser, enter http://netgear.cradle or http://192.168.100.1 A login prompt displays. 3. Enter the cradle user name and password. The user name is admin. The default password is password. The user name and password are case-sensitive. The BASIC Home screen displays. 4. Select Wireless.
AirCard Smart Cradle 8. To change the wireless channel, select a number in the Channel list. In some regions, not all channels are available. Do not change the channel unless you experience interference (shown by lost connections or slow data transfers). If this happens, experiment with different channels to see which is the best. When you use multiple access points, it is better if adjacent access points use different channels to reduce interference.
AirCard Smart Cradle 4. Select Wireless. 5. For the 2.4 GHz WiFi band, in the Wireless Network (2.4 GHz b/gn/n) section, select a setting from the Mode list. Up to 300 Mbps is the default setting. 6. For the 5 GHz WiFi band, in the Wireless Network 5 GHz a/n/ac section, select a setting from the Mode list. Up to 867 Mbps is the default setting, which allows 802.11ac and 802.11a wireless devices to join the network. 7. Click the Apply button. Your settings are saved.
AirCard Smart Cradle The user name is admin. The default password is password. The user name and password are case-sensitive. The BASIC Home screen displays. 4. Select Wireless. The Wireless Setup screen displays. 5. Under Security Options, select a radio button for a security option. The WPA2 option uses the newest standard for the strongest security, but some older computers and wireless devices cannot use WPA2.
AirCard Smart Cradle 4. Select Guest Network. 5. Scroll to the section for the guest WiFi network that you want to set up. The default guest wireless network names (SSIDs) are as follows: • NETGEAR-Guest is for the 2.4 GHz WiFi band. • NETGEAR-5G-Guest is for the 5 GHz WiFi band. 6. Select any of the following wireless settings: • Enable Guest Network. When this check box is selected, the guest network is enabled, and guests can connect to your network using the SSID of this profile.
AirCard Smart Cradle computers and wireless devices can connect to the WiFi network by using either WPA2 or WPA security. 9. Click the Apply button. Your Smart Cradle settings are saved. Control the Wireless Radios The cradle’s internal wireless radios broadcast signals in the 2.4 GHz and 5 GHz range. By default, the radios are on so that you can connect wirelessly to the cradle. When the wireless radios are off, you can still use an Ethernet cable for a LAN connection to the cradle.
AirCard Smart Cradle 4. Select ADVANCED > Advanced Setup > Wireless Settings. 5. In the 2.4 GHz and 5 GHz sections, select or clear the Enable Wireless Radio check boxes. Clearing these check boxes turns off the WiFi feature of the cradle for each band. 6. Click the Apply button. Set Up a Wireless Schedule You can turn off the wireless signal from your cradle at times when you do not need a wireless connection. For example, you might turn it off for the weekend if you leave town.
AirCard Smart Cradle 5. Click the Add a new period button. 6. Use the lists, radio buttons, and check boxes to set up a period during which you want to turn off the wireless signal. 7. Click the Apply button. The Advanced Wireless Settings screen displays. 8. Select the Turn off wireless signal by schedule check box to activate the schedule. 9. Click the Apply button. Your settings are saved. Specify WPS Settings Wi-Fi Protected Setup (WPS) lets you join the WiFi network without typing the WiFi password.
AirCard Smart Cradle The Router’s PIN field displays the PIN that you use on a registrar (for example, from the Network Explorer on a Vista Windows computer) to configure the cradle’s wireless settings through WPS. 5. (Optional) Select or clear the Enable Router’s PIN check box. The PIN function might temporarily be disabled when the cradle detects suspicious attempts to break into the cradle’s wireless settings by using the cradle’s PIN through WPS.
AirCard Smart Cradle 3. In the address field of the browser, enter http://netgear.cradle or http://192.168.100.1. A login prompt displays. 4. Enter the router user name and password. The user name is admin. The default password is password. The user name and password are case-sensitive. The BASIC Home screen displays. 5. Select ADVANCED > Advanced Setup > Wireless AP. 6. Select the Enable AP Mode check box. 7.
AirCard Smart Cradle Set Up the AirCard Smart Cradle in Bridge Mode You can use your cradle in bridge mode to connect multiple devices wirelessly at the faster 802.11ac speed. You need another router in your network with an Ethernet Internet connection. Note: When you use the cradle in bridge mode, the cradle charges the mobile hotspot, but does not use the mobile hotspot’s wireless broadband Internet connection. Smart WiFi Router AirCard Smart Cradle in bridge mode Figure 7.
AirCard Smart Cradle To set up bridge mode: 1. Make a note of the WiFi settings of the router to which the cradle will connect. You need to know the SSID, WiFi security mode, WiFi password, and operating frequency (either 2.4 GHz or 5 GHz). 2. Launch a web browser from a computer or WiFi device that is connected to the Smart Cradle. 3. In the address field of the browser, enter http://netgear.cradle or http://192.168.100.1. A login prompt displays. 4. Enter the user name and password.
AirCard Smart Cradle 7. Click the setup bridge mode wireless settings button. 8. Specify the settings of the other cradle to which this cradle will connect. a. Select the wireless network frequency (2.4 GHz or 5 GHz). For 802.11ac mode, select 5 GHz. b. In the Name (SSID) field, enter the wireless network name (SSID). c. In the Security Option section, select a radio button. d. If prompted, type the passphrase (the WiFi password that you use to connect wirelessly to the other router). 9.
AirCard Smart Cradle To set up Facebook WiFi: 1. Launch a web browser from a computer or wireless device that is connected to the Smart Cradle. 2. In the address field of the browser, enter http://netgear.cradle or http://192.168.100.1 A login prompt displays. 3. Enter the cradle user name and password. The user name is admin. The default password is password. The user name and password are case-sensitive. The BASIC Home screen displays. 4. Select ADVANCED > Advanced Setup > Facebook WiFi. 5.
AirCard Smart Cradle Note: The WiFi code is different from your guest network passphrase. If you select this radio button, you must give customers the WiFi code for them to use your business WiFi. 12. From the Session Length list, select a length of time that you want to allow your customers to be able to access your business WiFi after they check in. 13. To add terms of service to your Facebook check-in screen, select the Terms of Service check box and type your terms of service. 14.
7.
AirCard Smart Cradle Update the AirCard Smart Cradle Firmware The cradle firmware (routing software) is stored in flash memory. You might see a message at the top of the genie screens when new firmware is available. You can respond to that message to update the firmware or you can check to see if new firmware is available, and to update your product. (Visit http://support.netgear.com.) To check for new firmware and update your cradle: 1.
AirCard Smart Cradle Change the admin Password You can change the default password that is used to log in to the cradle with the user name admin. This password is not the one that you use for WiFi access. Be sure to change the password for the user name admin to a secure password. The ideal password contains no dictionary words from any language and contains uppercase and lowercase letters, numbers, and symbols. It can be up to 30 characters. To set the password for the user name admin: 1.
AirCard Smart Cradle Recover the admin Password Best practice is to enable password recovery if you change the password for the cradle user name admin. Then you can recover the password if it is forgotten. This recovery process is supported in Internet Explorer, Firefox, and Chrome browsers but not in the Safari browser. To set up password recovery: 1. Launch a web browser from a computer or wireless device that is connected to the Smart Cradle. 2.
AirCard Smart Cradle A login screen displays. 8. With your recovered password, log in to the cradle. View AirCard Smart Cradle Status To view cradle status and usage information: 1. Launch a web browser from a computer or wireless device that is connected to the Smart Cradle. 2. In the address field of the browser, enter http://netgear.cradle or http://192.168.100.1. A login prompt displays. 3. Enter the cradle user name and password. The user name is admin. The default password is password.
AirCard Smart Cradle Display Internet Port Statistics To display Internet port statistics: 1. Launch a web browser from a computer or wireless device that is connected to the Smart Cradle. 2. In the address field of the browser, enter http://netgear.cradle or http://192.168.100.1. A login prompt displays. 3. Enter the cradle user name and password. The user name is admin. The default password is password. The user name and password are case-sensitive. The BASIC Home screen displays. 4.
AirCard Smart Cradle - Poll Interval. The interval at which the statistics are updated in this screen. 6. To change the polling frequency, enter a time in seconds in the Poll Interval field and click the Set Interval button. To stop the polling entirely, click the Stop button. Check the Internet Connection Status To check the Internet connection status: 1. Launch a web browser from a computer or wireless device that is connected to the Smart Cradle. 2.
AirCard Smart Cradle • DNS Server. The IP address of the Domain Name Service server that provides translation of network names to IP addresses. • Lease Obtained. The date and time when the lease was obtained. • Lease Expires. The date and time that the lease expires. 6. To return the status of all items to 0, click the Release button. 7. To refresh the screen, click the Renew button. To exit the screen, click the Close Window button.
AirCard Smart Cradle 3. Enter the cradle user name and password. The user name is admin. The default password is password. The user name and password are case-sensitive. The BASIC Home screen displays. 4. Select ADVANCED > Administration > Backup Settings. The Backup Settings screen displays. 5. Click the Browse button to find and select the .cfg file. 6. Click the Restore button. The file is uploaded to the cradle and the cradle reboots. WARNING: Do not interrupt the reboot process.
AirCard Smart Cradle View and Customize Log Information To view and customize the log information: 1. Launch a web browser from a computer or wireless device that is connected to the Smart Cradle. 2. In the address field of the browser, enter http://netgear.cradle or http://192.168.100.1 A login prompt displays. 3. Enter the cradle user name and password. The user name is admin. The default password is password. The user name and password are case-sensitive. The BASIC Home screen displays. 4.
AirCard Smart Cradle Custom Static Routes Typically, you do not need to add static routes unless your network includes multiple routers or multiple IP subnets. As an example of when a static route is needed, consider the following case: • Your main Internet access is through a cable modem to an ISP. • You use an ISDN cradle on your home network for connecting to the company where you are employed. This cradle’s address on your LAN is 192.168.100.100. • Your company’s network address is 134.177.0.0.
AirCard Smart Cradle 5. Click the Add button. The screen adjusts. 6. In the Route Name field, type a name for this static route (for identification purposes only). 7. To limit access to the LAN only, select the Private check box. If the Private check box is selected, the static route is not reported in RIP. 8. To make this route effective, select the Active check box. 9. Type the IP address of the final destination. 10. Type the IP subnet mask for this destination.
AirCard Smart Cradle 5. In the table, select the radio button for the route. 6. Click the Edit button. The Static Routes screen adjusts. 7. Edit the route information. 8. Click the Apply button. Your changes are saved. Delete a Static Route To delete a static route: 1. Launch a web browser from a computer or wireless device that is connected to the Smart Cradle. 2. In the address field of the browser, enter http://netgear.cradle or http://192.168.100.1 A login prompt displays. 3.
AirCard Smart Cradle The user name is admin. The default password is password. The user name and password are case-sensitive. The BASIC Home screen displays. 4. Select Attached Devices. The Wired Devices section lists devices that are connected to the cradle with Ethernet cables. The other sections list devices that are connected to each WiFi band in the WiFi network. The following information is displayed for wireless devices: • SSID. The wireless network name (SSID). • IP Address.
AirCard Smart Cradle 2. In the address field of the browser, enter http://netgear.cradle or http://192.168.100.1. A login prompt displays. 3. Enter the cradle user name and password. The user name is admin. The default password is password. The user name and password are case-sensitive. The BASIC Home screen displays. 4. Select Advanced > Administration > Remote Management. 5. Select the Turn Remote Management On check box. 6.
AirCard Smart Cradle Monitor Internet Traffic Traffic metering allows you to monitor the volume of Internet traffic that passes through the cradle Internet port. You can set limits for traffic volume. To monitor Internet traffic: 1. Launch a web browser from a computer or wireless device that is connected to the Smart Cradle. 2. In the address field of the browser, enter http://netgear.cradle or http://192.168.100.1. A login prompt displays. 3. Enter the cradle user name and password.
AirCard Smart Cradle • Select the Connection time control radio button and enter the allowed hours in the Monthly limit field. 7. (Optional) If your ISP charges for extra data volume when you make a new connection, enter the extra data volume in MB in the Round up data volume for each connection by field. 8. In the Traffic Counter section, set the traffic counter to begin at a specific time and date. To start the traffic counter immediately, click the Restart Counter Now button. 9.
AirCard Smart Cradle 4. Select Advanced > Setup > WAN Setup. 5. Select the Respond to Ping on Internet Port check box. 6. Click the Apply button. Your settings are saved.
8. Share a USB Device Attached to the AirCard Smart Cradle 8 This chapter describes how to access and configure USB storage devices attached to your cradle. The USB port on the cradle can be used only to connect USB storage devices like flash drives or hard drives or a printer. Do not connect computers, USB modems, CD drives, or DVD drives to the cradle USB port.
AirCard Smart Cradle USB Device Requirements The cradle works with most USB-compliant external flash and hard drives. For the most up-to-date list of USB devices that the cradle supports, visit http://kbserver.netgear.com/readyshare. Some USB external hard drives and flash drives require you to load the drivers onto the computer before the computer can access the USB device. Such USB devices do not work with the cradle.
AirCard Smart Cradle You must use the power supply when you connect the USB device to the cradle. When you connect the USB device to the cradle USB port, it might take up to two minutes before it is ready for sharing. By default, the USB device is available to all computers on your local area network (LAN). To access the USB device from a Mac: 1. Select Go > Connect to Server. 2. Enter smb://readyshare as the server address. 3. Click the Connect button.
AirCard Smart Cradle Back Up Windows Computers with ReadySHARE Vault Your cradle comes with free backup software for all the Windows computers in your home. Connect a USB hard disk drive (HDD) to the USB port on your Smart Cradle for centralized, continuous, and automatic backup. To back up your Windows computer: 1. Connect a USB HDD to a USB port on the cradle. 2. Install the genie app on each Windows computer. To download the genie app, visit www.netgear.com/genie. 3.
AirCard Smart Cradle 10. Click the Apply button. Your settings are saved. Prepare to Back Up a Large Amount of Data Before you back up a large amount of data with Time Machine, Best practice is to follow this procedure. To prepare to back up a large amount of data: 1. Upgrade the operating system of the Mac computer. 2. Verify and repair the backup disk and the local disk. 3. Verify and repair the permissions on the local disk. 4. Set Energy Saver: a. From the Apple menu, select System Preferences. b.
AirCard Smart Cradle When you connect the USB device to the cradle USB port, it might take up to two minutes before it is ready for sharing. By default, the USB device is available to all computers on your local area network (LAN). 3. On your Mac computer, select Go > Connect to Server. 4. Type afp://netgear.cradle. 5. When prompted to enter your name and password, select the Guest radio button. 6. Click the Connect button. A list of connected devices displays.
AirCard Smart Cradle • Network Device Name. This is the name used to access the USB device connected to the cradle. The default is readyshare. • Workgroup. If you are using a Windows workgroup rather than a domain, the workgroup name is displayed here. The name works only in an operating system that supports NetBIOS, such as Microsoft Windows. • Access Method. Select the check boxes for the access methods that you want: - Network Neighborhood/MacShare. Enabled by default. - HTTP.
AirCard Smart Cradle 4. Select ADVANCED > USB Storage > Advanced Settings. 5. Select the FTP check box. 6. Click the Apply button. Your changes are saved. View Network Folders on a USB Device You can view or change the network folders on the USB storage device. To view network folders: 1. Launch a web browser from a computer or wireless device that is connected to the Smart Cradle. 2. In the address field of the browser, enter http://netgear.cradle or http://192.168.100.1. A login prompt displays. 3.
AirCard Smart Cradle 4. Select ADVANCED > USB Storage > Advanced Settings. 5. Scroll down to the Available Networks Folder section, and to view the following settings: • Share Name. The default share name is USB_Storage. You can click the name or you can type it in the address field of your web browser. If Not Shared is shown, the default share was deleted and no other share for the root folder exists. • Read Access and Write Access. Show the permissions and access controls on the network folder.
AirCard Smart Cradle The user name is admin. The default password is password. The user name and password are case-sensitive. The BASIC Home screen displays. 4. Select ADVANCED > USB Storage > Advanced Settings. The USB Storage (Advanced Settings) screen displays. 5. Click the Create Network Folder button. If this screen does not display, your web browser might be blocking pop-ups. If it is, change the browser settings to allow pop-ups. 6. In the USB Device list, select the USB device. 7.
AirCard Smart Cradle 3. Enter the cradle user name and password. The user name is admin. The default password is password. The user name and password are case-sensitive. The BASIC Home screen displays. 4. Select ADVANCED > USB Storage > Advanced Settings. The USB Storage (Advanced Settings) screen displays. 5. Click the Edit button. The Edit Network Folder screen displays the same settings shown in the Add a Network Folder screen. 6. Change the settings in the fields as needed. 7. Click the Apply button.
AirCard Smart Cradle 6. Click the Approved Devices button. The approved and available USB devices display. 7. In the Available USB Devices list, select the drive that you want to approve. 8. Click the Add button. The USB device is added to the Approved USB Devices list. 9. Select the Allow only approved devices check box. 10. Click the Apply button. Your settings are saved. 11. To work with another USB device, first click the Safely Remove USB Device button for the currently connected USB device.
AirCard Smart Cradle The USB Settings screen displays. 5. Click the Safely Remove USB Device button. This takes the drive offline. 6. Physically disconnect the USB device.
9. Access USB Devices Through the Internet 9 With Dynamic DNS, you can use the Internet to access a USB hard drive attached to the Smart Cradle’s USB port when you’re not home.
AirCard Smart Cradle Access USB Devices Through the Internet You can access USB devices through the Internet when you’re not home. To access USB devices from a remote computer: 1. Launch a web browser on a computer that is not on your home network. 2. Connect to your Smart Cradle: • To connect with Dynamic DNS, type the DNS name. To use a Dynamic DNS account, you must enter the account information in the Dynamic DNS screen. See Dynamic DNS on page 131.
AirCard Smart Cradle 4. Select ADVANCED > USB Storage > Advanced Settings. 5. Select the FTP (via Internet) check box. 6. Click the Apply button. Your changes are saved. 7. To limit access to the admin user, click the Edit button. 8. In the Read Access list, select admin. 9. In the Write Access list, select admin. 10. Click the Apply button. Your changes are saved.
AirCard Smart Cradle Access USB Devices Through the Internet with FTP You must first set up FTP through Internet access as described in Set Up FTP Access Through the Internet on page 128. To access a USB device with FTP from a remote computer: 1. To download, launch a web browser. 2. To upload, use an FTP client such as filezilla. 3. Type ftp:// and the Internet port IP address in the address field of the browser. For example, type ftp://10.1.65.4. If you are using Dynamic DNS, type the DNS name.
AirCard Smart Cradle NETGEAR Dynamic DNS (DDNS) service account and specify the account settings. See Set Up a New Dynamic DNS Account on page 132. FTP Directory: FTP://‘custom name’.mynetgear.com FTP Directory: FTP://‘custom name’.mynetgear.com FTP Directory: FTP://‘custom name’.mynetgear.com FTP Director y: FTP://‘cu FTP stom name’.m ynetgea r.com Directory : FTP:// ‘custom name’.my netgear.c om Figure 9.
AirCard Smart Cradle Set Up a New Dynamic DNS Account To set up Dynamic DNS and register for a free NETGEAR account: 1. Launch a web browser from a computer or wireless device that is connected to the Smart Cradle. 2. In the address field of the browser, enter http://netgear.cradle or http://192.168.100.1. A login prompt displays. 3. Enter the cradle user name and password. The user name is admin. The default password is password. The user name and password are case-sensitive.
AirCard Smart Cradle Specify a DNS Account That You Already Use If you already use a Dynamic DNS account with NETGEAR no-ip, www.no-ip.com, or Dyn.com, you can set up the cradle to use your account. To set up Dynamic DNS if you already use an account: 1. Launch a web browser from a computer or wireless device that is connected to the Smart Cradle. 2. In the address field of the browser, enter http://netgear.cradle or http://192.168.100.1. A login prompt displays. 3.
AirCard Smart Cradle Your changes are saved. 13. To verify that your Dynamic DNS service is enabled in the cradle, click the Show Status button. A message displays the Dynamic DNS status. Change the Dynamic DNS Settings To change your settings: 1. Launch a web browser from a computer or wireless device that is connected to the Smart Cradle. 2. In the address field of the browser, enter http://netgear.cradle or http://192.168.100.1. A login prompt displays. 3. Enter the cradle user name and password.
10. 10 Share a USB Printer The ReadySHARE Printer utility lets you share a USB printer that is connected to the USB port on your cradle. You can share this USB printer among the Windows and Mac computers on your network.
AirCard Smart Cradle Install the Printer Driver and Cable the Printer Some USB printer manufacturers (for example, HP and Lexmark) request that you do not connect the USB cable until the installation software prompts you to do so. To install the driver and cable the printer: 1. On each computer on your network that shares the USB printer, install the driver software for the USB printer. If you cannot find the printer driver, contact the printer manufacturer. 2.
AirCard Smart Cradle To download the utility: 1. Visit www.netgear.com/readyshare. 2. In the ReadySHARE Printer pane, click the PC Utility or Mac Utility link. 3. Follow the onscreen instructions to download the file. Install the ReadySHARE Printer Utility You must install the ReadySHARE Printer utility on each computer that will share the printer. After you install it, the utility displays as NETGEAR USB Control Center on your computer. To install the utility: 1.
AirCard Smart Cradle After the InstallShield Wizard completes the installation, the NETGEAR USB Control Center prompts you to select a language: 3. Select a language from the list and click the OK button. Some firewall software, such as Comodo, blocks NETGEAR USB Control Center from accessing the USB printer. If you do not see the USB printer displayed in the screen, you can disable the firewall temporarily to allow the utility to work. 4. Select the printer and click the Connect button.
AirCard Smart Cradle To manually connect and print: 1. Click the NETGEAR USB Control Center icon . The main screen displays. 2. Click the Connect button. The printer status changes to Manually connected by Mycomputer. Now, only the computer you are using can use this printer. 3. Use the print feature in your application to print your document. 4. To release the printer so that all computers on the network can use it, click the Disconnect button.
AirCard Smart Cradle 3. To print from your computer when the status shows Waiting to Connect: a. Click the Connect button. The printer status changes to Manually connected by Mycomputer. Now, only your computer can use the printer. b. To allow the printer to be shared, click the Disconnect button. The printer is released from the connection and the status changes to Available.
AirCard Smart Cradle 3. Click the Network Scanner button. The scanner screen displays so that you can use the USB printer for scanning. Change NETGEAR USB Control Center Settings You can stop the NETGEAR USB Control Center from starting automatically when you log in to Windows. You can also change the language and specify the time-out to release the printer connection. To turn off automatic NETGEAR USB Control Center startup: 1. Click the NETGEAR USB Control Center icon Share a USB Printer 141 .
AirCard Smart Cradle 2. Select Tools > Configuration. 3. Clear the Automatically execute when logging on Windows check box. 4. Click the OK button. Your change is saved. To change the language: 1. Click the NETGEAR USB Control Center icon . 2. Select Tools > Configuration. 3. In the Language list, select a language. 4. Click the OK button. The next time NETGEAR USB Control Center starts, the language changes. To specify the time-out: 1.
AirCard Smart Cradle 2. Select Tools > Configuration. 3. In the Timeout field, type the number of minutes. The time-out is the number of minutes that a computer holds its connection to the printer when the connection isn’t being used. 4. Click the OK button. Your change is saved.
11. 11 Troubleshooting This chapter provides information to help you diagnose and solve problems you might have with your cradle.
AirCard Smart Cradle Troubleshoot with the LEDs You can use the LEDs to help identify the cause of problems and troubleshoot. Standard LED Behavior When the AirCard Smart Cradle is Powered On After you turn on power to the cradle, verify that the following sequence of events occurs: 1. When power is first applied, verify that the Power LED is lit. 2. After approximately 30 seconds, verify the following: • The Power LED is solid green. • The Internet LED is lit.
AirCard Smart Cradle If all LEDs are still lit one minute after power-up, do the following: • Cycle the power to see if the cradle recovers. • Press and hold the Reset button to return the cradle to its factory settings. For more information, see Factory Settings on page 154. If the error persists, it is possible that a hardware problem occurred. Internet LED Is Off If the Internet LED does not light, check the following: • The mobile hotspot might not be securely docked.
AirCard Smart Cradle • Make sure that you are using the correct login information. The user name is admin, and the default password is password. Make sure that Caps Lock is off when you enter this information. • If you are attempting to set up your NETGEAR cradle as a replacement for an ADSL gateway in your network, the cradle cannot perform many gateway services. For example, the cradle cannot convert ADSL or cable data into Ethernet networking information.
AirCard Smart Cradle • If your ISP allows only one Ethernet MAC address to connect to Internet and might check for your computer’s MAC address. In this case, do one of the following: - Inform your ISP that you have bought a new network device, and ask them to use the cradle’s MAC address. - Configure your cradle to clone your computer’s MAC address.
AirCard Smart Cradle The Connection Status screen displays. 6. Check the Connection Status screen to see if your PPPoE connection is up and working. If the connection is not working, click the Connect button. The cradle continues to attempt to connect indefinitely. 7. If you cannot connect after several minutes, the cradle might be set up with an incorrect service name, user name, or password, or your ISP might be experiencing a provisioning problem.
AirCard Smart Cradle Cellular Network Connectivity If you are not able to access the Internet through the cellular network, do the following: • Make sure you are in an area with cellular network coverage by checking if your phone has signal. • Make sure that the Internet service for your mobile hotspot is active and the SIM card is correctly installed. • Make sure that the Auto connect feature on the mobile hotspot is set to ON.
AirCard Smart Cradle Test the LAN Path to Your Smart Cradle You can ping the cradle from your computer to verify that the LAN path to your cradle is set up correctly. To ping the cradle from a Windows computer: 1. From the Windows toolbar, click Start and select Run. 2. In the field provided, type ping followed by the IP address of the cradle, as in this example: ping http://192.168.100.1 3. Click the OK button.
AirCard Smart Cradle where is the IP address of a remote device such as your ISP DNS server. If the path is functioning correctly, messages display that are similar to those shown in Test the LAN Path to Your Smart Cradle on page 151. If you do not receive replies, check the following: • Check that the IP address of your cradle listed in your computer as the default gateway.
A. Supplemental Information This appendix includes technical information about your Smart Cradle.
AirCard Smart Cradle Factory Settings You can return the AirCard Smart Cradle its factory settings. Use the end of a paper clip or a similar object to press and hold the Reset button on the back of the AirCard Smart Cradle for at least seven seconds. The AirCard Smart Cradle resets and cradle returns to the factory configuration settings shown in the following table. When the AirCard Smart Cradle restarts, all LEDs on the front panel light. Table 3.
AirCard Smart Cradle Table 3. Factory default settings (continued) Feature WiFi Default behavior Wireless communication Enabled SSID name See the product label WiFi password or security key See the product label. Security WPA2-PSK (AES) Broadcast SSID Enabled Transmission speed Auto1 Country/region United States in the US; otherwise, varies by region RF channel 2.4GHz, CH 153 for 5 GHz (depending on the region) Operating mode Up to 300 Mbps at 2.4 GHz, 867 Mbps at 5 GHz 1.
AirCard Smart Cradle Technical Specifications Table 4. Cradle specifications Feature Description Data and routing protocols TCP/IP, RIP-1, RIP-2, DHCP, PPPoE, PPTP, Dynamic DNS, UPnP, and SMB Power adapter 240V, 50 Hz, input 12V/2.5A DC output Dimensions 157 x 230.4 x 148.75 mm (6.18 x 9.07 x 5.86 in.) Weight 800 g (1.