
User Guide

Manage the AirCard Smart Cradle
107
AirCard Smart Cradle
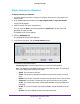
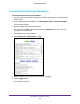
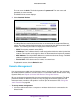
5. Click the Add button.
The screen adjusts.
6. In the Route Name field, type a name for this static route (for identification purposes only).
7. T
o limit access to the LAN only, select the Private check box.
If the Private check box is selected, the static route is not reported in RIP
.
8. T
o make this route effective, select the Active check box.
9. T
ype the IP address of the final destination.
10. T
ype the IP subnet mask for this destination.
If the destination is a single host, type 255.255.255.255.
11. T
ype the gateway IP address, which must be on the same LAN segment as the cradle.
12. T
ype a number from 1 through 15 as the metric value.
This value represents the number of cradles between your network and the destination.
Usually
, a setting of 2 or 3 works, but if this is a direct connection, set it to 1.
13. Click the Apply button.
The static route is added.
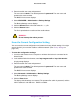
Edit a Static Route
To edit a static route:
1. Launch a web browser from a computer or wireless device that is connected to the
Smart Cradle.
2. In the address field of the browser
, enter http://netgear.cradle or http://192.168.100.1.
A login prompt displays.
3. Enter the cradle user name and password.
The user name is admin.
The default password is password. The user name and
password are case-sensitive.
The BASIC Home screen displays.
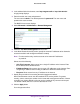
4. Select ADV
ANCED > Advanced Setup > Static Routes.
The Custom Static Routes screen displays.