
Quick Reference Guide
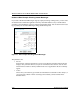
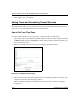


Table Of Contents
- Reference Manual for the Model DG834 ADSL Firewall Router
- Contents
- Chapter 1 About This Guide
- Chapter 2 Introduction
- Chapter 3 Connecting the Router to the Internet
- What You Need Before You Begin
- Connecting the DG834 to Your LAN
- Auto-Detecting Your Internet Connection Type
- Testing Your Internet Connection
- Manually Configuring Your Internet Connection
- Chapter 4 Protecting Your Network
- Chapter 5 Managing Your Network
- Chapter 6 Advanced Configuration
- Chapter 7 Troubleshooting
- Appendix A Technical Specifications
- Appendix B Network and Routing Basics
- Appendix C Preparing Your Network
- Preparing Your Computers for TCP/IP Networking
- Configuring Windows 95, 98, and Me for TCP/IP Networking
- Configuring Windows NT4, 2000 or XP for IP Networking
- DHCP Configuration of TCP/IP in Windows XP, 2000, or NT4
- Configuring the Macintosh for TCP/IP Networking
- Verifying the Readiness of Your Internet Account
- Restarting the Network
- Glossary
Reference Manual for the Model DG834 ADSL Firewall Router
4-10 Protecting Your Network
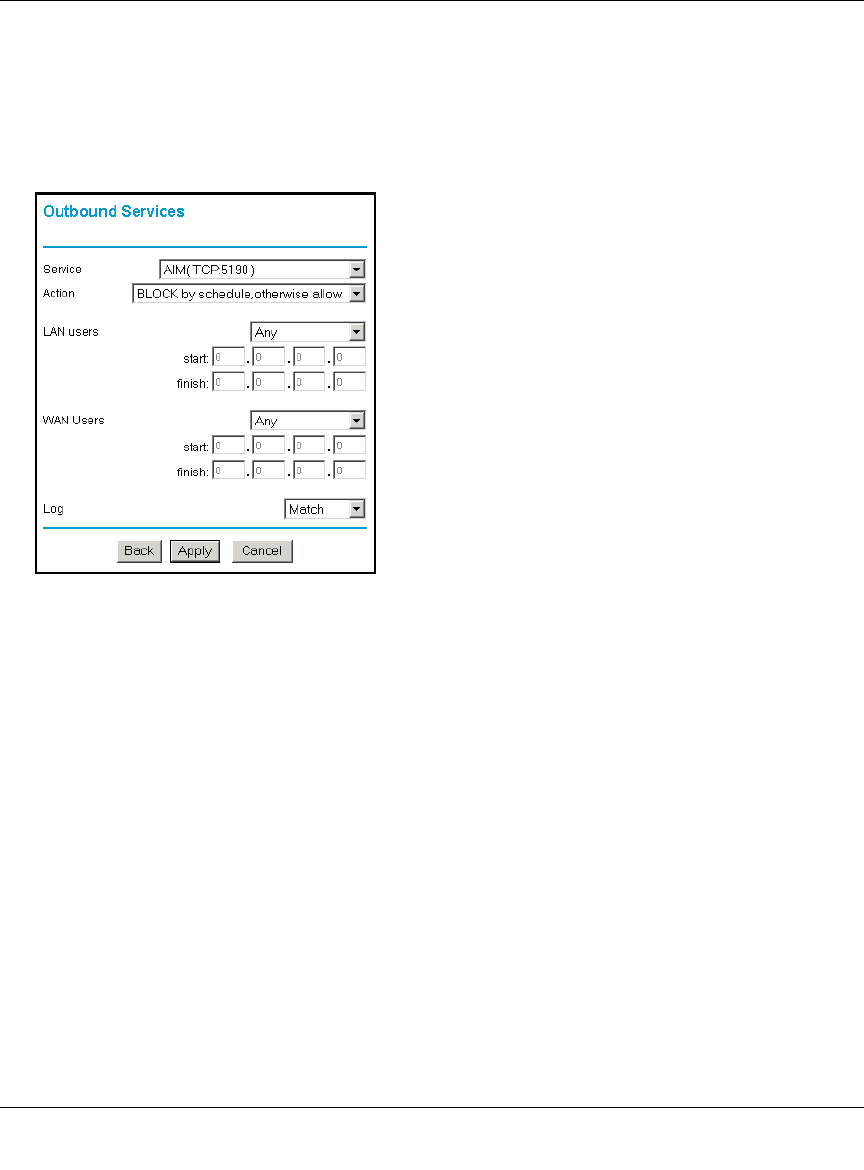
Outbound Rule Example: Blocking Instant Messenger
If you want to block Instant Messenger usage by employees during working hours, you can create
an outbound rule to block that application from any internal IP address to any external address
according to the schedule that you have created in the Schedule menu. You can also have the router
log any attempt to use Instant Messenger during that blocked period.
Figure 4-7: Rule example: Blocking Instant Messenger
The parameters are:
•Service
From this list, select the application or service to be allowed or blocked. The list already
displays many common services, but you are not limited to these choices. Use the Add
Custom Service feature to add any additional services or applications that do not already
appear.
• Action
Choose how you want this type of traffic to be handled. You can block or allow always, or
you can choose to block or allow according to the schedule you have defined in the
Schedule menu.