AC750 WiFi Range Extender Model E X6100v2 User Manual June 2016 202-11635-01 350 East Plumeria Drive San Jose, CA 95134 USA
AC750 WiFi Range Extender Support Thank you for purchasing this NETGEAR product. You can visit www.netgear.com/support to register your product, get help, access the latest downloads and user manuals, and join our community. We recommend that you use only official NETGEAR support resources. Conformity For the current EU Declaration of Conformity, visit http://kb.netgear.com/app/answers/detail/a_id/11621. Compliance For regulatory compliance information, visit http://www.netgear.com/about/regulatory.
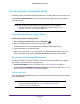
AC750 WiFi Range Extender Contents Chapter 1 Get to Know Your Extender Front Panel and Side Panel LEDs and Buttons . . . . . . . . . . . . . . . . . . . . . . . . . . . . . 6 When to Use Your Extender . . . . . . . . . . . . . . . . . . . . . . . . . . . . . . . . . . . . . . . . . . . . 7 Chapter 2 Get Started Use the Extender in Extender Mode. . . . . . . . . . . . . . . . . . . . . . . . . . . . . . . . . . . . 10 Place the Extender and Apply Power . . . . . . . . . . . . . . . . . . . . . . . . .
AC750 WiFi Range Extender Erase the Settings and Return to Factory Settings . . . . . . . . . . . . . . . . . . . . . 40 Update the Firmware . . . . . . . . . . . . . . . . . . . . . . . . . . . . . . . . . . . . . . . . . . . . . . . . 41 Restart the Extender Remotely . . . . . . . . . . . . . . . . . . . . . . . . . . . . . . . . . . . . . . . . 42 Chapter 5 FAQs and Troubleshooting FAQs . . . . . . . . . . . . . . . . . . . . . . . . . . . . . . . . . . . . . . . . . . . . . . . . . . . . . . . . . . .
1. Get to Know Your Extender 1 The AC750 WiFi Range Extender boosts your existing network range and speed, delivering dual-band WiFi. You can also use the extender in access point mode as a WiFi access point and create a new WiFi hotspot by using a wired Ethernet connection. This chapter covers the following topics: • Front Panel and Side Panel LEDs and Buttons • When to Use Your Extender • Support for the 802.
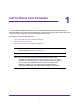
AC750 WiFi Range Extender Front Panel and Side Panel LEDs and Buttons The LEDs are located on the front panel. A switch, buttons, and an Ethernet port are located on the side panel. Router Link LED Router Arrow LED Client Arrow LED Client Link LED Power LED WPS LED Access Point/Extender switch Power On/Off button WPS button Factory Reset button Ethernet port Figure 1. Extender front panel and side panel Table 1.
AC750 WiFi Range Extender Table 1. LEDs (continued) LED Description Power LED • • • Solid amber. The extender is booting. Solid green. The extender is powered on. Off. The extender is powered off. WPS LED • • • Solid green. WiFi security is enabled (WPA or WPA2). Blinking green. The extender is making a WPS connection. Off. WiFi security is not enabled. Arrow LEDs help you place the extender. These LEDs work as follows: • No arrow LEDs are lit. The extender is in a good location.
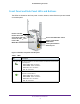
AC750 WiFi Range Extender The extender must do each of these jobs so that both ends of the bridge are in place. WiFi range extender Boosts the range of your existing WiFi and creates a stronger signal in hard-to-reach areas. Existing WiFi Sometimes your router does not provide the WiFi coverage that you need. Figure 2. Range extender in a home Support for the 802.11ac Networking Standard The extender supports the 802.11ac networking standard.
2.
AC750 WiFi Range Extender Use the Extender in Extender Mode In extender mode, the extender repeats signals from an existing WiFi router or access point. Set the Access Point/Extender switch, place the extender, apply power, and connect it to your WiFi network. Note: You can also use the extender as a WiFi access point and create a new WiFi hotspot by using a wired Ethernet connection. See Use the Extender in Access Point Mode on page 15.
AC750 WiFi Range Extender To use WPS to connect the extender to your WiFi router: 1. Press the WPS button on the extender. The WPS LED blinks. 2. Within two minutes, press the WPS button on your router or access point. The WPS LED on the extender lights solid green, the Router Link LED the extender connects to your existing WiFi network. lights, and If the Router Link LED does not light, try again. If it still does not light, see Connect With the NETGEAR Installation Assistant on page 12. 3.
AC750 WiFi Range Extender 9. Test the extender WiFi range by moving your WiFi-enabled computer or mobile device to the area with a poor router WiFi signal: a. Leave your WiFi-enabled computer or mobile device in the area with a poor router WiFi signal and return to the extender. b. Check the Client Link LED on the extender: • If the Client Link LED is solid green or amber, your extender WiFi network reaches the area with a poor router WiFi signal and your network setup is complete.
AC750 WiFi Range Extender If you do not want to extend both WiFi bands, clear the 2.4 GHz WiFi Networks or the 5 GHz WiFi Networks check box. 8. In the Password (Network Key) field, type the existing WiFi network password (also called passphrase or security key) and click the NEXT button. 9. Set the network name (SSID) and password for your new extender WiFi network and click the NEXT button.
AC750 WiFi Range Extender 18. If the Router Link LED doesn’t light amber or green, plug the extender into an outlet closer to the router and try again. Keep moving the extender to outlets closer to the router until the Router Link LED lights amber or green. 19. Reconnect your WiFi-enabled computer or mobile device to the new extender WiFi network. 20. Test the extender WiFi range by moving your WiFi-enabled computer or mobile device to the area with a poor router WiFi signal: a.
AC750 WiFi Range Extender Use the Extender in Access Point Mode You can use the extender as a WiFi access point, which creates a new WiFi hotspot by using a wired Ethernet connection. To install the extender as an access point: 1. Set the Access Point/Extender switch to Access Point. 2. Plug the extender into an electrical outlet and wait for the Power LED to light green. If the Power LED does not light, press the Power On/Off button. 3.
AC750 WiFi Range Extender A page displays that says you successfully created an access point. 11. Click the NEXT button. The registration page displays. 12. Follow the onscreen instructions to register your extender. Access Extender Settings After installation, you can log in to the extender to view or change the extender’s settings. To log in to the extender: 1. Use a WiFi network manager on a WiFi-enabled computer or mobile device to find and connect to the new extender WiFi network.
AC750 WiFi Range Extender The Welcome page displays. 6. Click the WIFI RANGE EXTENDER button. The extender scans for WiFi signals and finds the WiFi networks in your area and displays a list. 7. Select your WiFi network and click the NEXT button. 8. When prompted, enter the password to connect to your WiFi network and click the NEXT button. A message displays when the extender connects to your existing router’s WiFi network. 9. Click the NEXT button.
3.
AC750 WiFi Range Extender View Connected Devices You can view a list of devices that are connected to the extender network. To view connected devices: 1. On your WiFi-enabled computer or mobile device, open the WiFi connection manager and locate and connect to the extender WiFi network. 2. Launch a web browser. 3. Enter www.mywifiext.net in the address field of the browser. A login window opens. 4. Enter your user name and password. The Status page displays. 5. Select Settings > Connected Devices.
AC750 WiFi Range Extender When you enable FastLane Technology, two options are available: • Use the 2.4 GHz band to connect to the extender from WiFi-enabled devices and use the 5 GHz band to connect the extender to the WiFi router. Use this mode if your WiFi router supports the 5 GHz band but the devices that you want to use for gaming and streaming support the 2.4 GHz band. • Use the 5 GHz band to connect to the extender from WiFi-enabled devices and use the 2.
AC750 WiFi Range Extender • Router-to-Extender in 2.4 GHz only and Extender-to-Device in 5 GHz only • Router to Extender in 5 GHz only and Extender-to-Device in 2.4 GHz only 8. Click the Save button. Your settings are saved. Adjust the WiFi Coverage You can set the extender’s WiFi coverage depending on how large you want your coverage area to be. To adjust the WiFi coverage: 1.
AC750 WiFi Range Extender View WiFi Settings To view the WiFi settings: 1. On your WiFi-enabled computer or mobile device, open the WiFi connection manager and locate and connect to the extender WiFi network. 2. Launch a web browser. 3. Enter www.mywifiext.net in the address field of the browser. A login window opens. 4. Enter your user name and password. The Status page displays. 5. Select Settings > Wireless. Change the WiFi Network Name To change the WiFi network name: 1.
AC750 WiFi Range Extender 5. Select Settings > Wireless. 6. In each Network Name (SSID) field, type a network name. 7. Click the SAVE button. Your settings are saved. Turn Off the SSID Broadcast to Create a Hidden Network By default, the extender broadcasts its WiFi signal so that its WiFi network names (SSIDs) are easy for you to find and connect to from your computer, tablet, or smartphone. You can turn off the SSID broadcast to create a hidden WiFi network.
AC750 WiFi Range Extender 6. Clear the Broadcast the Network name (SSID) check box. 7. Click the SAVE button. Your settings are saved. Disable or Enable the WiFi Radios By default, the extender’s WiFi radios broadcast signals in the 2.4 GHz and 5 GHz bands. If you disable the WiFi radios, then no one can connect with WiFi to the extender. To enable or disable the WiFi radios: 1.
AC750 WiFi Range Extender 5. Select Settings > Wireless. 6. Select or clear the Enable 2.4 GHz WiFi check box. 7. Select or clear the Enable 5 GHz WiFi check box. 8. Click the SAVE button. Your settings are saved. Change the WiFi Speed When you use the extender in FastLane mode or in access point mode, you can change the WiFi speed setting. Note: When the extender connects to a router in extender mode, the extender channel and speed follow the router settings.
AC750 WiFi Range Extender 5. Select Settings > Wireless. 6. In each WiFi Speed menu, select a speed. 7. Click the SAVE button. Your settings are saved. Use WPS to Add a Computer to the Extender’s WiFi Network WPS (Wi-Fi Protected Setup) lets you connect a WiFi-enabled computer or mobile device to the extender’s network without entering the WiFi network passphrase or key. Instead, you use a WPS button or enter a PIN to connect.
AC750 WiFi Range Extender Use WPS With the Push Button Method For you to use the push button method to connect a WiFi-enabled computer or mobile device to the extender WiFi network, the computer or device must include a physical WPS button or an onscreen WPS button that you can click. To use WPS to add a WiFi-enabled computer or mobile device to the extender’s WiFi network: 1.
AC750 WiFi Range Extender Use WPS With the PIN Method To use the PIN method to connect a WiFi-enabled computer or mobile device to the extender WiFi network, you must know the PIN of the computer or device. To add a WiFi-enabled computer or mobile device to the extender’s WiFi network: 1. On your WiFi-enabled computer or mobile device, open the WiFi connection manager and locate and connect to the extender WiFi network. 2. Launch a web browser. 3. Enter www.mywifiext.
AC750 WiFi Range Extender Deny Access to a WiFi-Enabled or Mobile Device By default, access control is disabled so that it is easy for you to connect to the extender’s WiFi networks. You can deny network access to specific WiFi-enabled computers and mobile devices based on their MAC addresses. Each network device is assigned a MAC address, which is a unique 12-character physical address, containing the hexadecimal characters 0–9, a–f, or A–F only, and separated by colons (for example, 00:09:AB:CD:EF:01).
AC750 WiFi Range Extender Set Up an Access Schedule You can control access for all users during specific periods of the day. You can set up an access schedule that prevents Internet access through the extender network based on the times that you set. To set up an access schedule: 1. On your WiFi-enabled computer or mobile device, open the WiFi connection manager and locate and connect to the extender WiFi network. 2. Launch a web browser. 3. Enter www.mywifiext.net in the address field of the browser.
AC750 WiFi Range Extender Change the Extender’s Device Name The default name is EX6100v2. To change the extender’s device name: 1. On your WiFi-enabled computer or mobile device, open the WiFi connection manager and locate and connect to the extender WiFi network. 2. Launch a web browser. 3. Enter www.mywifiext.net in the address field of the browser. A login window opens. 4. Enter your user name and password. The Status page displays. 5. Select Settings > Wireless. The Wireless page displays. 6.
AC750 WiFi Range Extender 3. Enter www.mywifiext.net in the address field of the browser. A login window opens. 4. Enter your user name and password. The Status page displays. 5. Select Settings > Wireless. The Wireless page displays. 6. Click the IP Address heading. The IP Address section displays. By default, the Get Dynamically IP Address From Router radio button is selected. 7. Select the Use Static IP Address radio button. 8. Complete the fields to specify the IP network IP addresses. 9.
AC750 WiFi Range Extender 2. Power on the extender and connect all of your WiFi-enabled computers and mobile devices to the extender. 3. Make sure that the Link Rate LED remains lit. 4. Log in to your extender: a. Launch a web browser. b. Enter www.mywifiext.net in the address field of the browser. A login page opens. c. Enter your user name and password. The Status page displays 5. Select Settings > Connected Devices.
4.
AC750 WiFi Range Extender Change the Extender User Name and Password You can change the user name and password to log in to the extender. To add an extender user: 1. On your WiFi-enabled computer or mobile device, open the WiFi connection manager and locate and connect to the extender WiFi network. 2. Launch a web browser. 3. Enter www.mywifiext.net in the address field of the browser. A login window opens. 4. Enter your user name and password. The Status page displays. 5. Select Settings > Password.
AC750 WiFi Range Extender Turn Password Protection Off and On We recommend that you leave password protection on to help keep your network secure. You can turn password protection off and on. To turn password protection off or on: 1. On your WiFi-enabled computer or mobile device, open the WiFi connection manager and locate and connect to the extender WiFi network. 2. Launch a web browser. 3. Enter www.mywifiext.net in the address field of the browser. A login window opens. 4.
AC750 WiFi Range Extender 6. Click the BACK button. A login window opens. 7. Log in to the extender. Automatically Adjust for Daylight Saving Time 1. On your WiFi-enabled computer or mobile device, open the WiFi connection manager and locate and connect to the extender WiFi network. 2. Launch a web browser. 3. Enter www.mywifiext.net in the address field of the browser. A login window opens. 4. Enter your user name and password. The Status page displays. 5. Select Do More > Access Schedule.
AC750 WiFi Range Extender Back Up and Manage the Extender Configuration When the extender works correctly after initial setup, we recommend that you back up the extender configuration settings. After you back up the settings, if you change the extender configuration settings but are not content with the new settings, you can restore the extender configuration to the backed-up settings. Back Up the Configuration Settings You can back up the configuration file of the extender.
AC750 WiFi Range Extender Restore the Configuration Settings You can restore the configuration file of the extender to a previously saved configuration file. To restore the extender configuration settings: 1. On your WiFi-enabled computer or mobile device, open the WiFi connection manager and locate and connect to the extender WiFi network. 2. Launch a web browser. 3. Enter www.mywifiext.net in the address field of the browser. A login window opens. 4. Enter your user name and password.
AC750 WiFi Range Extender Return the Extender to Its Factory Settings To reset the extender to its factory settings, you can use the Factory Reset button or you can log in and click a RESET button. For information about the factory settings, see Factory Default Settings on page 48. Use the Factory Reset Button to Restore Factory Settings CAUTION: This process erases any settings that you configured in the extender. To restore factory settings: 1.
AC750 WiFi Range Extender 5. Select Settings > Other. CAUTION: After you click the RESET button, do not try to go online, turn off the extender, shut down the computer, or do anything else to the extender until it finishes restarting. 6. Click the RESET button. A confirmation pop-up window opens. 7. Confirm your decision. The extender returns to its factory settings and restarts. This process takes about one minute.
AC750 WiFi Range Extender 5. Select Firmware Update. 6. Click the CHECK ONLINE button. 7. If new firmware is available, follow the onscreen prompts to download it onto your computer. Note: You might need to unzip the firmware file. 8. Click the BROWSE button. 9. Locate and select the new firmware file. The firmware file name ends with a .chk extension.
AC750 WiFi Range Extender 5. Select Settings > Other. 6. Click the RESTART button and click the Yes button to confirm. The extender restarts, which takes about two minutes.
5.
AC750 WiFi Range Extender FAQs This section provides answers for difficulties you might experience with the extender. The NETGEAR installation assistant keeps asking me for my network password (passphrase) or security key, and I am sure that I entered the correct password. What can I do? The extender is probably placed at the borderline of the range covered by the router or access point. For more information about where to place the extender, see Place the Extender and Apply Power on page 10.
AC750 WiFi Range Extender Cannot Connect to the Extender If you cannot connect to the extender, determine what prevents you from connecting: • If you forgot your user name or password, click the Username & Password Help link. For more information, see Recover a Forgotten User Name or Password on page 36. • If your browser displays an error page, include http:// in the address field of your browser by typing http://www.mywifiext.net.
A.
AC750 WiFi Range Extender Factory Default Settings The following table includes the factory settings for the extender. You can use the Factory Reset button or by logging in and clicking a RESET button to return the extender to these settings. (See Return the Extender to Its Factory Settings on page 40.) Table 2.
AC750 WiFi Range Extender Table 3. Technical specifications (continued) Feature Description Environmental • • • Interface • • Operating temperature: 32° to 140°F (0° to 40°C) Operating humidity: 90% maximum relative humidity, noncondensing Electromagnetic emissions: Meets requirements of FCC Part 15 Class B. Local: 10BASE-T, 100/1000BASE-Tx, RJ-45 802.11ac, 802.11n, 802.11a, 802.11g, 802.