
Owner's Manual


LAN Configuration
75
ProSafe Wireless-N 8-Port Gigabit VPN Firewall FVS318N
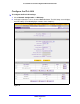
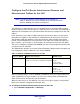
Figure 37.
2. Enter the settings as explained in the following table:
3. Click App
ly to save your changes and add the new IPv6 address pool to the List of IPv6
Address Pools table on the LAN Setup screen for IPv6.
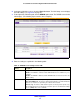
To edit an IPv6 LAN address pool:
1. On the
LAN Setup screen for IPv6 (see Figure 36 on page 72), click the Edit button in
the Action column for the address pool that you want to modify. The LAN IPv6 Config
scre
en displays.
2. Mo
dify the settings as explained in the previous table.
3. Click App
ly to save your settings.
To delete one or more IPv6 LAN address pools:
1. On the LAN Setup screen
for IPv6 (see Figure 36 on page 72), select the check box to
the left of each address pool that you want to delete, or click the Select All t
able button
to select all address pools.
2. Click the Del
ete table button.
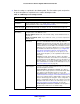
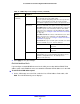
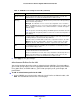
Table 13. LAN IPv6 Config screen settings
Setting Description
Start IPv6 Address Enter the start IP address. This address specifies the first of the contiguous
addresses in the IP address pool. Any new DHCPv6 client joining the LAN is
assigned an IP address between this address and the end IP address.
End IPv6 Address Enter the end IP address. This address specifies the last of the contiguous
addresses in the IP address pool. Any new DHCPv6 client joining the LAN is
assigned an IP address between the start IP address and this IP address.
Prefix Length Enter the IPv6 prefix length, for example, 10 or 64.