
Quick Reference Guide


ProSafe VPN Firewall FVS318v3 Reference Manual
Sample VPN Configurations with FVS318v3 C-7
v5.0, January 2012
– Subnet Mask: 255.255.255.0 (in this example)
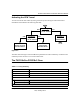
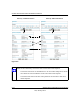
3. Log in to the FVS318v3 labeled Gateway B as in the illustration (Figure C-5).
Log in at the default address of http://192.168.0.1 with the default user name of admin and
default password of password (or using whatever password and LAN address you have
chosen).
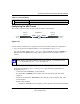
4. Repeat the process using the VPN Wizard to configure the FVS318v3 at Gateway B.
Follow the steps listed in Figure C-2 and Figure C-3, but use the following parameters instead
as illustrated in Figure C-6:
• Connection Name: Scenario_1 (in this example)
• Pre-Shared Key: 12345678 (in this example), must be the same at both VPN tunnel
endpoints
• Remote WAN IP address: 14.15.16.17 (in this example), must be unique at each VPN
tunnel endpoint
• Remote LAN IP Subnet
– IP Address: 10.5.6.1 (in this example), must be unique at each VPN tunnel endpoint
– Subnet Mask: 255.255.255.0 (in this example)
All traffic from the range of LAN IP addresses specified on FVS318v3 A and FVS318v3 B will
now flow over a secure VPN tunnel once the VPN tunnel is initiated (see “Initiating and Checking
the VPN Connections” on page 11).
Note: Based on the network addresses used in this example, you would log in to the
LAN IP address of http://172.23.9.1 at Gateway B.