ProSafe® Plus Switch Utility User Guide 350 East Plumeria Drive San Jose, CA 95134 USA September 2010 202-10524-03 v1.
ProSafe Plus Switch Utility User Guide ©2010 NETGEAR, Inc. All rights reserved. No part of this publication may be reproduced, transmitted, transcribed, stored in a retrieval system, or translated into any language in any form or by any means without the written permission of NETGEAR, Inc. Technical Support Thank you for choosing NETGEAR. To register your product, get the latest product updates, or get support online, visit us at http://support.netgear.com.
Table of Contents Chapter 1 Getting Started Installing the ProSafe Plus Switch Utility . . . . . . . . . . . . . . . . . . . . . 4 Discovering Switches . . . . . . . . . . . . . . . . . . . . . . . . . . . . . . . . . . . . . . . . . 6 Utility Features Overview. . . . . . . . . . . . . . . . . . . . . . . . . . . . . . . . . . . . . . . 7 System (General Configuration and Information) . . . . . . . . . . . . . . . . . . 7 VLAN (Virtual LAN networks) . . . . . . . . . . . . . . . . . . . . . . . . . . . . .
ProSafe Plus Switch Utility User Guide Advanced 802.1Q VLAN Configuration . . . . . . . . . . . . . . . . . . . . . . . . .24 VLAN Configuration . . . . . . . . . . . . . . . . . . . . . . . . . . . . . . . . . . . . . . . .24 VLAN Membership . . . . . . . . . . . . . . . . . . . . . . . . . . . . . . . . . . . . . . . . .25 Port PVID . . . . . . . . . . . . . . . . . . . . . . . . . . . . . . . . . . . . . . . . . . . . . . . .25 Port Tagging . . . . . . . . . . . . . . . . . . . . . . . . . . . . . . . .
1.
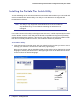
ProSafe Unmanaged Plus Switch Configuration Utility User Guide Installing the ProSafe Plus Switch Utility To take advantage of the enhanced features on ProSafe® Plus switches you can install and use the ProSafe® Plus Switch Utility. The utility is on the Resource CD shipped with ProSafe® Plus switches. Note: The utility is only supported on MS Windows and can be installed on any Windows PC(s) on the network containing the switches to be managed.
ProSafe Unmanaged Plus Switch Configuration Utility User Guide 2. Click Install ProSafe® Plus Utility to install the utility program on your PC. If the Resource CD home page does not display, your PC may have the Autorun feature disabled. You can enable your PC’s Autorun feature or use the PC’s file manager to navigate to the CD and double click on Autorun.exe. Autorun Note: The utility name may vary slightly between different ProSafe® Plus switch models.
ProSafe Unmanaged Plus Switch Configuration Utility User Guide Discovering Switches When the utility is launched, it immediately searches the network for ProSafe® Plus switches. Note: Local PC firewall applications such as Symantec Endpoint Protection can prevent the utility from communicating with the switches. If the utility is unable to discover your switches and you are using a local firewall, you will need to turn off the firewall function in order for discovery to work.
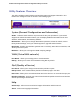
ProSafe Unmanaged Plus Switch Configuration Utility User Guide Utility Features Overview The utility configures switch features and provides status and support information. The features are arranged on tabs as shown in the following figure: System (General Configuration and Information) Status - indicates which switches are present and if they are operational. If your switch supports the switch information feature you can display additional information such as IP Address, Subnet Mask, and Gateway Address.
ProSafe Unmanaged Plus Switch Configuration Utility User Guide Switch Settings It is possible to make port settings that block further access to the switch you are configuring. If this occurs you can reset the switch manually to restore access. If you do this, your previous settings will be lost.
ProSafe Unmanaged Plus Switch Configuration Utility User Guide Default Settings All ProSafe® Plus Switch features have default settings. You do not need to configure any settings in order to use the ProSafe® Plus switches. The following table lists the default values for switch settings. Shaded features are not configurable on all switches.
ProSafe Unmanaged Plus Switch Configuration Utility User Guide Tab Menu Feature Default Value VLAN Port Based Basic Disabled Advanced Disabled Basic Disabled Advanced Disabled 802.1Q QoS QoS Global Configuration QoS Mode 802.
ProSafe Unmanaged Plus Switch Configuration Utility User Guide Uninstalling the Utility To uninstall the utility: 1. Use your PC’s Add or Remove Programs command, Start > Control Panel > Add or Remove Programs. 2. Select ProSafe Plus Utility and click Change/Remove. 3. When you are asked if you want to completely remove the selected application, click Yes. 4. You can also remove the WinPcap and AIR programs if they are not needed by another program.
2. System Configuration 2 This chapter chapter..contains the following topics: • System Features • Status • Maintenance • Monitoring The System tab lets you select a switch to manage, display general information about the switch, perform basic switch maintenance, and monitor data flow through the switch. System features are: Status - indicates which switches are present and if they are operational.
ProSafe Unmanaged Plus Switch Configuration Utility User Guide System Features The System tab lets you select a switch to manage, display general information about the switch, perform basic switch maintenance, and monitor data flow through the switch. The switch selection remains in effect until you select a different switch, or quit the utility. System features are: Status - indicates which switches are present and if they are operational.
ProSafe Unmanaged Plus Switch Configuration Utility User Guide Status The Status menu allows you to select a switch and display switch information. Switch Selection In order to use any of the System tab features you must first select a switch. Click on the radio button for the desired switch. You will be asked to enter the password for the selected switch. The default password for all switches is “password”.
ProSafe Unmanaged Plus Switch Configuration Utility User Guide DHCP Mode Selection The Switch Information screen contains a field for DHCP (Dynamic Host Configuration Protocol) Mode selection. When you enable this setting the switch will obtain a network IP address from a DHCP server in the network. Each time the switch is powered on or reset, it will request an IP address from a DHCP Server in the Network. This is called a Dynamic IP address.
ProSafe Unmanaged Plus Switch Configuration Utility User Guide Maintenance The Maintenance feature allows you to change the password for the selected switch, perform a device reboot, reset the switch to its factory default settings, or upgrade the switch firmware. Change Password To change the password for a switch: 1. Select System > Maintenance. The Maintenance menu and Change Password feature will display. 2. Enter the old password (default is “password”) and the new password. 3. Click Apply.
ProSafe Unmanaged Plus Switch Configuration Utility User Guide Firmware Upgrade Note: After firmware downloading is complete, the switch will automatically reboot. This will briefly disrupt network traffic through the switch. In order to upgrade switch firmware you must first download a firmware upgrade file for the selected switch from the NETGEAR support website to your PC. To upgrade firmware on the selected switch: 1. Select System > Maintenance > Firmware Upgrade.
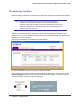
ProSafe Unmanaged Plus Switch Configuration Utility User Guide Monitoring The Monitoring menu provides statistics on port data volume, allows you to configure port mirroring and on some switch models perform cable testing. Port Statistics To view port statistics: 1. Select System > Monitoring. The Port Statistics for the selected switch will display in bytes received, bytes sent, and packet errors. Port Mirroring Port mirroring allows a port to see the data on another port.
ProSafe Unmanaged Plus Switch Configuration Utility User Guide Cable Test Some switch models have a cable testing feature that allows you to check for cable faults. If a cable fault is found on a port the cable test will give an estimate of the distance of the fault from the switch. To perform a cable test: 1. Click System > Monitoring > Cable Tester. The Cable Tester screen will display. 2. Select the port(s) to be tested and click TEST SELECTED PORT.
ProSafe Unmanaged Plus Switch Configuration Utility User Guide MultiCast IGMP Snooping Internet Group Management Protocol (IGMP) Snooping is a feature that allows a switch to forward multicast traffic intelligently on the switch. Multicast IP traffic is traffic that is destined to a host group. Host groups are identified by class D IP addresses, which range from 224.0.0.0 to 239.255.255.255.
3. Virtual LAN Configuration 3 This chapter contains the following topics: • VLAN Overview • Port Based Configuration • 802.
ProSafe Unmanaged Plus Switch Configuration Utility User Guide VLAN Overview Virtual LANs are made up of networked devices grouped together logically into separate networks. The Switch Configuration Utility allows you to group ports on a switch to create a virtual network made up of the devices connected to the ports. VLANs can be grouped using Port Based or 802.1Q criteria . Port Based - allows you to assign ports to virtual networks.
ProSafe Unmanaged Plus Switch Configuration Utility User Guide Port Based Configuration Port Based Virtual LAN configuration assigns ports on the selected switch to a Virtual LAN Group. The number of VLANs that can be created is limited to the number of ports on the switch. The Basic Port Based VLAN Configuration page is designed to help you to partition your network into different segments. Ports with the same ID are grouped into the same VLAN group.
ProSafe Unmanaged Plus Switch Configuration Utility User Guide 802.1Q Based Configuration 802.1Q VLAN configuration can be done using basic or advanced methods. Basic 802.1Q VLAN Configuration In Basic 802.1Q VLAN configuration you configure ports to a VLAN Group ID (1-4093 or all). To configure ports using 802.1Q criteria: 1. Select the switch. 2. Select VLAN. This will display the Port-Based VLAN configuration page. 3. Select 802.1Q on the menu. 4. Select Enable. 5.
ProSafe Unmanaged Plus Switch Configuration Utility User Guide VLAN Membership To add ports to a VLAN group: 1. Select VLAN Membership from the menu on the left. The VLAN Membership screen displays. 2. Select the VLAN group you want to configure from the VLAN Identifier pull down list 3. Check the boxes for the ports you want to add to the VLAN group. You can use the Group Operation commands to add all ports or clear the current selections.
ProSafe Unmanaged Plus Switch Configuration Utility User Guide To tag data from ports: 1. Click on the VLAN tab and then select 802.1Q > Advanced> Port Tagging. The Port Tagging screen displays. 2. Select the ports whose data you want tagged, select the Tag Tagging Control, and click Apply. To untag data from ports: 1. Click on the VLAN tab and then select 802.1Q > Advanced > Port Tagging. The Port Tagging screen displays. 2.
4.
ProSafe Unmanaged Plus Switch Configuration Utility User Guide QoS Overview There are many different classes of data that can be sent across a network. Depending on the volume of traffic on the network and the capacity of the equipment in the network, data can be delayed, or lost and retransmitted before reaching its destination. Normally this is not a problem since the data is reassembled at the destination.
ProSafe Unmanaged Plus Switch Configuration Utility User Guide QoS Global Configuration Global configuration allows you to assign priorities for how data will be transmitted by the switch. Priority can be assigned either by port number (Port Based) or by the type of data being transmitted (802.1p based). You would typically want to assign a low priority for normal classes of data (email, internet browsing, and ordinary data transfers) and high priority to video, voice, and other delay sensitive data.
ProSafe Unmanaged Plus Switch Configuration Utility User Guide 4 priority levels To assign Port Based priorities: 1. Select System and click on the radio button for the switch you want to configure. 2. Select QoS. The QoS Global Configuration screen displays. 3. Select the ports that you want to have that priority. 4. Select a priority level that you want to assign from the list at the bottom of the display. 5. Click Apply. The selected ports will be displayed with the new priority. 6.
ProSafe Unmanaged Plus Switch Configuration Utility User Guide Rate Limiting You can limit the rate at which the switch accepts incoming data and the rate that it retransmits outgoing data. you can set rate values. The rate choices vary depending on the switch model. Rate limiting can be set for a port in addition to other QoS settings. If a port has a rate limit set, the switch will restrict the acceptance or retransmission of data to the values configured. To configure Rate Limiting: 1.
ProSafe Unmanaged Plus Switch Configuration Utility User Guide Broadcast Filtering A switch can be configured to block massive transmission of broadcast packets being forwarded to every port on the same VLAN. This is also known as broadcast storm protection. Failure to block broadcast storm packets can cause a delay or halt to other data. Some switches allow you to select a Storm Control Rate for each port, others assign a predetermined Storm control rate for all ports on the switch.
5.
ProSafe Unmanaged Plus Switch Configuration Utility User Guide Online Help The Help tab provides access to the NETGEAR Support web site and to the online user guide for the ProSafe® Plus Switch Configuration Utility (the latest copy of this manual). User Guide If the PC running the utility program has access to the internet, selecting User Guide, then clicking Apply will open the latest version of this user guide. You can then download a copy of the User Guide to your PC.
Index Numerics L 802.1p-based priority 29 802.1Q 21 802.
ProSafe Unmanaged Plus Switch Configuration Utility User Guide T technical support 2 trademarks 2 U user guide 33 utility, install 4 utility, uninstall 11 V VLAN 7 VLAN membership 24 VLAN, add groups 23 VLAN, advanced 22 VLAN, port based 22 W WinPcap 5 Index | 36