NETGEAR ® IEEE 802.11a Wireless PCI Adapter 54 Mbps Model HA311 User’s Guide .
NETGEAR, INC. 4500 Great America Parkway Santa Clara, CA 95054 USA Phone: 1-888-NETGEAR E-mail: support@NETGEAR.com www.NETGEAR.com Technical Support YOU MUST REGISTER TO OBTAIN TECHNICAL SUPPORT. PLEASE RETAIN PROOF OF PURCHASE AND THE WARRANTY INFORMATION. To register your product, get product support or obtain product information and product documentation, go to http://www.NETGEAR.com/register. You’ll find technical support information at http://www.NETGEAR.com/ through the Customer Service area.
CONTENTS CHAPTER 1—INTRODUCTION ........................................................................................................4 Benefits ..........................................................................................................................................5 Features.........................................................................................................................................5 Package Contents..............................................................
CHAPTER 1—INTRODUCTION Congratulations on your purchase of NETGEAR’s HA311 802.11a Wireless PCI Adapter. This wireless PCI adapter enables you to network various PC’s together without physically laying any wire and delivers high-speed wireless performance – up to 54 Mbps, 72 Mbps in turbo mode. It provides small business networks with reliable, standards-based 802.11a wireless LAN connectivity that is protected with industrystandard security against unauthorized access. NETGEAR's 802.
Benefits ♦ Blazing speeds – up to 54 Mbps, 72 Mbps in turbo mode. ♦ Ultra-reliable, standards-based IEEE 802.11a wireless LAN networking. ♦ Highest level of industry standard security with WEP encryption ♦ Free from interference, it coexists with IEEE 802.11b and Bluetooth™ devices. Features The key features of the NETGEAR HA311 802.11a Wireless PCI Adapter are: ♦ Reliable IEEE 802.11a standards-based wireless technology.
Package Contents This product package should contain: ♦ One HA311 802.11a Wireless PCI Adapter with an integral antenna ♦ One HA311 Wireless PCI Adapter Resource CD-ROM ♦ One HA311 User’s Guide (this manual) ♦ One Support Information Card ♦ One Warranty and registration card Please call your reseller or customer support in your area if there are any wrong, missing, or damaged parts. You can refer to the Support Information Card for the telephone number of customer support in your area.
♦ Windows XP, 2000, ME, NT 4.0 or Windows 98 Second Edition installed. Related NETGEAR IEEE 802.11a Products ♦ HE102 802.11a Wireless Access Point ♦ HA501 802.11a Wireless CardBus Adapter ♦ HR814 802.11a Cable/DSL Internet Gateway Router About This Guide This User’s Guide will show you how to install and use NETGEAR’s HA311 802.11a Wireless PCI Adapter. With a few simple steps, you can connect your PCs to create a flexible and reliable network. Get Started Now! The HA311 802.
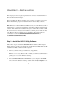
CHAPTER 2—INSTALLATION This chapter provides step-by-step instructions on how to install the HA311 802.11a Wireless PCI Adapter. Before installing the HA311 hardware into your PC, you will need to use the HA311 Installation program to install the HA311 driver utility software. Note: Windows 98 SE and Windows ME users may need the Windows CD or Cabinet files to complete the installation of the HA311 Wireless PCI Adapter software. If the Windows installation files (a.k.a. Cabinet files with the .
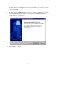
Double-click the CD-ROM drive letter (such as D:\) to look at the contents of the CD-ROM. 3. Double-click the SETUP application icon to start the installation procedure. The InstallShield Wizard will open and display the NETGEAR HA311 Setup window, as shown here. 4. Click Next to continue.
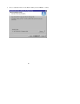
5. Select a destination folder for the HA311 Utility and click Next to continue.
6. Select the name for the HA311 Utility’s Program folder or enter a name in the Program Folders field, then click Next to continue.
7. The setup program will install the utility and the HA311 driver files. Click Finish to complete the installation.
8. If you are using Windows 98 SE or Windows ME, insert the Windows installation CD if prompted. The HA311 installation program will automatically launch the Microsoft WMI Installation Wizard to install the Windows Management Instrumentation (WMI) Core Components on your computer if they haven’t already been installed. Follow the instructions to complete the WMI installation. To continue the installation process for your HA311, proceed to Step 2—Install the HA311 Wireless PCI Adapter, on the next page.
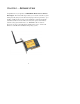
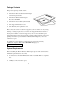
Step 2—Install the HA311 Wireless PCI Adapter HARDWARE DESCRIPTION The HA311 Wireless PCI Adapter has two interfaces: ♦ A 32-bit PCI connector that connects to any PC with an available PCI slot. ♦ A wireless interface that remains outside of the PC chassis when the Wireless PCI Adapter is inserted into a PC. There are two green LEDs, Network (NWK) and Power (PWR), that indicate the wireless link condition of the HA311 Wireless PCI Adapter with another wireless node or the associated Access Point.
4. Insert the HA311 Wireless PCI Adapter into the PCI slot as displayed in these illustrations: The HA311 Wireless PCI Adapter card should be firmly fitted and screwed into the PCI slot.
If you are using a desktop PC case, it will look like this once installed. 5. If you are using a tower PC case, it will look like this once installed. Restore the PC cover and reconnect the power cord to the PC. Make sure the HA311 antenna is pointing upwards to ensure the best reception. To continue the installation process for your HA311, proceed to Step 3—Install the HA311 Wireless PCI Adapter Driver, on the next page.
Step 3—Install the HA311 Wireless PCI Adapter Driver Once you have installed the HA311 Wireless PCI Adapter, you will need to make sure the appropriate driver is installed on your PC. To do this, please follow these steps: If you are using Windows NT 4.0, please follow the instructions on page 21. FOR WINDOWS XP, 2000, ME, AND 98 SE USERS 1. Turn on your PC and logon to Windows, if applicable. 2.
For Windows XP users, the Found New Hardware Wizard window automatically will detect the new HA311 Wireless PCI Adapter and then display the Hardware Installation window (as shown below). The Hardware Installation window indicates that HA311 has not passed Windows logo testing. Click the Continue Anyway button to allow Windows 2000 to install the driver and initialize the HA311 Wireless PCI Adapter. Click Finish to close the Found New Hardware Wizard. 3. Restart your PC, if prompted.
Verifying Driver Installation After you have completed Step 3—Install the HA311 Wireless PCI Adapter Driver on the previous pages, we suggest you follow these instructions to verify that the HA311 Wireless PCI Adapter driver has been successfully installed on your PC. 1. From the Windows Desktop, double-click the My Computer icon. 2. Double-click the Control Panel icon, and then double-click the System icon. 3. Click the Device Manager folder tab. 4. Double-click Network Adapters.
5. Double-click NETGEAR HA311 Wireless PCI Adapter. The Device Status window will appear and should indicate that the HA311 Wireless PCI Adapter is functioning properly. To continue the installation process for your HA311, proceed to Step 4— Configure the HA311 Network Settings, on page 23.
FOR WINDOWS NT 4.0 USERS 1. Turn on your computer and logon to Windows, if applicable. 2. From the Windows NT desktop, double-click the My Computer icon. 3. Double-click the Control Panel icon, and then double-click the Network icon. 4. Click the Adapter tab and click the Add button to continue. 5. The Select Network Adapter dialog box will be displayed and list a number of network adapter cards. Insert the HA311 Wireless PCI Adapter Resource CD-ROM into your CD-ROM drive. Click Have Disk… 6.
Verifying NT 4.0 Driver Installation After you have completed Step 3—Install the HA311 Wireless PCI Adapter Driver for Windows NT 4.0 Users on the previous page, we suggest you follow these steps to verify that the HA311 Wireless PCI Adapter driver has been successfully installed on your PC. 1. From the Windows NT desktop, double-click the My Computer icon. 2. Double-click the Control Panel icon, and then click the Devices tab. A list of devices installed in the system will be shown.
Step 4—Configure the HA311 Network Settings NETGEAR supplies you with the HA311 Wireless PCI Adapter Configuration Utility program to provide information on your wireless network, such as signal quality and link conditions, and to let you modify the various configurable wireless parameters, such as SSID, enable the Turbo mode, etc.
ABOUT THE HA311 SYSTRAY APPLICATION The SysTray (System Tray) resides on one end of the taskbar in the Microsoft Windows Desktop. It displays interface icons for memory-resident applications that execute continuously in the background, such as the clock, speaker volume, and virus detection. The wireless LAN configuration utility installation for the HA311 Wireless PCI Adapter will add a configuration and status reporting utility icon in your SysTray.
Double-click the Wireless PCI Adapter SysTray icon to activate the wireless LAN configuration utility for the HA311 Wireless PCI Adapter. You can click any of the folder tabs in the NETGEAR HA311 802.11a Configuration Utility dialog box to view the current status or modify operational parameters. ♦ For detailed information on configuring the HA311, refer to Chapter 3—Configuring the HA311 Wireless PCI Adapter, on page 28.
Step 5—Test the Network Connection Status Follow these steps to verify that the HA311 Wireless PCI Adapter has been successfully installed and that your wireless access is functioning properly. 1. Start the NETGEAR HA311 802.11a Configuration Utility and click the Status tab. 2. The Status section of the HA311 Configuration Utility dialog box will display the current condition of the wireless LAN.
This chart describes the information shown in the Status section of the dialog box: STATUS Connect to AP MAC Address DESCRIPTION Displays the association of the access point or other wireless node in ad-hoc mode. Shows the MAC address of the associated access point when the HA311 Wireless PCI Adapter is configured in infrastructure mode. Network Mode Indicates the configuration mode used -- 802.11a ad-hoc mode, ad-hoc mode, or infrastructure mode. • 802.
CHAPTER 3—CONFIGURING THE HA311 802.11A WIRELESS PCI ADAPTER NETGEAR supplies you with a wireless LAN configuration utility program to provide information on your wireless network, such as signal quality and link conditions, and to let you modify the various configurable wireless parameters. Now that the HA311 802.11a Wireless PCI Adapter has been installed, you can use the HA311 802.11a Configuration Utility to view and customize configuration settings and features.
Configuration Section The Configuration section of the NETGEAR HA311 802.11a Configuration Utility dialog box shows you the configuration parameters of the wireless LAN and allows you to modify them. Make your selections and click OK to continue.
This table describes the options available from the Configuration section: CONFIGURATION DESCRIPTION Network Configurable between ad-hoc and infrastructure modes. In 802.11 ad-hoc mode, the wireless nodes form their own local network where the end nodes communicate peer-to-peer without an access point. In infrastructure mode, the wireless node searches all available wireless channels to associate with an access point.
Statistics Section The Statistics section of the NETGEAR HA311 802.11a Configuration Utility dialog box indicates the real-time Rx/Tx packets performance in graph form and also displays the performance statistics in figures. Click OK to continue.
About Section The About section of the NETGEAR HA311 802.11a Configuration Utility dialog box shows the release information of both the device driver for the Wireless PCI Adapter and the wireless LAN configuration utility software. Click OK to continue.
CHAPTER 4—WIRELESS NETWORK FUNDAMENTALS Wireless Network Configuration AD-HOC MODE (PEER-TO-PEER WORKGROUP) The Institute of Electrical and Electronics Engineers (IEEE) standard for wireless LANs (WLANs), 802.11- offers two methods for configuring a wireless network — ad-hoc and infrastructure. In an ad-hoc network, computers are brought together as needed; thus, there is no structure or fixed points to the network — each node can generally communicate with any other node.
♦ Set all stations to use the same network name (or SSID). ♦ Set all stations to use the same wireless channel for communication. ♦ Set all stations to disable the WEP encryption key, or set all stations to use an identical WEP encryption key as used by the Access Point. INFRASTRUCTURE MODE With a wireless access point, you can put the wireless LAN into Infrastructure mode.
♦ Set up wireless channels used by individual access points. (It is not necessary to set channels on the stations as the stations will automatically scan through all channels for the nearest access point.) Service Set Identification (SSID) The Service Set Identification (SSID) is a thirty-two alphanumeric character (maximum) string identifying the wireless local area network. Some vendors refer to the SS ID as network name.
Authentication and WEP Encryption The absence of a physical connection between nodes makes the wireless links vulnerable to information theft. To provide a certain level of security, IEEE 802.11 standard has defined two types of authentication methods, Open System and Shared Key. Open System authentication is a null algorithm. Shared Key authentication is an algorithm where both the transmitting node and the receiving node share an authentication key to perform a checksum on the original message.
The 128-bit WEP data encryption method consists of 104 configurable bits and the 152-bit WEP data encryption method consists of 128 configurable bits Similar to the forty-bit WEP data encryption method, the remaining 24 bits are factory set and not user configurable.
IEEE 802.11a uses Orthogonal Frequency Division Multiplexing (OFDM), a new encoding scheme that offers certain benefits over a spread spectrum in channel availability and data rate. The 802.11a uses OFDM to define a total of 8 non-overlapping 200 MHz channels across the 2 lower bands; each of these is divided into 52 subcarriers and each carrier is approximately 300 KHz wide. By comparison, 802.11b uses only 3 non-overlapping channels. IEEE 802.
The HE102 user can use eight channels in non-turbo mode. TURBO MODE: OFF Channel Frequency 36 5.18 GHz 40 5.20 GHz 44 5.22 GHz 48 5.24 GHz 52 5.26 GHz 56 5.28 GHz 60 5.30 GHz 64 5.32 GHz The HE102 user can use three channels in turbo mode. TURBO MODE: ON Channel Frequency 42 5.21 GHz 50 5.25 GHz 58 5.29 GHz Note: The available channels supported by the wireless products in various countries are different.
APPENDIX A—TROUBLESHOOTING PROBLEM CAUSE SOLUTION No lights are lit on the Wireless PCI Adapter. The wireless card is not inserted into the PCI slot on your desktop PC properly Or the proper HA311 Wireless PCI Adapter driver is not loaded. • Remove and reinsert the Wireless PCI Adapter. • Check the device manager in Windows to see if the adapter card is properly recognized in the Windows operating system. Reload the driver if necessary.
APPENDIX B—GENERAL SPECIFICATIONS Model Radio Data Rate Frequency HA311 802.11a Wireless PCI Adapter 6, 9, 12, 18, 24, 36, 48, 54, 72 for Turbo mode (Auto rate capable) 5.15 ~ 5.25 GHz (lower band) for US/Canada, Japan 5.25 ~ 5.35 GHz (middle band) for US/Canada Operating Range: @ 6 Mbps @ 54 Mbps Encryption Bus interface Provided drivers Dimensions Weight Status LEDs Electromagnetic Compliance Environmental Specifications Warranty Outdoor environment 1200 ft. 100 ft. Indoor environment 300 ft. 60 ft.
APPENDIX C—REGULATORY COMPLIANCE Trademarks NETGEAR is a registered trademark of NETGEAR, INC. Windows is a registered trademark of Microsoft Corporation. Other brand and product names are trademarks or registered trademarks of their respective holders. Information is subject to change without notice. All rights reserved.
♦ This device may not cause harmful interference. ♦ This device must accept any interference received, including interference that may cause undesired operation. Note: This equipment has been tested and found to comply with the limits for a Class B digital device, pursuant to part 15 of the FCC Rules. These limits are designed to provide reasonable protection against harmful interference in a residential installation.
Radio Frequency Interference Requirements This device is restricted to indoor use due to its operation in the 5.15 to 5.25 GHz frequency range. FCC requires this product to be used indoors for the frequency range 5.15 to 5.25 GHz to reduce the potential for harmful interference to co-channel Mobile Satellite systems. High power radars are allocated as primary users of the 5.25 to 5.35 GHz and 5.65 to 5.85 GHz bands. These radar stations can cause interference with and /or damage this device.