
Use and Care Manual


Table Of Contents
- Contents
- 1. Introduction and Hardware Overview
- 2. Get Started
- 3. Manage the Modem LAN Settings
- 4. Manage the Mobile Broadband Connection
- 5. Secure Your Network
- Change the Modem Password
- Manage Port Forwarding for Incoming Traffic
- Manage Port Filtering for Outgoing Traffic
- Block Specific Services and Applications From Accessing the Internet and Allow All Other Services and Applications
- Allow Specific Services and Applications to Access the Internet and Block All Other Services and Applications
- View Services and Applications on the Blacklist and Remove a Service or Application From the List
- View Services and Applications on the Whitelist and Remove a Service or Application From the List
- Disable Port Filtering
- Manage SIM Card Security
- 6. Manage the Modem and Monitor Usage and the Network
- Upgrade the Firmware of the Modem
- Back Up and Restore the Modem Settings
- Return the Modem to Its Factory Default Settings
- View Monthly Data and Session Data Usage
- Set a Plan Limit for the Data Counter
- Change the Billing Cycle Counter or Reset the Data Counter
- View Service Provider, Type of Service, and Signal Strength
- View Account Details and Other Details About Your Modem
- View Information About the Mobile Broadband Connection
- Set Up SMS Alert Messages
- Set the Data Limit for SMS Alert Messages
- View Alerts
- Turn Off the LEDs
- 7. Manage SMS Messages
- 8. Frequently Asked Questions
- What do I do when I can’t connect a device to the modem?
- What do I do when I can’t access the Internet?
- What do I do when the No Signal icon displays?
- Why does the Signal Strength LED show only a few bars?
- Why is the download or upload speed slow?
- Can I connect multiple LAN devices to the modem?
- How do I access the modem’s web pages?
- What do I do if I forget my admin login password?
- How do I disconnect from the mobile broadband network?
- How do I find my computer’s IP address?
- How do I find a device’s MAC address?
- How do I find my mobile phone number?
- Where can I find more information?
- 9. Alerts and Troubleshooting
- A. Default Settings and Specifications
- B. Wall-Mount the Modem
4. Click the Sign In button.
The full Dashboard page displays.
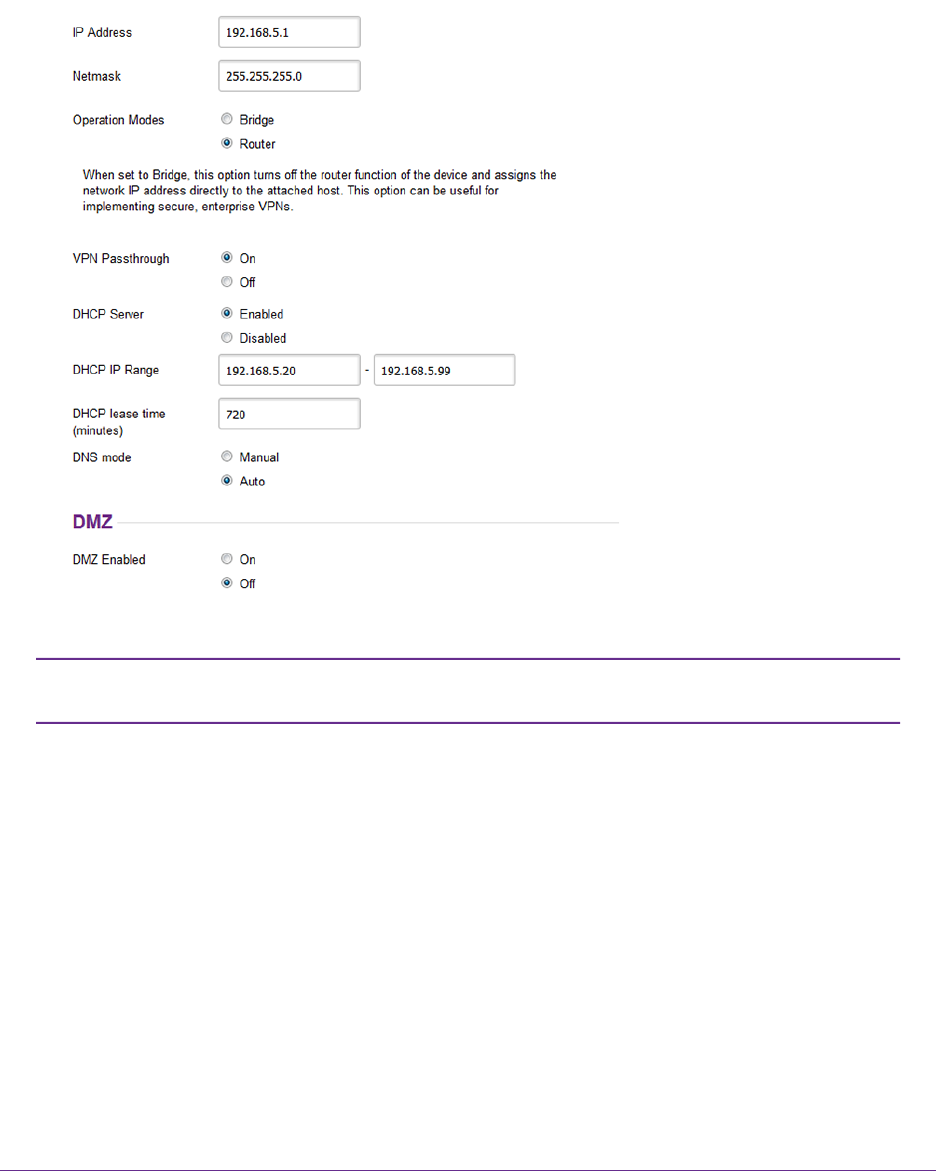
5. Select Settings > Advanced > LAN.
The diagnostics feature on the LAN page is intended for NETGEAR technical support
only. By default, the Enable Diagnostics Off radio button is selected.
Note
6. Make sure that next to DHCP Server, the Enabled radio button is selected.
By default, when the modem functions in Router mode, the DHCP server is enabled.
7. In the DHCP IP Range fields, enter the start and end IP addresses for the DHCP pool.
The IP addresses must be in the same network as the LAN IP address of the modem. By default, the
DHCP pool consists of addresses in the 192.168.5.20–192.168.5.99 range.
The Submit button displays after you enter IP addresses for the DHCP pool.
8. To change the period that the leased DHCP address remains effective, in the DHCP lease time field,
enter a time in minutes.
By default, the lease time is 720 minutes (12 hours).
9. To change the DNS settings, next to DNS mode, select the Manual radio button.
The DNS 1 and DNS 2 fields display.
Manage the Modem LAN Settings
25
LTE Modem LB1120 and LB1121