NETGEAR ® IEEE 802.
© 2002 by NETGEAR, Inc. All rights reserved. Trademarks ©2002 NETGEAR, Inc. NETGEAR® , the Netgear Logo, the Gear Guy, and Everybody's connecting are trademarks or registered trademarks of Netgear, Inc. in the United States and/or other countries. Microsoft, Windows, and the Windows logo are trademarks, or registered trademarks of Microsoft Corporation in the United States and/or other countries. Other brand and product names are trademarks or registered trademarks of their respective holders.
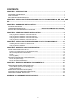
CONTENTS CHAPTER 1: INTRODUCTION ......................................................................................... 1 FEATURES AND BENEFITS ...........................................................................................................1 APPLICATIONS ...............................................................................................................................1 RELATED NETGEAR PRODUCTS .........................................................................................
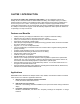
CHAPTER 1: INTRODUCTION With NETGEAR's MA311 802.11b Wireless PCI Adapter, you can effortlessly network any desktop PC and avoid the hassles of traditional Ethernet wiring. This adapter helps you create a wireless network for sharing your broadband cable or DSL Internet access among multiple PCs in and around your home or office.
4. Database access Doctors, nurses, retailers needing mobile database access while in the hospital, retail store or office campus 5. SOHO (Small Office and Home Office) users SOHO users needing easy and quick installation of a small computer network Package Contents The product package should contain: MA311 802.
CHAPTER 2: Installing the Drivers and Utility for Windows 98, Me, 2000, and XP Important: Please install the MA311 drivers and utility BEFORE installing the MA311 hardware. Make sure the MA311 Adapter is NOT plugged into the PCI slot while you are performing the following procedures. NT users: Please see “Chapter 5: Installing the Drivers and Utility for Windows NT” 1. Power ON your computer. Insert the MA311 PCI Adapter Resource CD into the CD-ROM drive.
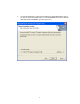
3. The Choose Destination Location screen displays the default Destination Folder. If you want to change the default folder, you can click Browse and choose a different destination folder. Click Next to go to the next screen.
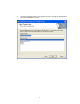
4. The Select Program Folder screen appears. Accept or change the default folder name and click Next to continue.
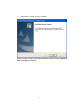
5. Click Finish to complete the utility installation. The next chapter, Chapter 3: Hardware Installation, explains how to complete the MA311 PCI Adapter installation.
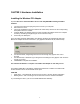
CHAPTER 3: Hardware Installation Installing the Wireless PCI Adapter Important: Be sure to install the MA311 drivers and utility BEFORE installing the MA311 hardware 1. 2. 3. 4. 5. Turn the power OFF and unplug the power cord from your computer. Remove the PC cover. Choose an available PCI slot (PCI slots are the shorter slots) and remove the corresponding back plate from the PC chassis.
CHAPTER 4: Verifying Driver Installation After the utility and the hardware installation are finished, Windows automatically installs the necessary drivers (Windows 98, Me, 2000 or XP). Verifying Driver Installation under Windows 98 1. 2. 3. 4. 5. From the Windows 98 desktop, double-click My Computer. Double-click Control Panel. Double-click the System icon. Click on the Device Manager folder tab. Double-click Network Adapter.
4. Double-click Network Adapter. There should be no yellow exclamation mark or red crosssign on the MA311 PCI Adapter selection. 5. Double-click MA311 PCI Adapter. The Device status window should indicate that the MA311 PCI Adapter is working properly. The installation of the MA311 PCI Adapter driver in Windows XP is complete. Proceed to Chapter 6: Wireless LAN Configuration.
CHAPTER 5: Installing the Drivers and Utility for Windows NT Microsoft Windows NT 4.0 is not a Plug and Play operating system and does not automatically detect and prompt you for installation of the PCI adapter driver. The driver installation has to be initiated manually. Installing Drivers Software for Windows NT 1. 2. 3. 4. 5. 6. Install the MA311 PCI Adapter into your desktop system. (See “Chapter 3: Installing Hardware” steps 1 to 5) Power ON the computer.
7. In the Insert Disk dialog box, enter D:\ or D:\winnt in the field provided, assuming that D: is the driver letter for the CD-ROM drive. Click OK. 8. The Select OEM Option dialog box opens listing two options from which to choose. Select NETGEAR MA311 PCI Adapter and click OK. 9. If other cards in your system use TCP/IP bindings, the Microsoft TCP/IP Properties dialog box will open. Set any necessary TCP/IP configurations and click Close. 10.
3. A list of devices installed in the system will be shown. Scroll down the list to locate the NETGEAR MA311PCI Adapter entry. The PCI adapter entry should indicate that the MA311 PCI Adapter is started. Installation of the MA311 PCI Adapter driver in Windows NT is complete. Continue now to the section below, Installing Utility Software for Windows NT. Important: The I/O Address and IPQ settings should be unique and not conflict with any other device settings in your system.
3. The Choose Destination Location screen displays the default Destination Folder. If you want to change the default folder, you can click Browse and choose a different destination. Click Next to go to the next screen.
4. Click Finish to complete the installation. The MA311 Configuration Utility installation is now complete. Proceed to configuring the wireless parameters.
CHAPTER 6: Wireless LAN Configuration WLAN Configuration Utility A wireless LAN configuration utility program is provided to give you information on your wireless network such as signal quality and link conditions, and to let you modify the various configurable wireless parameters.
You may click on the Advanced button to perform advanced configuration.
For more information on using the XP Wireless Network Configuration utility please refer to Windows XP Help pages. System Tray Applications (for all Windows users) Note: The SysTray (System Tray) resides on one end of the taskbar in the Microsoft Windows desktop. It displays interface icons for memory-resident applications that execute in the background continuously, such as the clock, speaker volume, and virus detection.
WLAN Utility Parameter Modification Double-clicking on the wireless SysTray icon activates the wireless LAN configuration utility for the MA311 PCI Adapter. You can click on any of the folder tabs in the NETGEAR MA311 PCI Adapter Utility dialog box to modify the operational parameters. .
Link Quality Indicates how well the wireless node is communicating with the associated access point or another wireless node. Profile The Profile field allows you to set values for all parameters by selecting a previously defined profile. To create a profile, go to the Profile field, type in a Profile Name and set the corresponding parameters (SSID, WEP, etc.). After changing parameters, Save the profile and click the Activate button to put it into effect.
Transmit Rate Channel Preamble Type Fragmentation Threshold RTS/CTS Threshold the same BSSID. When in Infrastructure mode, this field defines the Extended Service Set ID (ESSID). The ESSID assigned to the wireless node is required to match the access point ESSID for the wireless node to communicate with the access point. Allows you to define the data transfer rate. The default value is Fully Automatic.
Security (WEP) To prevent unauthorized wireless stations from accessing data transmitted over the network, the WLAN Utility offers highly secure data encryption, known as WEP, making your data transmission over air more secure. To activate the WEP Encryption, check the WEP Enabled check box. An Encryption window, as shown above, will appear. The instructions are as follows: 1. Check the box in Enable Encryption (WEP Key) 2.
After entering the WEP keys in the key field, click the OK button and then click the Apply button on the Configuration tab to make the setting take effect. Important: The WEP key must be set up exactly the same on the Wireless LAN stations as they are on the wireless Access Points. Security Enable Encryption (WEP Key) Key Length Key 1 Key 2 Key 3 Key 4 Enables the data encryption for the wireless node.
Site Survey SSID Mac Address Channel Signal WEP Mode SSIDs of each access point that is accessible by this wireless node. Mac Addresses of each access point. Wireless channel used by each access point. Signal strength of each access point to this node. Indicates whether WEP encryption of each access point is enable or disable. Indicates the network mode: Infrastructure or 802.
About About Indicates the release information of the wireless LAN configuration utility software, firmware, and the wireless nodes hardware. Adapter Properties Configuration Device Properties Page When running Windows 98 or Me Wireless parameters for the MA311 PCI Adapter can be modified from the Network control window. 1. 2. From the Windows desktop, right-click the Network Neighborhood icon. When a pop-up menu opens, click on the Properties tab. The Network window opens.
3. A window pops up displaying three folder tabs. Click on the Advanced folder tab. The property screen opens displaying a number of configurable parameters. These parameters are shown in the Device Properties Parameters table 6-1 below. When running Windows 2000 Configuring the network adapter properties for Windows 2000 is different from all other Windows operating systems. 1. 2. 3. From the Windows desktop, right-click My Computer and select Property.
Fragment Threshold Network Type Power Save Mode Preamble Type Transmit Rate RTS Threshold When in Infrastructure mode, this field defines the Extended Service Set ID (ESSID). The ESSID assigned to the wireless node is required to match the access point ESSID in order for the wireless node to communicate with the access point. The default SSID is “Wireless”. Indicates the packet length used for fragmentation. Packets larger than the size programmed in this field will be fragmented.
CHAPTER 7: WIRELESS NETWORK FUNDAMENTALS Wireless Network Configuration Ad-hoc Mode (Peer-to-Peer Workgroup) The Institute of Electrical and Electronics Engineers (IEEE) standard for wireless LANs (WLANs), 802.11, offers two methods for configuring a wireless network — ad-hoc and infrastructure. In an ad-hoc network, computers are brought together as needed; thus, there is no structure, nor are there fixed points to the network — each node can generally communicate with any other node.
Service Set Identification (SSID) The Service Set Identification (SSID) is a thirty-two alphanumeric character (maximum) string identifying the wireless local area network. Some vendors refer to the SSID as network name. For stations to communicate with each other, all stations must be configured with the same SSID. A wireless LAN consisting of nodes operating in ad-hoc configuration without an access point is called a Basic Service Set (BSS).
Wireless Channel Selection IEEE 802.11 wireless nodes communicate with each other using radio frequency signals in the ISM (Industrial, Scientific, and Medical) band between 2.4 GHz and 2.5 GHz. Neighboring channels are 5 MHz apart. However, due to spread spectrum effect of the signals, a node sending signals using a particular channel will utilize frequency spectrum 12.5 MHz above and below the center channel frequency.
APPENDIX A: HARDWARE SPECIFICATIONS General Specifications Radio Data Rate Frequency Range Encryption Bus interface Provided drivers Dimensions Weight Status LEDs Electromagnetic Compliance Environment Specifications Warranty MA311 802.11b Wireless PCI Adapter 1, 2, 5.5, 11 Mbps (Auto Rate Sensing) 2.4 GHz to 2.5 GHz Direct Sequence Spread Spectrum (DSSS) Outdoor environment Indoor environment 1 Mbps - 1476 ft (450 m) 1 Mbps - 656 ft (200 m) 2 Mbps - 885 ft (270 m) 2 Mbps - 426 ft (130 m) 5.
1