White Paper NETGEAR Auto-IP Surveillance Camera and Auto-WiFi VLANs on NETGEAR Switches NETGEAR Auto-IP Surveillance Camera and Auto-WiFi VLANs on NETGEAR Switches White Paper Page 1
White Paper NETGEAR Auto-IP Surveillance Camera and Auto-WiFi VLANs on NETGEAR Switches Table of Contents Introduction ...............................................................................................................................3 Key Terms.....................................................................................................................................3 Steps to configure the NETGEAR Auto-Camera VLAN and Auto-WiFi VLAN feature............................................
White Paper NETGEAR Auto-IP Surveillance Camera and Auto-WiFi VLANs on NETGEAR Switches Introduction Wireless technology and Surveillance IoT have essentially changed the way many administrators and network architects are designing and managing converged networks.
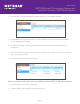
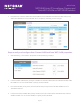
White Paper NETGEAR Auto-IP Surveillance Camera and Auto-WiFi VLANs on NETGEAR Switches 2. Once the user is on the local interface GUI, Select Switching > Auto-VLAN > OUI Table. 3. In the OUIs field, specify the WiFi device or camera OUI prefix to be added in the format AA:BB:CC. You can configure up to 32 OUIs. 4. In the Description field, enter the description for the OUI. The maximum length of description is 32 characters. 5.
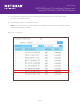
White Paper NETGEAR Auto-IP Surveillance Camera and Auto-WiFi VLANs on NETGEAR Switches 3. If the device is a Camera, select Auto-Camera Mode and click Enable. If the device is WiFi access point, select Auto-WiFi Mode and click Enable. Once completed, click Apply to save changes. Steps to verify and configure Auto-Camera VLAN and Auto-WiFi VLAN properties: 1. Select Switching > Auto-VLAN > Properties. The Properties page displays. 2.
White Paper NETGEAR Auto-IP Surveillance Camera and Auto-WiFi VLANs on NETGEAR Switches 5. From the Auto-Camera priority menu, select the OUI-based priority for the Auto-Camera VLAN from 0 to 7. The default value is 7. 6. Click the Apply button. Your settings are saved Note: If a device connected to a pre-configured Auto-VLAN port and is not on the OUI table, it will be automatically defaulted to VLAN1.
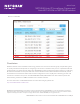
White Paper NETGEAR Auto-IP Surveillance Camera and Auto-WiFi VLANs on NETGEAR Switches Device on OUI table: Conclusion Wireless networks and IP Surveillance technology has become much more technologically complex. Being able to quickly automate the simple task of configuring an IP camera or wireless access point to a specified VLAN will greatly simplify a complex network deployment.