ReadyNAS Ultra, Ultra Plus, NVX, and Pro Series Hardware Manual Models: Ultra 2 Ultra 4 Ultra 6 Ultra 2 Plus Ultra 4 Plus Ultra 6 Plus NVX Pioneer NVX (Business Edition) Pro 2 Pro 4 Pro 6 Pro Pioneer Pro (Business Edition) 350 East Plumeria Drive San Jose, CA 95134 USA July 2011 202-10846-03
ReadyNAS Desktop Storage Systems © 2011 NETGEAR, Inc. All rights reserved. No part of this publication may be reproduced, transmitted, transcribed, stored in a retrieval system, or translated into any language in any form or by any means without the written permission of NETGEAR, Inc. Technical Support Thank you for choosing NETGEAR. To register your product, get the latest product updates, or get support online, visit us at http://support.netgear.com.
Table of Contents Chapter 1 Getting Started Additional Documentation. . . . . . . . . . . . . . . . . . . . . . . . . . . . . . . . . . . . . . . 6 Choosing a Setup Location . . . . . . . . . . . . . . . . . . . . . . . . . . . . . . . . . . . . . 6 System Requirements . . . . . . . . . . . . . . . . . . . . . . . . . . . . . . . . . . . . . . . . . 7 Diskless Units . . . . . . . . . . . . . . . . . . . . . . . . . . . . . . . . . . . . . . . . . . . . . . . .
ReadyNAS Desktop Storage Systems Appendix A Defaults and Technical Specifications Two-Bay Systems . . . . . . . . . . . . . . . . . . . . . . . . . . . . . . . . . . . . . . . . . . . 36 Four-Bay Systems . . . . . . . . . . . . . . . . . . . . . . . . . . . . . . . . . . . . . . . . . . . 38 Six-Bay Systems . . . . . . . . . . . . . . . . . . . . . . . . . . . . . . . . . . . . . . . . . . . . 40 Safety Warnings . . . . . . . . . . . . . . . . . . . . . . . . . . . . . . . . . . . . . . . . . . . . .
1. Getting Started 1 Congratulations on your purchase of a NETGEAR ReadyNAS® storage system. This ReadyNAS Ultra, Ultra Plus, NVX, and Pro Series Hardware Manual describes the physical features of these storage systems.
ReadyNAS Desktop Storage Systems Additional Documentation For detailed information about configuring, managing, and using your storage system, see the appropriate software manual for your unit, as listed in the following table. Model Software Manual Ultra Series: Ultra 2, Ultra 4, Ultra 6 ReadyNAS for Home RAIDiator 4.2.17 Software Manual Ultra Plus Series: Ultra 2 Plus, Ultra 4 Plus, Ultra 6 Plus NVX Pioneer Pro Pioneer NVX (Business Edition) ReadyNAS for Business RAIDiator 4.2.
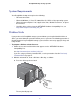
ReadyNAS Desktop Storage Systems System Requirements Your ReadyNAS desktop unit requires the following: • Ethernet connection • Microsoft Windows 7, Vista, XP, 2000, Mac OS, UNIX, or Linux operating system • Microsoft Internet Explorer 7.0+, Apple Safari, 2.0+, Mozilla Firefox 2.0+, or Opera 9.5+ browser • Hard disk drive or drives from the NETGEAR Hardware Compatibility List; see http://www.readynas.com/hard_disk_hcl.
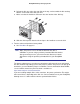
ReadyNAS Desktop Storage Systems b. Pull out the disk tray, place the new disk on the tray, and assemble the disk and tray with the screws that came with your unit. c. Make sure that the hard disk connectors face the interior of the disk bay. d. Slide the disk tray back into the unit and press the handle to secure the disk. 3. Turn the unit on and perform a factory reboot. e. See Boot Menu on page 15. Note: Note: This process erases all data and formats the disk as X-RAID2TM.
2.
ReadyNAS Desktop Storage Systems Front and Side Panels This section describes the front and side panels of ReadyNAS Ultra 2, Ultra 2 Plus, and Pro 2 units. Your unit’s color might vary from the color shown in this manual. 1 8 2 3 4 5 6 7 Figure 1. ReadyNAS Ultra 2, Ultra 2 Plus, and Pro 2 front and side panels 1. Exhaust vents 2. Power button and LED 3. Disk activity LED 4. Disk 1 and disk 2 LEDs 5. USB 3.0 port 6. Backup button 7. USB and backup status LED 8.
ReadyNAS Desktop Storage Systems Drive Bay This section describes the drive bay of ReadyNAS Ultra 2, Ultra 2 Plus, and Pro 2 units. 6 3 4 1 5 3 2 4 Figure 2. ReadyNAS Ultra 2, Ultra 2 Plus, and Pro 2 drive bay 1. Drive bay door 2. Disk bays 3. Recessed disk tray locking mechanism 4. Disk release latch 5. Disk tray latch handle 6.
ReadyNAS Desktop Storage Systems Rear Panel This section describes the rear panel of ReadyNAS Ultra 2, Ultra 2 Plus, and Pro 2 units. 1 2 3 4/5 6/7 8 Figure 3. ReadyNAS Ultra 2, Ultra 2 Plus, and Pro 2 rear panel 1. Exhaust fan 2. Kensington lock 3. Reset button 4. LAN2 gigabit Ethernet port with LED status indicators 5. USB 2.0 port 6. LAN1 gigabit Ethernet port with LED status indicators 7. USB 2.0 port 8.
ReadyNAS Desktop Storage Systems Status Information You can obtain information about the status of your unit by reviewing the indicators listed in the following table. Indicator Description Power button and LED Press this button to turn on the ReadyNAS. The LED has these states: • Blinking. Booting • Blue. Powered on • Off. Powered off Disk LEDs (1, 2) Each disk bay has an LED associated with it on the front panel of the unit. The disk LEDs have these states: • On.
ReadyNAS Desktop Storage Systems Boot Menu Use the boot menu to restart or troubleshoot your ReadyNAS unit. Your unit has the following boot modes: • Normal. Initiates a normal boot process, just like booting using the Power button. • Factory default. Initiates a short disk test that takes approximately 5 minutes, then begins a 10-minute time-out period waiting for RAIDar. During the 10-minute time-out period, the system can be powered off safely without causing any data loss.
ReadyNAS Desktop Storage Systems To access the boot menu: 1. Power off your unit. 2. Using a straightened paper clip, press and hold the Reset button. 3. Press the Power button to power on the unit. 4. Continue to press the Reset button until the Power button LED, USB and backup status LED, disk 1 LED, and disk 2 LED illuminate. 5. Press the Backup button to scroll through boot mode options.
3.
ReadyNAS Desktop Storage Systems Front and Side Panels This section describes the front and side panels of ReadyNAS Ultra 4, Ultra 4 Plus, Pro 4, NVX Pioneer, and NVX (Business Edition) units. Your unit’s color might vary from the color shown in this manual. 2 3 4 5 6 1 7 8 Figure 4. ReadyNAS Ultra 4, Ultra 4 Plus, Pro 4, NVX Pioneer, and NVX (Business Edition) front and side panels 1. Exhaust vents 2. USB 2.0 port 3. Backup button and backup LED 4. Disk LEDs 5. Disk activity LED 6.
ReadyNAS Desktop Storage Systems Drive Bay This section describes the drive bay of ReadyNAS Ultra 4, Ultra 4 Plus, Pro 4, NVX Pioneer, and NVX (Business Edition) units. 6 1 2 3 4 5 3 4 Figure 5. ReadyNAS Ultra 4, Ultra 4 Plus, Pro 4, NVX Pioneer, and NVX (Business Edition) drive bay 1. Drive bay door 2. Disk bays 3. Recessed disk tray locking mechanism 4. Disk release latch 5. Disk tray latch handle 6.
ReadyNAS Desktop Storage Systems Rear Panel This section describes the rear panel of ReadyNAS Ultra 4, Ultra 4 Plus, Pro 4, NVX Pioneer, and NVX (Business Edition) units. 3 4 5 1 2 6 Figure 6. ReadyNAS Ultra 4, Ultra 4 Plus, Pro 4, NVX Pioneer, and NVX (Business Edition) rear panel 1. Exhaust fan 2. Power cable socket 3. Reset button 4. LAN1 and LAN2 gigabit Ethernet ports with LED status indicators 5. USB 2.0 ports 6.
ReadyNAS Desktop Storage Systems Status Information You can obtain information about the status of your unit by reviewing the indicators listed in the following table. Item Description Power button and LED Press this button to turn on the ReadyNAS. The LED has these states: • Blinking. Booting • Blue. Powered on • Off. Powered off Disk LEDs (1, 2, 3, 4) Each disk bay has an LED associated with it, in numerical order from left to right, along the top of the front panel of the unit.
ReadyNAS Desktop Storage Systems System Shutdown You can shut down your unit in two ways: • Using the Power button: • • • Preferred shutdown: • If the status display screen is not lit, press the Power button three times to initiate a graceful shutdown. • If the status display screen is lit, press the Power button two times to initiate a graceful shutdown. Forced shutdown. If the unit is hung, press the Power button and hold for 5 seconds to force shutdown. Using FrontView.
ReadyNAS Desktop Storage Systems WARNING! Use the skip volume check boot mode only when instructed to do so by a NETGEAR Technical Support representative, otherwise data loss might occur. • Memory test. Performs a memory test. The pass or fail result is reported on the status display screen. • Disk test. Performs an offline full disk test. This can take 4 hours or more depending on the size of your disks. Any problems are reported on the status display screen or in the RAIDar discovery tool.
4.
ReadyNAS Desktop Storage Systems Front and Side Panels This section describes the front and side panels of ReadyNAS Ultra 6, Ultra 6 Plus, Pro 6, Pro Pioneer, and Pro (Business Edition) units. Your unit’s color might vary from the color shown in this manual. 7 1 2 6 3 4 5 Figure 7. ReadyNAS Ultra 6, Ultra 6 Plus, Pro 6, Pro Pioneer, and Pro (Business Edition) front and side panels 1. Exhaust vent 2. Power button and LED 3. USB and backup status LED 4. Backup button 5. USB 2.0 port 6.
ReadyNAS Desktop Storage Systems Drive Bay This section describes the drive bay of ReadyNAS Ultra 6, Ultra 6 Plus, Pro 6, Pro Pioneer, and Pro (Business Edition) units. 5 3 4 6 3 1 2 4 Figure 8. ReadyNAS Ultra 6, Ultra 6 Plus, Pro 6, Pro Pioneer, and Pro (Business Edition) drive bay 1. Drive bay door 2. Disk bays 3. Recessed disk tray locking mechanism 4. Disk release latch 5. Disk tray latch handle 6.
ReadyNAS Desktop Storage Systems Rear Panel This section describes the rear panel of ReadyNAS Ultra 6, Ultra 6 Plus, Pro 6, Pro Pioneer, and Pro (Business Edition) units. 1 3 4 5 6 2 7 8 Figure 9. ReadyNAS Ultra 6, Ultra 6 Plus, Pro 6, Pro Pioneer, and Pro (Business Edition) rear panel 1. Exhaust fan 2. PSU exhaust fan 3. USB 2.0 ports 4. Reset button 5. LAN1 and LAN2 gigabit Ethernet ports with LED status indicators 6. Kensington lock 7. Power switch 8.
ReadyNAS Desktop Storage Systems Status Information You can obtain information about the status of your unit by reviewing the indicators listed in the following table. Item Description Power button and LED Press this button to boot the ReadyNAS. The LED has these states: • Blinking. Booting • Blue. Powered on • Off. Powered off Disk icons (1, 2, 3, 4, 5, 6) Disk icons are located on the status display screen. The disk icons have these states: • Empty box. No disk is installed in that bay.
ReadyNAS Desktop Storage Systems System Shutdown You can shut down your unit in these ways: • Using the Power button: • • • Preferred shutdown: • If the status display screen is not lit, press the Power button three times initiate a graceful shutdown. • If the status display screen is lit, press the Power button two times to initiate a graceful shutdown. Forced shutdown. If the unit is hung, press the Power button and hold for 5 seconds to force shutdown. Using FrontView.
ReadyNAS Desktop Storage Systems WARNING! Use the skip volume check boot mode only when instructed to do so by a NETGEAR Technical Support representative, otherwise data loss might occur. • Memory test. Performs a memory test. The pass or fail result is reported on the status display screen. • Disk test. Performs an offline full disk test. This can take 4 hours or more depending on the size of your disks. Any problems are reported on the status display screen or in the RAIDar discovery tool.
5. Disks 5 Use only supported disks in your ReadyNAS storage system. If you use unsupported disks, NETGEAR Technical Support will not provide assistance. For a list of supported disks, see the NETGEAR Hardware Compatibility List at http://www.readynas.com/hard_disk_hcl. For information about configuring disks, see the appropriate software manual for your unit. Manuals are available at http://www.readynas.com/documentation.
ReadyNAS Desktop Storage Systems Previously Formatted Disks You must take care when using previously formatted disks in your ReadyNAS unit, as described in the following table. Unit Status Precaution ReadyNAS unit has no disks (diskless) Turn the unit off and insert the disk as described in Diskless Units on page 7.
ReadyNAS Desktop Storage Systems Adding a Disk You can add a hard disk to an empty disk bay. You do not need to shut down your unit before adding a disk. If you are adding previously formatted disks to your unit, see the precautions in Previously Formatted Disks on page 31. To add a disk: 1. Press the disk tray release latch. The tray handle pops out. 2. Pull out the disk tray and place the new disk on the tray. Make sure that the hard disk connectors face the interior of the disk bay. 3.
ReadyNAS Desktop Storage Systems Failed Disk Notification If a disk fails in your ReadyNAS, you are notified by email. Email alerts must be set up for notifications to be sent. In addition, FrontView provides information about the failed disk. NETGEAR recommends replacing a failed disk with the same disk model. Use FrontView to determine the disk vendor and model used in your unit.
ReadyNAS Desktop Storage Systems 3. Make sure that the hard disk connectors face the interior of the disk bay. 4. Slide the disk tray back into the unit and press the handle to secure the disk. The volume automatically synchronizes with the new disk in the background. This could take several hours depending on the disk size. You can continue to use your ReadyNAS, although access is slower until the volume synchronization finishes. You are notified by email when the process is complete.
A.
ReadyNAS Desktop Storage Systems Two-Bay Systems The following table lists factory default settings for ReadyNAS Ultra 2, Ultra 2 Plus, and Pro 2 storage systems. Feature Default Login User login URL when the ReadyNAS is not connected to a DHCP server https://192.168.168.
ReadyNAS Desktop Storage Systems Physical dimensions (h x w x d): • 142 x 101 x 220 mm • 5.60 x 3.98 x 8.70 in Physical weight: • 2.07 kg / 4.56 lb without disks Power consumption: • 38 W (with 2 x 2 TB disks) Electrical: • Input: DC 12.
ReadyNAS Desktop Storage Systems Four-Bay Systems The following table lists factory default settings for ReadyNAS Ultra 4, Ultra 4 Plus, Pro 4 NVX Pioneer, and NVX (Business Edition) storage systems. Feature Default Login User login URL when the ReadyNAS is not connected to a DHCP server https://192.168.168.
ReadyNAS Desktop Storage Systems Physical dimensions (h x w x d): • 200 x 132 x 222 mm • 7.9 x 5.2 x 8.7 in Physical weight: • 4.70 kg / 10.
ReadyNAS Desktop Storage Systems Six-Bay Systems The following table lists factory default settings for ReadyNAS Ultra 6, Ultra 6 Plus, Pro 6, Pro Pioneer, and Pro (Business Edition) storage systems. Feature Default Login User login URL when the ReadyNAS is not connected to a DHCP server https://192.168.168.
ReadyNAS Desktop Storage Systems Physical dimensions (h x w x d): • 250 x 170 x 285 mm • 10.0 x 6.7 x 11.2 in Physical weight: • 7.30 kg / 16.
ReadyNAS Desktop Storage Systems Safety Warnings 1. The equipment contains no operator access areas and is certified for installation only by trained personnel, according to the installation instructions provided with each unit. 2. Install the socket outlet near the equipment in an easily accessible location. 3. Observe the on-board battery precautions. DANGER: RISK OF EXPLOSION IF BATTERY IS REPLACED BY AN INCORRECT TYPE. DISPOSE OF USED BATTERIES ACCORDING TO THEIR INSTRUCTIONS. 4.
ReadyNAS Desktop Storage Systems General Safety Precautions Follow these rules to ensure general safety: • Keep the area around the ReadyNAS clean and free of clutter. • See the technical specifications in this manual for details about your specific ReadyNAS Ultra unit. • Replace the on-board battery only with the same battery or an equivalent type of battery recommended by the manufacturer. Dispose of used batteries according to the manufacturer's instructions.
B. Compliance Notification B Regulatory Compliance Information This section includes user requirements for operating this product in accordance with National laws for usage of radio spectrum and operation of radio devices. Failure of the end-user to comply with the applicable requirements may result in unlawful operation and adverse action against the end-user by the applicable National regulatory authority.
ReadyNAS Desktop Storage Systems Operation is subject to the following two conditions: • This device may not cause harmful interference, and • This device must accept any interference received, including interference that may cause undesired operation. FCC Radio Frequency Interference Warnings & Instructions This equipment has been tested and found to comply with the limits for a Class B digital device, pursuant to Part 15 of the FCC Rules.
Index B E battery 42 boot menu NVX (Business Edition) 21 NVX Pioneer 21 Pro 14 Pro (Business Edition) 28 Pro 4 21 Pro 6 28 Pro Pioneer 28 Ultra 2 14 Ultra 2 Plus 14 Ultra 4 21 Ultra 4 Plus 21 Ultra 6 28 Ultra 6 Plus 28 electrical safety 42 electrostatic discharge 43 email alerts 33 ESD 43 F factory default settings 36, 38, 40 failed disk 33 FCC 44 front panel NVX (Business Edition) 17 NVX Pioneer 17 Pro (Business Edition) 24 Pro 2 10 Pro 4 17 Pro 6 24 Pro Pioneer 24 Ultra 2 10 Ultra 2 Plus 10 Ultra 4 17
ReadyNAS Desktop Storage Systems Ultra 2 Plus 13 Ultra 4 20 Ultra 4 Plus 20 Ultra 6 27 Ultra 6 Plus 27 location, unit 6 Ultra 2 13 Ultra 2 Plus 13 Ultra 4 21 Ultra 4 Plus 21 Ultra 6 28 Ultra 6 Plus 28 side panel NVX (Business Edition) 17 NVX Pioneer 17 Pro (Business Edition) 24 Pro 2 10 Pro 4 17 Pro 6 24 Pro Pioneer 24 Ultra 2 10 Ultra 2 Plus 10 Ultra 4 17 Ultra 4 Plus 17 Ultra 6 24 Ultra 6 Plus 24 socket outlet 42 status information 13 NVX (Business Edition) 20 NVX Pioneer 20 Pro (Business Edition) 27 Pr
ReadyNAS Desktop Storage Systems Ultra 2 13 Ultra 2 Plus 13 Ultra 4 20 Ultra 4 Plus 20 Ultra 6 27 Ultra 6 Plus 27 T technical specifications 36, 38, 40 technical support 2 trademarks 2 troubleshooting with boot menu NVX (Business Edition) 21 NVX Pioneer 21 Pro (Business Edition) 28 Pro 2 14 Pro 4 21 Pro 6 28 Pro Pioneer 28 Ultra 2 14 Ultra 2 Plus 14 Ultra 4 21 Ultra 4 Plus 21 Ultra 6 28 Ultra 6 Plus 28 U unit location 6 V volume synchronization 8, 32 48