N150 Wireless ADSL2+ Modem Router DGN1000v3 User Manual August 2013 202-11177-01 350 East Plumeria Drive San Jose, CA 95134 USA
N150 Wireless ADSL2+ Modem Router DGN1000v3 Support Thank you for selecting NETGEAR products. After installing your device, locate the serial number on the label of your product and use it to register your product at https://my.netgear.com. You must register your product before you can use NETGEAR telephone support. NETGEAR recommends registering your product through the NETGEAR website. For product updates and web support, visit http://support.netgear.com. Phone (US & Canada only): 1-888-NETGEAR.
Contents Chapter 1 Hardware Setup Unpack Your Modem Router . . . . . . . . . . . . . . . . . . . . . . . . . . . . . . . . . . . . 8 Hardware Features. . . . . . . . . . . . . . . . . . . . . . . . . . . . . . . . . . . . . . . . . . . . 9 Front Panel . . . . . . . . . . . . . . . . . . . . . . . . . . . . . . . . . . . . . . . . . . . . . . . . 9 Back Panel . . . . . . . . . . . . . . . . . . . . . . . . . . . . . . . . . . . . . . . . . . . . . . . 11 Side Panel with Restore Factory Settings Button. . .
N150 Wireless ADSL2+ Modem Router DGN1000v3 Security Options: WPA-PSK, WPA2-PSK, and WPA-PSK + WPA2-PSK Mixed Mode . . . . . . . . . . . . . . . . . . . . . . . . . . 33 Security Options: WPA/WPA2 Enterprise . . . . . . . . . . . . . . . . . . . . . . . 34 Security Options: WEP . . . . . . . . . . . . . . . . . . . . . . . . . . . . . . . . . . . . . . 35 Set Up a Guest Network. . . . . . . . . . . . . . . . . . . . . . . . . . . . . . . . . . . . . . . 37 View Attached Devices. . . . . . . . . . . . . . .
N150 Wireless ADSL2+ Modem Router DGN1000v3 Restore Configuration Settings. . . . . . . . . . . . . . . . . . . . . . . . . . . . . . . .85 Erase the Current Configuration Settings . . . . . . . . . . . . . . . . . . . . . . . .85 Change the Password . . . . . . . . . . . . . . . . . . . . . . . . . . . . . . . . . . . . . . . .85 Password Recovery . . . . . . . . . . . . . . . . . . . . . . . . . . . . . . . . . . . . . . . . . .86 Perform Diagnostics . . . . . . . . . . . . . . . . . . . . . . . . . . .
N150 Wireless ADSL2+ Modem Router DGN1000v3 Check Ethernet Cable Connections . . . . . . . . . . . . . . . . . . . . . . . . . . . 133 Wireless Settings . . . . . . . . . . . . . . . . . . . . . . . . . . . . . . . . . . . . . . . . . 133 Network Settings . . . . . . . . . . . . . . . . . . . . . . . . . . . . . . . . . . . . . . . . . 133 Troubleshoot with the LEDs . . . . . . . . . . . . . . . . . . . . . . . . . . . . . . . . . . . 134 Power LED Is Off . . . . . . . . . . . . . . . . . . . . . . . . . .
1. Hardware Setup Get t o kno w yo ur mo dem r out er 1 The NETGEAR® N150 Wireless ADSL2+ Modem Router DGN1000v3, going forward in this manual referred to as the modem router, provides an easy and secure way to set up a wireless home network with fast access to the Internet. You need to connect the modem router to a high-speed digital subscriber line (DSL).
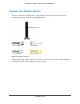
N150 Wireless ADSL2+ Modem Router DGN1000v3 Unpack Your Modem Router Your box contains the following items. In the unlikely event that any parts are incorrect, missing, or damaged, contact your NETGEAR dealer. N150 Modem Router Power adapter Filter/splitter Phone cable Ethernet cable Figure 1. Package contents Your package might contain more items. The filter, phone cable, or splitter provided depends on the region, and in some locations, a CD is included.
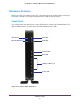
N150 Wireless ADSL2+ Modem Router DGN1000v3 Hardware Features Before you cable your modem router, take a moment to become familiar with the front panel, back panel, and label. Pay particular attention to the LEDs on the front panel. Front Panel The modem router front panel has the status LEDs that are shown in the following figure. The WiFi and WPS buttons are to the left of the WiFi and WPS status LEDs.
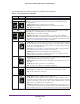
N150 Wireless ADSL2+ Modem Router DGN1000v3 The following table describes the buttons and LEDs on the front panel. Table 1. Front panel buttons and LEDs Button LED Description WPS Pressing the WPS button lets you use Wi-Fi Protected Setup (WPS) to join the network (see Wi-Fi Protected Setup Method on page 21). The WPS LED has the following behavior: • Solid green. Wireless security has been enabled. • Blinking green. A WPS-capable device is connecting to the device. • Off. WPS is not enabled.
N150 Wireless ADSL2+ Modem Router DGN1000v3 Back Panel The back panel has the buttons and port connections as shown in the following figure. ADSL port Ethernet LAN ports Power adapter input On/Off button Figure 3.
N150 Wireless ADSL2+ Modem Router DGN1000v3 Side Panel with Restore Factory Settings Button You can return the modem router to its factory settings. On the right panel of the modem router, use the end of a paper clip or some other similar object to press and hold the Restore Factory Settings button for at least seven seconds. The modem router resets and returns to the factory settings. Restore Factory Settings button Figure 4.
N150 Wireless ADSL2+ Modem Router DGN1000v3 Bottom Panel The label on the bottom panel of the modem router shows the preset login information, MAC address, and serial number. MAC address Serial number WiFi network name Password Figure 5. Label on the bottom panel of the modem router Position Your Modem Router The modem router lets you access your network from virtually anywhere within the operating range of your wireless network.
N150 Wireless ADSL2+ Modem Router DGN1000v3 ADSL Microfilters If this is the first time you have cabled a modem router between a DSL phone line and your computer or laptop, you might not be familiar with ADSL microfilters. If you are, you can skip this section and proceed to Cable Your Modem Router on page 15. An ADSL microfilter is a small inline device that filters DSL interference out of standard phone equipment that shares the same line with your DSL service.
N150 Wireless ADSL2+ Modem Router DGN1000v3 Plugs into the DSL line Figure 7. Two-line ADSL microfilter with built-in splitter Summary • One-line ADSL microfilter. Use with a phone or fax machine. • Splitter. Use with a one-line ADSL microfilter to share an outlet with a phone and the modem router. • Two-line ADSL microfilter with built-in splitter. Use to share an outlet with a phone and the modem router. Cable Your Modem Router Use a DSL Internet connection.
2. Getting Started C onnec t to th e mo de m r out er 2 This chapter explains how to use NETGEAR genie® to set up your modem router after you complete cabling as described in the installation guide and in the previous chapter.
N150 Wireless ADSL2+ Modem Router DGN1000v3 Modem Router Setup Preparation You can set up your modem router with the NETGEAR genie automatically, or you can use the genie menus and screens to set up your modem router manually. Before you start the setup process, get your ISP information and make sure the computers and devices in the network have the settings described here.
N150 Wireless ADSL2+ Modem Router DGN1000v3 NETGEAR genie Setup NETGEAR genie runs on any device with a web browser. To use NETGEAR genie to set up your modem router: 1. Turn on the modem router by pressing the On/Off button. 2. Make sure that your computer or wireless device is connected to the modem router with an Ethernet cable (wired) or wirelessly with the preset security settings listed on the product label. 3. Launch your Internet browser.
N150 Wireless ADSL2+ Modem Router DGN1000v3 If the modem router does not connect to the Internet: 1. Review your settings to be sure that you have selected the correct options and typed everything correctly. 2. Contact your ISP to verify that you have the correct configuration information. 3. Read Chapter 8, Troubleshooting. If problems persist, register your NETGEAR product and contact NETGEAR technical support.
N150 Wireless ADSL2+ Modem Router DGN1000v3 After the update, the modem router restarts. For more information, see Update the Modem Router Firmware on page 74. Dashboard (BASIC Home Screen) The modem router BASIC Home screen has a dashboard that lets you see the status of your Internet connection and network at a glance. You can click any of the six sections of the dashboard to view and change the settings. The left column has menus. You can use the ADVANCED tab to access more menus and screens.
N150 Wireless ADSL2+ Modem Router DGN1000v3 Join Your Wireless Network You can use the manual or the WPS method to join your wireless network. For instructions about how to set up a guest network, see Set Up a Guest Network on page 37. Manual Method With the manual method, choose the network that you want and type its password to connect. To connect manually: 1. On your computer or wireless device, open the software that manages your wireless connections.
N150 Wireless ADSL2+ Modem Router DGN1000v3 NETGEAR genie App and Mobile genie App The genie app is the easy dashboard for managing, monitoring, and repairing your home network. See the NETGEAR genie App User Manual for details about the genie apps. Retrieve wireless password About genie Language Menu Dashboard (Click to view details) Support Figure 10. genie app dashboard The genie app can help you with the following: • Automatically repair common wireless network problems.
3.
N150 Wireless ADSL2+ Modem Router DGN1000v3 xDSL Setup NETGEAR recommends that you use the Setup Wizard to detect the DSL connection and automatically set up the modem router (see Internet Connection Setup Wizard on page 41). If you have technical experience and are sure of the correct DSL mode, multiplexing method, and virtual circuit number for the virtual path identifier (VPI) and virtual channel identifier (VCI), you can specify those settings on the xDSL Setup screen.
N150 Wireless ADSL2+ Modem Router DGN1000v3 Internet Setup NETGEAR recommends that you use the Setup Wizard to detect the Internet connection and automatically set up the modem router (see Internet Connection Setup Wizard on page 41). You can view or change the basic ISP information on the Internet Setup screen. To view or change the basic Internet setup: 1. From the Home screen, select Internet.
N150 Wireless ADSL2+ Modem Router DGN1000v3 2. Select the Yes or No radio button. • Yes. Select the encapsulation method and enter the login name. If you want to change the login time-out, enter a new value in minutes. • No. Enter the account and domain names, only if needed. 3. Enter the settings for the IP address and DNS server. The default settings usually work fine. If you have problems with your connection, check the ISP settings. 4. Click the Apply button. Your settings are saved. 5.
N150 Wireless ADSL2+ Modem Router DGN1000v3 Internet Setup Screen Fields: Login Required These fields display only when your ISP requires a login, that is, when you select the Yes radio button. • Encapsulation. The choices are PPPoE or PPPoA. • Login. The login name provided by your ISP. This login name is often an email address. • Password. The password that you use to log in to your ISP. • Service Name (if Required). If your ISP provided a service name, enter it here. • Connection Mode.
N150 Wireless ADSL2+ Modem Router DGN1000v3 • Use This MAC Address. Enter the MAC address that you want to use. NAT (Network Address Translation). NAT allows computers on your home network to share the modem router Internet connection. NAT is enabled by default because it is needed in most situations. The following settings are available: • Enable. • Disable.
N150 Wireless ADSL2+ Modem Router DGN1000v3 After installation, Live Parental Controls automatically starts. 4. Click the Next button, read the note, and click the Next button again to proceed. Because Live Parental Controls uses free OpenDNS accounts, you are prompted to log in or create a free account. 5. Select the radio button that applies to you and click the Next button. • If you already have an OpenDNS account, leave the Yes radio button selected.
N150 Wireless ADSL2+ Modem Router DGN1000v3 After you log on or create your account, the filtering level screen displays: 6. Select the radio button for the filtering level that you want and click the Next button. 7. Click the Take me to the status screen button. Parental controls are now set up for the modem router. The dashboard shows Parental Controls as Enabled. Basic Wireless Settings The Wireless Settings screen lets you view or configure the wireless network setup.
N150 Wireless ADSL2+ Modem Router DGN1000v3 If you use a wireless computer to change the wireless network name (SSID) or other wireless security settings, you are disconnected when you click the Apply button. To avoid this problem, use a computer with a wired connection to access the modem router. To view or change basic wireless settings: 1. Select BASIC > Wireless. The screen sections, settings, and procedures are explained in the following sections. 2. Change the settings as needed. 3.
N150 Wireless ADSL2+ Modem Router DGN1000v3 Wireless Settings Screen Fields You can use this screen to view or change the wireless network settings and the security option. • Enable SSID Broadcast. This feature allows the modem router to broadcast its SSID so wireless stations can see this wireless name (SSID) in their scanned network lists. This check box is selected by default. To turn off the SSID broadcast, clear this check box, and click the Apply button. • Enable Wireless Isolation.
N150 Wireless ADSL2+ Modem Router DGN1000v3 Security Options: WPA-PSK, WPA2-PSK, and WPA-PSK + WPA2-PSK Mixed Mode WPA encryption is built into all hardware that has the Wi-Fi-certified seal. This seal means that the product is authorized by the Wi-Fi Alliance (http://www.wi-fi.org/) because it complies with the worldwide single standard for high-speed wireless local area networking.
N150 Wireless ADSL2+ Modem Router DGN1000v3 The passphrase is a text string from 8 to 63 ASCII characters or exactly 64 hexadecimal digits. A hexadecimal digit is one of the following characters: 0, 1, 2, 3, 4, 5, 6, 7, 8, 9, A, B, C, D, E, and F (uppercase or lowercase). Wireless clients need to use the passphrase to access the wireless network through the modem router. 4. Click the Apply button.
N150 Wireless ADSL2+ Modem Router DGN1000v3 3. Select the WPA mode: • WPA [TKIP] • WPA2 [AES] • WPA [TKIP] + WPA2 [AES] 4. Type the IP address of the RADIUS server. The address can be on your LAN or it can be an external address. 5. Enter the port number for the RADIUS server in the range from 1 to 6553. The default number is 1812. 6. Type the shared secret, which needs to be between 1 and 128 characters. The default value is blank. The shared secret is case-sensitive. 7. Click the Apply button.
N150 Wireless ADSL2+ Modem Router DGN1000v3 3. From the Authentication Type menu, select one of the following types: • Shared Key. Clients can use only shared key authentication. • Automatic. Client can use either open system or shared key authentication. 4. From the Encryption Strength menu, select the encryption key size: • 64-bit. Standard WEP encryption, using 40/64-bit encryption. • 128-bit. Standard WEP encryption, using 104/128-bit encryption. This selection provides higher encryption security.
N150 Wireless ADSL2+ Modem Router DGN1000v3 Set Up a Guest Network Adding a guest network allows visitors at your home to use the Internet without using your wireless security key. You can set up to three guest networks, all of which can be active at a same time. However, if all three guest networks are active, only one is displayed on the Router Status screen (see View Router Status on page 76). By default, none of the guest networks are enabled. To set up a guest network: 1.
N150 Wireless ADSL2+ Modem Router DGN1000v3 • Enable Wireless Isolation. If this check box is selected, wireless computers or devices that join the network can use the Internet but cannot access each other or access Ethernet devices on the network. 4. (Optional) Change the name of the guest network. The default names are NETGEAR-Guest1, NETGEAR-Guest2, and NETGEAR-Guest3. The guest network name is case-sensitive and can be up to 32 characters.
N150 Wireless ADSL2+ Modem Router DGN1000v3 • MAC Address. The unique MAC address for each device does not change. The MAC address is typically shown on the product label. • Device Name. If the device name is known, it is shown here. 2. (Optional) Click the Refresh button. The information onscreen is updated.
4. NETGEAR genie ADVANCED Home S pecify cu sto m se ttings 4 This chapter contains the following sections: • NETGEAR genie ADVANCED Home Screen • Internet Connection Setup Wizard • WAN Setup • LAN Setup • WPS Wizard for WiFi Connections • QoS Setup The following selections on the ADVANCED Home screen are described in separate chapters: • Security. See Chapter 5, Security. • Administration. See Chapter 6, Administration. • Advanced Setup. See Chapter 7, Advanced Settings.
N150 Wireless ADSL2+ Modem Router DGN1000v3 NETGEAR genie ADVANCED Home Screen The genie ADVANCED Home dashboard presents status information. The content is the same as what is on the Router Status screen available from the Administration menu. For more information about the fields on the screen, see View Router Status on page 76.
N150 Wireless ADSL2+ Modem Router DGN1000v3 To use the Setup Wizard: 1. Select ADVANCED > Setup Wizard. 2. From the Country menu, select your location. Note: If you have purchased the modem router in the US, you cannot change the country, and the selection is fixed at the US. 3. Select the Yes radio button. If you select No, you are taken to the Internet Setup screen (see Internet Setup on page 25). 4. Click the Next button.
N150 Wireless ADSL2+ Modem Router DGN1000v3 • Wireless Setup. This is a shortcut to the same Wireless Settings screen that you can access from the dashboard on the BASIC Home screen. For information, see Basic Wireless Settings on page 30. • Guest Network. This is a shortcut to the same Guest Network screen that you can access from the dashboard on the BASIC Home screen. For information, see Set Up a Guest Network on page 37. • WAN Setup. Internet (WAN) setup.
N150 Wireless ADSL2+ Modem Router DGN1000v3 firewall security less effective. For more information, see the following section, Default DMZ Server. • Respond to Ping on Internet Port. If you want the modem router to respond to a ping from the Internet, select this check box. Use this feature only as a diagnostic tool because it allows your modem router to be discovered. Do not select this check box unless you have a specific reason. • Disable IGMP Proxying.
N150 Wireless ADSL2+ Modem Router DGN1000v3 Default DMZ Server The default DMZ server feature is helpful when you are using some online games and videoconferencing applications that are incompatible with Network Address Translation (NAT). The modem router is programmed to recognize some of these applications and to work correctly with them, but other applications might not function well.
N150 Wireless ADSL2+ Modem Router DGN1000v3 These web-based applications might require an MTU change: - A secure website that does not open, or displays only part of a web page - Yahoo email - MSN portal - America Online’s DSL service • You use VPN and have severe performance problems. • You used a program to optimize MTU for performance reasons, and now you have connectivity or performance problems. Note: An incorrect MTU setting can cause Internet communication problems.
N150 Wireless ADSL2+ Modem Router DGN1000v3 LAN Setup The LAN Setup screen allows configuration of LAN IP services such as Dynamic Host Configuration Protocol (DHCP) and Routing Information Protocol (RIP). The modem router is shipped preconfigured to use private IP addresses on the LAN side and to act as a DHCP server. The modem router’s default LAN IP configuration is: • LAN IP address. 192.168.0.1 • Subnet mask. 255.255.255.
N150 Wireless ADSL2+ Modem Router DGN1000v3 LAN Setup Screen Settings The following settings are available. Device Name By default, the device name is DGN1000v3, which is the modem router model. You can change the device name to another name. LAN TCP/IP Setup • IP Address. The LAN IP address of the modem router. By default the LAN IP address is 192.168.0.1. • IP Subnet Mask. The LAN subnet mask of the modem router. By default the IP subnet mask is 255.255.255.0.
N150 Wireless ADSL2+ Modem Router DGN1000v3 For more information, see Set Up Address Reservation on page 50. Specify DHCP Server Settings By default, the modem router functions as a DHCP server. The modem router assigns IP, DNS server, and default gateway addresses to all computers connected to the LAN. The assigned default gateway address is the LAN address of the modem router. The modem router assigns IP addresses to the attached computers from a pool of addresses specified on the LAN Setup screen.
N150 Wireless ADSL2+ Modem Router DGN1000v3 2. Clear the Use Router as DHCP Server check box. 3. Click the Apply button. Your settings are saved. 4. (Optional) If there is no other DHCP server on your network, set your computers’ IP addresses manually so that they can access the modem router. Set Up Address Reservation When you specify a reserved IP address for a computer on the LAN, that computer always receives the same IP address each time it accesses the modem router’s DHCP server.
N150 Wireless ADSL2+ Modem Router DGN1000v3 The reserved address is not assigned until the next time the computer contacts the modem router’s DHCP server. Reboot the computer, or access its IP configuration and force a DHCP release and renew. To change a reserved address entry: 1. Select ADVANCED > Setup > LAN Setup. The LAN Setup screen displays. 2. In the Address Reservation Table, select the radio button next to the reserved address that you want to change. 3. Click the Edit button. 4.
N150 Wireless ADSL2+ Modem Router DGN1000v3 The following screen lets you select the method for adding the WPS client (a wireless device or computer). 3. Select the radio button for the setup method that you want to use, and follow the steps. • Push Button. a. Either click the WPS button on this screen, or press the WPS button on the front of the modem router. • b. Within two minutes, go to the wireless client and press its WPS button to join the network without entering a password. PIN Number.
N150 Wireless ADSL2+ Modem Router DGN1000v3 QoS Setup Quality of Service (QoS) is an advanced feature that can be used to prioritize some types of traffic ahead of others. The modem router can provide QoS prioritization over the wireless link and on the Internet connection. You use the QoS Setup screen to set up QoS features. The following sections describe the QoS features.
N150 Wireless ADSL2+ Modem Router DGN1000v3 Quality of Service Priority Rules and Internet Access You can give prioritized Internet access to the following types of traffic: • Specific applications • Specific online games • Individual Ethernet LAN ports of the modem router • A specific device by MAC address To specify prioritization of traffic, you need to create a policy for the type of traffic and add the policy to the QoS Policy table on the QoS Setup screen.
N150 Wireless ADSL2+ Modem Router DGN1000v3 2. Click the Setup QoS rule button. All preconfigured QoS rules are displayed in a table, along with their priority (Highest, High, Normal, or Low) and a description: 3. Select the radio button next to the QoS policy that you want to view or change. 4. Click the Edit button. The QoS - Priority Rules screen displays. 5. Change the policy settings.
N150 Wireless ADSL2+ Modem Router DGN1000v3 6. On the QoS - Priority Rules screen, click the Apply button. Your changes are saved in the table on the QoS Setup screen. To delete a QoS rule: 1. Select ADVANCED > Setup > QoS Setup. The QoS Setup screen displays. 2. Click the Setup QoS rule button. All preconfigured QoS rules are displayed in a table, along with their priority (Highest, High, Normal, or Low) and a description. 3. Select the radio button next to the QoS policy that you want to delete.
N150 Wireless ADSL2+ Modem Router DGN1000v3 The screen adjusts: • On-line gaming. The On-line gaming menu lets you select existing games, but scroll down to the bottom of the menu to select Add a new game. The screen adjusts: 5. In the QoS Policy for field, type a descriptive name for the new application or game. 6. From the Priority menu, select the priority that this traffic needs to receive relative to other applications and traffic when accessing the Internet: Select Highest, High, Normal, or Low.
N150 Wireless ADSL2+ Modem Router DGN1000v3 Create a QoS Rule for a Modem Router LAN Port To create a QoS policy for a device connected to one of the modem router’s LAN ports: 1. Select ADVANCED > Setup > QoS Setup. The QoS Setup screen displays. 2. Click the Setup QoS rule button. The existing QoS rules display. 3. Click the Add Priority Rule button. The QoS - Priority Rules screen displays. 4. From the Priority Category menu, select Ethernet LAN Port. The screen adjusts: 5.
N150 Wireless ADSL2+ Modem Router DGN1000v3 4. From the Priority Category menu, select MAC Address. The screen adjusts: 5. In the QoS Policy for field, type a descriptive name for the new policy. 6. If the device for which you want to create a QoS policy is displayed in the MAC Device List, select its radio button. The information from the MAC Device List populates the QoS Policy (that is, the policy name), MAC Address, and Device Name fields. 7.
N150 Wireless ADSL2+ Modem Router DGN1000v3 The MAC Device List displays. 5. Select the radio button next to the device that you want to change. 6. Change the MAC address, device name, or priority. 7. Click the Edit button. Note: You cannot edit a device that was detected by the modem router and automatically added to the MAC Device List. The device information is saved in the MAC Device List. To remove a MAC address from the MAC Device List: 1. Select ADVANCED > Setup > QoS Setup.
N150 Wireless ADSL2+ Modem Router DGN1000v3 To set the maximum uplink bandwidth: 1. Select ADVANCED > Setup > QoS Setup. 2. Select the Turn Bandwidth Control On check box. 3. Select the Automatically check Internet Uplink bandwidth radio button. 4. Click the Check button. The modem router detects the available uplink bandwidth. After about one minute, the available bandwidth displays onscreen. This information can help you to determine the maximum bandwidth setting that you want to allow. 5.
5. Security Keep u nwa nted content out of your net work 5 This chapter explains how to use the basic firewall features of the modem router to prevent objectionable content from reaching the computers and devices on your network.
N150 Wireless ADSL2+ Modem Router DGN1000v3 Keyword Blocking of HTTP Traffic Use keyword blocking to prevent certain types of HTTP traffic from accessing your network. By default, keyword blocking is disabled. The blocking can be always or according to a schedule. To set up keyword blocking: 1. Select ADVANCED > Security > Block Sites. 2. Select one of the keyword blocking options: • Per Schedule. Turn on keyword blocking according to the Schedule screen settings.
N150 Wireless ADSL2+ Modem Router DGN1000v3 6. Click the Apply button. Your settings are saved. To delete a keyword or domain: 1. Select ADVANCED > Security > Block Sites. The Block Sites screen displays. 2. From the keyword list, select the keyword or domain that you want to remove. 3. Click the Delete Keyword button. 4. Click the Apply button. Your settings are saved. To remove all keywords and domains: 1. Select ADVANCED > Security > Block Sites. The Block Sites screen displays. 2.
N150 Wireless ADSL2+ Modem Router DGN1000v3 You can add rules to further restrict the outbound communications or more widely open the inbound communications. Exceptions can be based on the service or application, source or destination IP addresses, and time of day. You can log traffic that matches or does not match the rule and change the order of rule precedence.
N150 Wireless ADSL2+ Modem Router DGN1000v3 2. In the Outbound Services section, click the Add button. 3. Select the service or application to be covered by this rule. If the service or application you want does not display in the menu, you need to define it (see Add Custom Services to Allow or Block on page 68). 4. Select the action you want for traffic covered by this rule: • BLOCK always. Always block the traffic covered by this rule. • BLOCK by schedule, otherwise Allow.
N150 Wireless ADSL2+ Modem Router DGN1000v3 • Single address. Type the required address in the Start field. • Address range. Type the start address for the range in the Start field and the end address for the range in the End field. 7. Specify whether traffic covered by this rule is logged: • Never. The modem router never logs traffic covered by this rule, whether it matches or not. • Always. The modem router logs traffic that is covered by this rule, whether it matches or not.
N150 Wireless ADSL2+ Modem Router DGN1000v3 3. Click the Delete button. The firewall rule is removed from the Outbound Services table on the Firewall Rules screen. Manage Inbound Firewall Rules By default, the firewall blocks all access from outside except responses to requests from the LAN side. You can set up rules to allow access to particular services, applications, ports, and computers. These rules are implemented through port forwarding and port triggering. To add an inbound firewall rule: 1.
N150 Wireless ADSL2+ Modem Router DGN1000v3 2. In the Service Table section, click the Add Custom Service button. 3. In the Service Type/User Defined field, type a suitable name for the new service or application. 4. From the Protocol menu, select the correct type of protocol for the new service: • TCP • UDP • TCP/UDP Note: If you are not sure which protocol to select, select TCP/UDP. 5. In the Starting Port field, enter the starting port number for the new service or application. 6.
N150 Wireless ADSL2+ Modem Router DGN1000v3 2. In the Service Table, select the radio button to the left of the service that you want to remove. 3. Click the Delete Service button. The custom service is removed from the Service Table on the Firewall Rules screen.
N150 Wireless ADSL2+ Modem Router DGN1000v3 5. Click the Apply button. Your settings are saved. Security Event Email Notifications To receive logs and alerts by email, provide your email information in the E-mail screen, and specify which alerts you want to receive and how often. To set up email notifications: 1. Select ADVANCED > Security > E-mail. 2. Select the Turn Email Notification On check box. 3.
N150 Wireless ADSL2+ Modem Router DGN1000v3 7. (Optional) Select when logs are sent automatically: a. Select an option from the menu: • When log is full • Hourly • Daily • Weekly • None b. If you select Daily or Weekly, select the time from the menu, and select the a.m. or p.m. radio button. c. If you select Weekly, select the day from the menu. Logs are sent automatically. If the log fills up before the specified time, the log is emailed.
6. 6 Administration Manage you r ne twork This chapter describes the modem router settings for administering and maintaining your modem router and home network.
N150 Wireless ADSL2+ Modem Router DGN1000v3 Update the Modem Router Firmware The modem router firmware (routing software) is stored in flash memory. You can update the firmware from the Administration menu on the ADVANCED tab. You might see a message at the top of the genie screens when new firmware is available for your product. You can use the Check button on the Router Update screen to check and update to the latest firmware for your product if new firmware is available.
N150 Wireless ADSL2+ Modem Router DGN1000v3 To download new firmware manually and update your modem router: 1. Visit downloadcenter.netgear.com, locate the DGN1000v3 support page, and download the new firmware. 2. Read the new firmware release notes to determine whether you need to reconfigure the modem router after upgrading. 3. Select ADVANCED > Administration > Router Update. 4. Locate and select the firmware file on your computer: a. Click the Browse update. b. Navigate to the firmware file.
N150 Wireless ADSL2+ Modem Router DGN1000v3 View Router Status To view modem router status and usage information: Depending on the screen that you have open, select ADVANCED or ADVANCED Home: Router Information The following settings are displayed: • Hardware Version. The modem router model. • Firmware Version. The version of the modem router firmware. It changes if you update the modem router firmware.
N150 Wireless ADSL2+ Modem Router DGN1000v3 • GUI Language Version. The localized language of the web management interface. • LAN Port. - MAC Address. The Media Access Control address. This is the unique physical address used by the Ethernet (LAN) port of the modem router. - IP Address. The IP address used by the Ethernet (LAN) port of the modem router. The default is 192.168.0.1. - DHCP Server. Identifies whether the modem router’s built-in DHCP server is active for devices on the LAN.
N150 Wireless ADSL2+ Modem Router DGN1000v3 2. In the Internet Port pane, click the Show Statistics button. The following information is displayed: • System Up Time. The time elapsed since the modem router was last restarted. • Port. The statistics for the WAN (Internet), four LAN (Ethernet) ports, and WLAN (wireless LAN) port. For each port, the screen displays: • - Status. The link status of the port. - TxPkts. The number of packets transmitted on this port since reset or manual clear.
N150 Wireless ADSL2+ Modem Router DGN1000v3 2. In the Internet Port pane, click the Connection Status button. The following information displays: • Connection Time. The time elapsed since the last connection to the Internet through the DSL port. • Connection Status. Connected or disconnected. • Negotiation. ---- (which indicates off) or Successful. • Authentication. ---- (which indicates off) or Successful. • IP Address. The IP address that is assigned to the modem router. • Subnet Mask.
N150 Wireless ADSL2+ Modem Router DGN1000v3 To view the modem statistics: Click the Modem Statistics button. The information that is displayed on this screen is not described in this manual. This information is typically used by NETGEAR support. To close the xDSL Line Status screen: Click the Close Window button.
N150 Wireless ADSL2+ Modem Router DGN1000v3 Wireless Settings The following settings are displayed: • Name (SSID). The wireless network name (SSID) that the modem router uses. • Region. The geographic region where the modem router is being used. It might be illegal to use the wireless features of the modem router in some parts of the world. • Channel. The operating channel of the wireless port being used. The default channel is Auto.
N150 Wireless ADSL2+ Modem Router DGN1000v3 You can specify which types of actions and events are logged, and how the system logs are sent. By default, all actions and events are logged, and the system logs are not sent anywhere. To view logs: Select ADVANCED > Administration > Logs. Depending on the type of action that was logged, the log screen can show the following information: • Action. Whether access was blocked or allowed, whether a service was initialized, whether a user logged in, and so on.
N150 Wireless ADSL2+ Modem Router DGN1000v3 To refresh the log screen: Click the Refresh button. To clear the log entries: Click the Clear Log button. To email the log immediately: Click the Send Log button. Note: To send and receive emails, make sure that you have set up and enabled email notification (see Security Event Email Notifications on page 71). Change Which Actions and Events Are Logged To configure which actions are logged: 1. Select ADVANCED > Administration > Logs.
N150 Wireless ADSL2+ Modem Router DGN1000v3 Set Up How the System Logs Are Sent By default, no system logs (syslogs) are sent. Before you set up where the system logs are sent, set up when system logs are sent and enable email notification (see Security Event Email Notifications on page 71). To set up where system logs are sent: 1. Select ADVANCED > Administration > Logs. The Logs screen displays. 2. Specify where system logs are sent by selecting one of the following check boxes: • Broadcast on LAN.
N150 Wireless ADSL2+ Modem Router DGN1000v3 Restore Configuration Settings To restore configuration settings that you backed up: 1. Select ADVANCED > Administration > Backup Settings. The Backup Settings screen displays. 2. Click the Browse button. 3. Locate and select the .cfg file. 4. Click the Restore button. The file is uploaded to the modem router, and the modem router reboots. WARNING: Do not interrupt the reboot process.
N150 Wireless ADSL2+ Modem Router DGN1000v3 To change the password for the user name admin: 1. Select ADVANCED > Administration > Set Password. 2. Type the old password, and type the new password twice. 3. (Optional) Specify a value in minutes to change the automatic logout time. By default, if you are logged in to the web management interface as an administrator and the web management interface remains idle for five minutes, you are logged out automatically. 4. Click the Apply button.
N150 Wireless ADSL2+ Modem Router DGN1000v3 The screen adjusts: 3. From the lists, select two security questions, and provide answers to them. 4. Click the Apply button. Your settings are saved. To recover your password: 1. In the address field of your browser, type www.routerlogin.net. A login screen displays. 2. Click the Cancel button. If password recovery is enabled, you are prompted to answer two security questions. 3. Enter the saved answers to the security questions.
N150 Wireless ADSL2+ Modem Router DGN1000v3 To perform diagnostic tests: 1. Select ADVANCED > Administration > Diagnostics. 2. (Optional) Ping an IP address or host name: a. Type an IP address or host name in the field. b. Click the Ping button. The ping results display onscreen. c. To return to the Diagnostics screen, click the Back button. 3. (Optional) Perform a DNS lookup: a. Type an Internet name in the field. b. Click the Lookup button.
N150 Wireless ADSL2+ Modem Router DGN1000v3 To reboot the modem router: 1. Select ADVANCED > Administration > Diagnostics. The Diagnostics screen displays. 2. Click the Reboot button.
7. 7 Advanced Settings S et up un iqu e situa tions This chapter describes the advanced features of your modem router. Networking knowledge is needed to implement some of these features.
N150 Wireless ADSL2+ Modem Router DGN1000v3 Advanced Wireless Settings You can use this screen to turn the wireless radio on and off, to configure advanced wireless settings, to specify WPS settings, to use AP mode, and to set up a wireless access list. Control the Wireless Radio By default, the wireless radio is enabled so that you can connect wirelessly to the modem router.
N150 Wireless ADSL2+ Modem Router DGN1000v3 wireless networks in your environments, you can clear the Enable 20/40 MHz Coexistence check box to increase the wireless speed to the maximum supported speed. WARNING: The Fragmentation Length, CTS/RTS Threshold, and Preamble Mode options are reserved for wireless testing and advanced configuration only. Do not change these settings unless directed by NETGEAR support. Incorrect settings might disable the wireless function of the modem router unexpectedly. 4.
N150 Wireless ADSL2+ Modem Router DGN1000v3 The screen adjusts: 3. Use the menus, radio buttons, and check boxes to set up a period during which you want the wireless signal to be turned off. The Start and End menus use 24-hour clock settings. Setting up a schedule is self-explanatory. 4. Click the Apply button. Your settings are saved. The Advanced Wireless Settings screen displays. 5. Select the Turn off wireless signal by schedule check box to activate the schedule. 6. Click the Apply button.
N150 Wireless ADSL2+ Modem Router DGN1000v3 2. In the table, select the radio button next to the wireless Schedule that you want to remove. 3. Click the Delete button. The wireless schedule is removed from the table on the Advanced Wireless Settings screen. View or Change WPS Settings You can control how WPS functions on the modem router. NETGEAR recommends that you use caution if you change the WPS settings.
N150 Wireless ADSL2+ Modem Router DGN1000v3 3. (Optional) Under the Enable Router's PIN check box, type a number in the field. By default, the number is 3. This number specifies the number of times that a PIN connection is allowed to fail. You can change this setting only when the PIN is enabled. 4. (Optional) Clear the check box under the Enable Router’s PIN check box to turn off automatic disabling of the PIN. You can change this setting only when the PIN is enabled.
N150 Wireless ADSL2+ Modem Router DGN1000v3 To restrict access based on MAC addresses: 1. Select ADVANCED > Advanced Setup > Wireless Settings. 2. Click the Set Up Access List button. 3. Click the Add button. 4. In the Device Name field, type a name for the wireless device. 5. In the MAC Address field, type the MAC address of the wireless device. Tip: You can also copy and paste the MAC addresses from the Attached Devices screen into the MAC Address field on this screen.
N150 Wireless ADSL2+ Modem Router DGN1000v3 3. Click the Edit button. The Edit Wireless Card screen displays. 4. Make the changes. 5. Click the Accept button. The changed settings are shown in the table on the Wireless Card Access List screen. To delete a wireless device from the access list: 1. Select ADVANCED > Advanced Setup > Wireless Settings. The Advanced Wireless Settings screen displays. 2. In the table, select the radio button next to the wireless device that you want to remove. 3.
N150 Wireless ADSL2+ Modem Router DGN1000v3 The modem router can function either as a base station or as a repeater: • Wireless base station. The modem router acts as the parent access point, bridging traffic to and from the child repeater access point, as well as handling wireless and wired local computers. To configure this mode, you need to know the MAC address of the child repeater access point. • Wireless repeater.
N150 Wireless ADSL2+ Modem Router DGN1000v3 3. Select the Wireless Base Station radio button. 4. (Optional) Select the Disable Wireless Client Association check box. Wireless clients are prevented from associating with the base station and LAN client associations only are allowed. You can leave the check box cleared if you prefer wireless clients to be able to associate with the base stations. 5.
N150 Wireless ADSL2+ Modem Router DGN1000v3 To configure the modem router as a repeater: 1. Select ADVANCED > Advanced Setup > Wireless Repeating Function. The Wireless Repeating Function screen displays. The wireless MAC address of the modem router is displayed onscreen. 2. Select the Enable Wireless Repeating Function check box. 3. Select the Wireless Repeater radio button. 4. Fill in the Repeater IP Address fields.
N150 Wireless ADSL2+ Modem Router DGN1000v3 Port Forwarding and Port Triggering By default, the modem router blocks inbound traffic from the Internet to your computers except replies to your outbound traffic. You might need to create exceptions to this rule for these purposes: • To enable remote computers on the Internet to access a server on your local network. • To enable certain applications and games to work correctly if the modem router does not recognize their replies.
N150 Wireless ADSL2+ Modem Router DGN1000v3 Your modem router then sends this request message through the Internet to the web server at www.example.com. 4. The web server at www.example.com composes a return message with the requested web page data. The return message contains the following address and port information. The web server then sends this reply message to your modem router: • Source address. The IP address of www.example.com • Source port number.
N150 Wireless ADSL2+ Modem Router DGN1000v3 stores the original information, performs Network Address Translation (NAT) on the source address and port, and sends this request message through the Internet to the IRC server. 4. Noting your port triggering rule and having observed the destination port number of 6667, your modem router creates an additional session entry to send any incoming port 113 traffic to your computer. 5.
N150 Wireless ADSL2+ Modem Router DGN1000v3 The following sequence shows the effects of the port forwarding rule you have defined: 1. The user of a remote computer opens a browser and requests a web page from www.example.com, which resolves to the public IP address of your modem router. The remote computer composes a web page request message with the following destination information: • Destination address. The IP address of www.example.
N150 Wireless ADSL2+ Modem Router DGN1000v3 Set Up Port Forwarding to Local Servers The port forwarding feature lets you allow certain types of incoming traffic to reach servers on your local network. For example, you might want to make a local web server, FTP server, or game server visible and available to the Internet. Use the Port Forwarding / Port Triggering screen to configure the modem router to forward specific incoming protocols to computers on your local network.
N150 Wireless ADSL2+ Modem Router DGN1000v3 Manage Custom Services for Port Forwarding Before you define a service, game, or application that does not display in the Service Name menu on the Port Forwarding / Port Triggering screen, first determine which port number or range of numbers the application uses. You can usually determine this information by contacting the publisher of the application or user groups or news groups. When you have the port number information, follow these steps.
N150 Wireless ADSL2+ Modem Router DGN1000v3 8. Specify the internal ports by one of these methods: • Leave the Use the same port range for Internal port check box selected. • Fill in the Internal Starting Port. Note: The Internal Ending Port field is masked out because the ending port number is calculated automatically by using the same range as the external port range. 9. Specify the internal IP address by one of these methods: • In the Internal IP Address fields, type the internal IP address.
N150 Wireless ADSL2+ Modem Router DGN1000v3 Application Example: Make a Local Web Server Public If you host a web server on your local network, you can use port forwarding to allow web requests from anyone on the Internet to reach your web server. To make a local web server public: 1. Assign your web server either a fixed IP address or a dynamic IP address using DHCP address reservation. In this example, your modem router always gives your web server an IP address of 192.168.0.33. 2.
N150 Wireless ADSL2+ Modem Router DGN1000v3 Manage Port Triggering By default, port triggering is enabled with a time-out period of 20 minutes. The time-out value controls the inactivity timer for the designated inbound ports. The inbound ports close when the inactivity time expires. This is required because the modem router cannot detect when the application has terminated.
N150 Wireless ADSL2+ Modem Router DGN1000v3 Manage Port Triggering Services To configure port triggering services, you need to know which inbound ports the application needs, and the number of the outbound port that will trigger the opening of the inbound ports. You can usually determine this information by contacting the publisher of the application or user groups or news groups. To add a port triggering service: 1. Select ADVANCED > Advanced Setup > Port Forwarding/Port Triggering.
N150 Wireless ADSL2+ Modem Router DGN1000v3 Note: If you are not sure which protocol to select, select TCP/UDP. 9. In the Starting Port field, enter the starting port number for the inbound connection. 10. In the Ending Port field, enter the ending port number for the inbound connection. If the inbound connection uses a single port number, enter that number in both fields. 11. Click the Apply button.
N150 Wireless ADSL2+ Modem Router DGN1000v3 The service is removed from the Port Triggering Portmap Table on the Port Forwarding / Port Triggering screen. Dynamic DNS If your Internet service provider (ISP) gave you a permanently assigned (fixed) IP address, you can register a domain name and have that name linked with your IP address by public Domain Name Servers (DNS).
N150 Wireless ADSL2+ Modem Router DGN1000v3 This is the name that you use to log in to your account, not your host name. 7. In the Password field, type the password or key for your Dynamic DNS account. 8. Click the Apply button. Your settings are saved. Static Routes Static routes provide more routing information to your modem router. Typically, you do not need to add static routes.
N150 Wireless ADSL2+ Modem Router DGN1000v3 2. Click the Add button. 3. In the Route Name field, type a name for this static route. This name is for identification purposes only. 4. (Optional) To limit access to the LAN only, select the Private check box. If Private is selected, the static route is not reported in RIP. 5. (Optional) To prevent the route from becoming effective after you click the Apply button, clear the Active check box.
N150 Wireless ADSL2+ Modem Router DGN1000v3 To remove a static route: 1. Select ADVANCED > Advanced Setup > Static Routes. The Static Routes screen displays. 2. In the table, select the radio button to the left of the route that you want to remove. 3. Click the Delete button. The route is removed from the table on the Static Routes screen. Remote Management The remote management feature lets you update or check the status of your modem router over the Internet.
N150 Wireless ADSL2+ Modem Router DGN1000v3 • For a range of IP addresses on the Internet: a. Select IP Address Range radio button. b. In the From fields, enter the start IP address of the range from which access is allowed. • c. In the To fields, enter the end IP address of the range from which access is allowed. For all IP addresses on the Internet, keep the Everyone radio button selected. This is the default setting. 4. Specify the port number for accessing the web management interface.
N150 Wireless ADSL2+ Modem Router DGN1000v3 By default, this check box is selected. You can disable UPnP for automatic device configuration. If you clear the Turn UPnP On check box, the modem router does not allow any device to automatically control the resources, such as port forwarding (mapping), of the modem router. 3. Type the advertisement period in minutes. The advertisement period specifies how often the modem router broadcasts its UPnP information. This value can range from 1 to 1440 minutes.
N150 Wireless ADSL2+ Modem Router DGN1000v3 Your Internet service provider (ISP) can provide information about your IPv6 connection. • If your ISP did not provide details, you can select 6to4 Tunnel. • If you are not sure what type of IPv6 connection the modem router uses, select Auto Detect so that the modem router detects the IPv6 type that is in use. • If your Internet connection does not use PPPoE, DHCP, a fixed IP address, or pass-through but is IPv6, select Auto Config.
N150 Wireless ADSL2+ Modem Router DGN1000v3 Auto Detect To set up an IPv6 Internet connection through auto detection: 1. Select ADVANCED > Advanced Setup > IPv6. 2. From the Internet Connection Type menu, select Auto Detect. The screen adjusts: The modem router automatically detects the information in the following fields: • Connection Type. This field indicates the connection type that is detected. • Router’s IPv6 Address on WAN.
N150 Wireless ADSL2+ Modem Router DGN1000v3 If you do not specify an ID here, the modem router generates one automatically from its MAC address. 5. Specify the IPv6 filtering mode by selecting one of the following radio buttons: • Secured. In the secured mode, which is the default mode, the modem router inspects both TCP and UDP packets. • Open. In the open mode, the modem router inspects UDP packets only. 6. Click the Apply button. Your settings are saved.
N150 Wireless ADSL2+ Modem Router DGN1000v3 • Router’s IPv6 Address on LAN1. This field shows the IPv6 address that is acquired for the modem router’s LAN interface. The number after the slash (/) is the length of the prefix, which is also indicated by the underline (_) under the IPv6 address. If no address is acquired, the field displays Not Available. 3. (Optional) In the DHCP User Class (If Required) field, enter a host name. If your ISP has given you a specific host name, enter it here.
N150 Wireless ADSL2+ Modem Router DGN1000v3 IPv6 6to4 Tunnel The remote relay router is the router to which your modem router creates the 6to4 tunnel. Make sure that the IPv4 Internet connection is working before you apply the 6to4 tunnel settings for the IPv6 connection. To set up an IPv6 Internet connection by using a 6to4 tunnel: 1. Select ADVANCED > Advanced Setup > IPv6. 2. From the Internet Connection Type menu, select 6to4 Tunnel.
N150 Wireless ADSL2+ Modem Router DGN1000v3 4. Specify how the modem router assigns IPv6 addresses to the devices on your home network (the LAN) by selecting one of the following radio buttons: • Use DHCP Server. This method passes more information to LAN devices, but some IPv6 systems might not support the DHCv6 client function. • Auto Config. This is the default setting. 5.
N150 Wireless ADSL2+ Modem Router DGN1000v3 The screen adjusts: 3. Configure the fixed IPv6 addresses for the WAN connection: • IPv6 Address/Prefix Length. The IPv6 address and prefix length of the modem router WAN interface. • Default IPv6 Gateway. The IPv6 address of the default IPv6 gateway, which is supposed to be on the modem router’s WAN interface. • Primary DNS Server. The primary DNS server that resolves IPv6 domain name records for the modem router. • Secondary DNS Server.
N150 Wireless ADSL2+ Modem Router DGN1000v3 If you do not specify an ID here, the modem router generates the address and prefix length automatically from its MAC address. 6. Specify the IPv6 filtering mode by selecting one of the following radio buttons: • Secured. In the secured mode, which is the default mode, the modem router inspects both TCP and UDP packets. • Open. In the open mode, the modem router inspects UDP packets only. 7. Click the Apply button. Your settings are saved.
N150 Wireless ADSL2+ Modem Router DGN1000v3 the prefix, which is also indicated by the underline (_) under the IPv6 address. If no address is acquired, the field displays Not Available. 3. (Optional) In the User Class (If Required) field, enter a host name. If your ISP has given you a specific host name, enter it here. Otherwise, leave this field blank. 4. (Optional) In the Domain Name (If Required) field, enter a domain name. You can type the domain name of your IPv6 ISP.
N150 Wireless ADSL2+ Modem Router DGN1000v3 The screen adjusts: The modem router automatically detects the information in the following fields: • Router’s IPv6 Address on WAN. This field shows the IPv6 address that is acquired for the modem router’s WAN (or Internet) interface. The number after the slash (/) is the length of the prefix, which is also indicated by the underline (_) under the IPv6 address. If no address is acquired, the field displays Not Available. • Router’s IPv6 Address on LAN1.
N150 Wireless ADSL2+ Modem Router DGN1000v3 Note: The default setting of the Connection Mode field is Always On to provide a steady IPv6 connection. The modem router never terminates the connection. If the connection is terminated, for example, when the modem is turned off, the modem router attempts to reestablish the connection immediately after the PPPoE connection becomes available again. 6.
N150 Wireless ADSL2+ Modem Router DGN1000v3 To monitor Internet traffic: 1. Click ADVANCED > Advanced Setup > Traffic Meter. 2. Select the Enable Traffic Meter check box. By default, there is no traffic limit and the traffic volume is not controlled. 3. In the Traffic Counter section, set the traffic counter to begin at a specific time and date. 4. (Optional) If you want the traffic counter to start immediately, click the Restart Counter Now button. 5. Click the Apply button. Your settings are saved.
N150 Wireless ADSL2+ Modem Router DGN1000v3 To display more information about the data traffic on your modem router and to change the poll interval: Click the Traffic Status button. Restricting Internet Traffic by Volume You can record and restrict the traffic by volume in MB. This is useful when your ISP measures your traffic in volume. To record and restrict the volume of Internet traffic by volume: 1. Click ADVANCED > Advanced Setup > Traffic Meter. The Traffic Meter screen displays. 2.
N150 Wireless ADSL2+ Modem Router DGN1000v3 Restricting Internet Traffic by Connection Time You can record and restrict the traffic in connection time. This is useful when your ISP measures your connection time. To record and restrict the volume of Internet traffic by volume: 1. Click ADVANCED > Advanced Setup > Traffic Meter. The Traffic Meter screen displays. 2. Select the Enable Traffic Meter check box. 3. Select the Connection time control radio button. 4.
8. 8 Troubleshooting Get he lp with pro ble m s This chapter provides information to help you diagnose and solve problems you might have with your modem router. If you do not find the solution here, check the NETGEAR support site at http://support.netgear.com for product and contact information.
N150 Wireless ADSL2+ Modem Router DGN1000v3 Quick Tips This section describes tips for troubleshooting some common problems. Sequence to Restart Your Network When you need to restart your network, follow this sequence: 1. Turn off and unplug the modem router. 2. Plug in the modem router and turn it on. Wait two minutes. Check Ethernet Cable Connections Make sure that the Ethernet cables are securely plugged in.
N150 Wireless ADSL2+ Modem Router DGN1000v3 Troubleshoot with the LEDs When you turn on the power, the Power, LAN, and DSL LEDs light as described here. If they do not, refer to the sections that follow for help. 1. When power is first applied, the Power LED lights solid red. 2. After approximately 10 seconds, the LAN port LED lights green are connected. 3. After approximately 1 minute, the DSL link LED lights green established. for any local ports that to indicate that a DSL link is 4.
N150 Wireless ADSL2+ Modem Router DGN1000v3 Power LED Is Blinking If the Power LED blinks slowly and continuously, the firmware of the modem router is corrupted. This can occur if a firmware update is interrupted, or if the modem router detects a problem with the firmware. If the error persists, you have a hardware problem. For recovery instructions, or help with a hardware problem, contact technical support at www.netgear.com/support.
N150 Wireless ADSL2+ Modem Router DGN1000v3 • If your modem router’s IP address was changed and you do not know the current IP address, clear the modem router’s configuration to factory defaults. This sets the modem router’s IP address to 192.168.0.1. This procedure is explained in Side Panel with Restore Factory Settings Button on page 12. Troubleshoot the Internet Connection If your modem router is unable to access the Internet, check the ADSL connection, then the WAN TCP/IP connection.
N150 Wireless ADSL2+ Modem Router DGN1000v3 Internet LED Is Red If the Internet LED is red, the device was unable to connect to the Internet. Verify the following: • Check that your login credentials are correct, or that the information you entered on the Internet Setup screen is correct. • Check if your ISP has a problem—it might not be that the modem router cannot connect to the Internet, but rather that your ISP that cannot provide an Internet connection.
N150 Wireless ADSL2+ Modem Router DGN1000v3 Troubleshoot PPPoE or PPPoA To verify if your PPPoE or PPPoA connection is working: 1. Select ADVANCED > Administration > Router Status. The Router Status screen displays. 2. In the Modem pane, check the following: The Modem Status is connected. 3. In the Internet Port pane, check the following: • A valid IP address and subnet mask are displayed. • The connection is PPPoE or PPPoA. 4. In the Internet Port pane, click the Connection Status button.
N150 Wireless ADSL2+ Modem Router DGN1000v3 router, reboot your computer, and verify the DNS address. Alternatively, you can configure your computer manually with DNS addresses, as explained in your operating system documentation. • Your computer might not have the modem router configured as its TCP/IP modem router. If your computer obtains its information from the modem router by DHCP, reboot the computer, and verify the modem router address.
N150 Wireless ADSL2+ Modem Router DGN1000v3 Incorrect Date or Time The modem router uses the Network Time Protocol (NTP) to obtain the current time from one of several network time servers on the Internet. Each entry in the log is stamped with the date and time of day. Problems with the date and time function can include the following: • Date shown is January 1, 2003. This means the modem router has not yet reached a network time server. Check that your Internet access is configured correctly.
N150 Wireless ADSL2+ Modem Router DGN1000v3 If the path is not working, you see this message: Request timed out If the path is not functioning correctly, you might have one of the following problems: • Wrong physical connections For a wired connection, make sure that the numbered LAN port LED is lit for the port to which you are connected. • Wrong network configuration - Verify that the Ethernet card driver software and TCP/IP software are both installed and configured on your computer or workstation.
A. Supplemental Information View th e fa cto ry settin gs and s pec if ic at ions A This appendix includes the factory default settings and technical specifications for the modem router.
N150 Wireless ADSL2+ Modem Router DGN1000v3 Factory Settings You can return the modem router to its factory settings. On the right side panel of the modem router, use the end of a paper clip or some other similar object to press and hold the Restore Factory Settings button for at least seven seconds. (For more information about the location of the button, see Side Panel with Restore Factory Settings Button on page 12.) The modem router returns to the factory settings shown in the following table. Table 3.
N150 Wireless ADSL2+ Modem Router DGN1000v3 Table 3. Factory default settings (continued) Feature Wireless Default Behavior Wireless communication Enabled SSID name See the label on the modem router. Security See the label on the modem router.
N150 Wireless ADSL2+ Modem Router DGN1000v3 Technical and Physical Specifications Table 4.
B. Notification of Compliance N E T GEAR wirele ss rout er s , gat eway s , APs B Regulatory Compliance Information This section includes user requirements for operating this product in accordance with National laws for usage of radio spectrum and operation of radio devices. Failure of the end-user to comply with the applicable requirements may result in unlawful operation and adverse action against the end-user by the applicable National regulatory authority.
N150 Wireless ADSL2+ Modem Router DGN1000v3 FCC Radio Frequency Interference Warnings & Instructions This equipment has been tested and found to comply with the limits for a Class B digital device, pursuant to Part 15 of the FCC Rules. These limits are designed to provide reasonable protection against harmful interference in a residential installation.
N150 Wireless ADSL2+ Modem Router DGN1000v3 IMPORTANT NOTE: Radiation Exposure Statement: This equipment complies with IC radiation exposure limits set forth for an uncontrolled environment. This equipment should be installed and operated with minimum distance 20cm between the radiator & your body. NOTE IMPORTANTE: Déclaration d'exposition aux radiations: Cet équipement est conforme aux limites d'exposition aux rayonnements IC établies pour un environnement non contrôlé.