Wireless Router Setup Manual NETGEAR, Inc. 4500 Great America Parkway Santa Clara, CA 95054 USA November 2007 208-10148-01 v1.
Trademarks NETGEAR and the NETGEAR logo are registered trademarks, and RangeMax and Smart Wizard are trademarks of NETGEAR. Inc. Microsoft, Windows, and Windows NT are registered trademarks of Microsoft Corporation. Other brand and product names are registered trademarks or trademarks of their respective holders.
Contents Getting to Know Your Wireless Router ................................................................................ 1 Unpacking Your New Wireless Router ............................................................................... 1 What You Need Before You Begin ..................................................................................... 8 Updating Your Router Firmware ........................................................................................
iv Contents
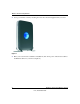
Getting to Know Your Wireless Router Congratulations on your purchase of the NETGEAR® RangeMax™ Dual Band Wireless-N Router WNDR3300. Before you begin installing your router, check the package contents (see Unpacking Your New Wireless Router). Become familiar with the front and back panels of your router—especially the status lights—and the important information on the router label (see “Bottom Label” on page 8).
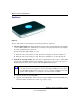
Wireless Router Setup Manual 2. Set up your wireless router by inserting the router into the stand supplied with your router. Figure 1 3. Place your router in an area suitable for installation (near an AC power outlet and accessible to the Ethernet cables for your wired computers). 2 Getting to Know Your Wireless Router v1.
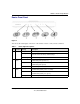
Wireless Router Setup Manual Router Front Panel Figure 2 You can use the status lights on the front of the wireless router to verify various conditions. Table 1. Status Light Descriptions Item Function 1 Power Activity Description On green solid Power is supplied to the router. Blinking The unit is starting up, or the restore factory settings button is being pushed to restore the factory default settings. Off 2 3 2.4 GHz Mode 5 GHz Mode Power is not supplied to the router.
Wireless Router Setup Manual Table 1. Status Light Descriptions (continued) Item Function 4 5 Internet LAN Activity Description Amber off No Ethernet cable is connected to the modem. Amber on The Ethernet cable connection to the modem is good. Amber blinking Packets are being transmitted and received from a modem or other network device, but no IP address has been received. Green off No IP address has been received. On IP address has been received.
Wireless Router Setup Manual Router Back Panel The rear panel of the WNDR3300 router contains the items in the list that follows the figure. 1 2 3 4 Figure 3 The back of the wireless router includes: 1. Four local (LAN) 10/100 Mbps Ethernet ports for connecting the router to local computers 2. Internet (WAN) Ethernet port for connecting the router to a cable or DSL modem 3. Restore factory settings button 4. AC power adapter outlet Getting to Know Your Wireless Router v1.
Wireless Router Setup Manual Top Panel Figure 4 The top of the wireless router includes a dome that performs two functions: 1. Antenna display lights. The lights identify the activity of the eight internal antennas, flashing to show which combination of antennas is receiving the strongest signals. These status lights are off by default but can be turned on. To turn the antenna display lights on or off: a. Push the dome for less than 2 seconds, then release. If lights are off, they will turn on. b.
Wireless Router Setup Manual b. Push the wireless router’s dome for 5 seconds, then release. The dome lights should begin to blink. While the router is in WPS enable mode (a maximum of 2 minutes), wireless security is not enabled. Indoors, computers can connect over wireless networks at a range of several hundred feet.
Wireless Router Setup Manual Bottom Label View the label on the bottom of the wireless router to identify the serial number, port connectors, status lights, and default login information. Figure 5 What You Need Before You Begin Prepare the following before you set up your router: • • Internet service. The configuration information your Internet Service Provider (ISP) gave you.
Wireless Router Setup Manual Updating Your Router Firmware NETGEAR is always improving the operability and features included with your router. To make it easy for you to receive the best, most up-to-date features of your router, NETGEAR provides a variety of methods for updating your product. • The Smart Wizard installation assistant lets you check for and install updates as part of the setup activity. • The router includes an update feature that lets you check for and install updates.
Wireless Router Setup Manual 2. When the Welcome screen displays, click Setup to start the Smart Wizard. Follow the wizard instructions. 3. When you are asked to log in, refer to the bottom label for the default login information, or see the steps in “Connecting Your Wireless Router”. Manual Setup There are two steps to setting up your wireless router: 1. Connect the router to the ADSL or cable modem, and connect a computer to the router.
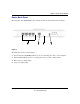
Wireless Router Setup Manual c. Locate the Ethernet cable (1) that connects your computer to the modem. 1 2 Figure 6 d. Disconnect the cable at the modem (2). You will connect it to the router later. e. Use the label on the bottom of the wireless router to locate the Internet port, which is on the left next to the power connection. f. Locate the Ethernet cable that came with the NETGEAR product. Securely insert that Ethernet cable into your modem and into the Internet port of the wireless router (3).
Wireless Router Setup Manual g. Locate the cable you removed from the modem in step 1c. Securely insert that cable (4) into a LAN port on the router such as LAN port 1. 4 Internet Figure 8 Your network cables are connected, and you are ready to start your network. 2. Start your network in the correct sequence. Failure to start or restart your network in the correct sequence could prevent you from accessing the Internet. a. First, plug in and turn on the cable or DSL modem. Wait 2 minutes. b.
Wireless Router Setup Manual Figure 9 d. Check the wireless router status lights to verify the following: • • • • Power. The Power light (1) should turn solid green. If it does not, see “Basic Functions Are Not Working” on page 22. Mode. The Mode light (2) should be on: the Mode light (3) should be off. Internet. The Internet port light (4) should be lit.
Wireless Router Setup Manual A login window like the one in the following figure opens: Figure 11 4. For security reasons, the router has its own user name and password. When prompted, enter admin for the router user name and password for the router password, both in lowercase letters. The router user name and password are not the same as any other user name or password you might use to log in to your Internet connection.
Wireless Router Setup Manual On the left, click Setup Wizard to view the following screen. Figure 12 If you cannot connect to the wireless router, verify your computer networking setup. It should be set to obtain both IP and DNS server addresses automatically, which is usually the case. For help with this, consult the documentation that came with your computer, or see the links in “Related Documents” on page 33. 5. Click Next.
Wireless Router Setup Manual Documentation link under Web Support to view support information or the documentation for the wireless router. Accessing the Wireless Router after Installation and Checking for New Firmware The Smart Wizard appears only when you first install the router or when the router is in its factory default state (for example, if you have reset the router to its factory default settings).
Wireless Router Setup Manual A login window like the one in the following figure opens: Figure 14 Enter the user name and password. To update your router firmware: 1. If the Router Upgrade screen does not display automatically, select Router Upgrade under Maintenance on the main menu. The Router Upgrade screen displays. 2. Click Browse, and locate the unzipped firmware image that you downloaded to your PC (the file ends in .chk). 3.
Wireless Router Setup Manual If you are unable to successfully upgrade using this method, refer to the online Reference Manual available through the Documentation link on the router main menu (or through a link on the Resource CD) for other ways to upgrade the router. If you selected the No radio button during installation, and you want to check for new firmware later, use the following procedure.
Wireless Router Setup Manual To set up and test basic wireless connectivity: 1. Log in to the wireless router at its default LAN address of http://192.168.1.1 with the default user name of admin and default password of password, or using whatever LAN address and password you have set up. 2. Select Wireless Settings under Setup in the main menu. 3. Note that the default SSID (service set identification key) is NETGEAR.
Wireless Router Setup Manual • • • • Up to 270Mbps at 5GHz & 54Mbps at 2.4GHz (default setting) Up to 270Mbps at 2.4GHz Up to 130Mbps at 2.4GHz Up to 130Mbps at 5GHz & 54Mbps at 2.4GHz 4. To save your changes, click Apply. Implementing Appropriate Wireless Security Indoors, computers can connect over 802.11g wireless networks at a range of over 300 feet. Such distances can allow others outside your immediate area to access your network.
Help with Troubleshooting This chapter gives information about troubleshooting your wireless router.
Wireless Router Setup Manual 2. Verify that for each powered-on computer connected to the wireless router with a securely plugged in Ethernet cable, the corresponding wireless router LAN port status light is lit (see “Router Front Panel” on page 3). The label on the bottom of the wireless router identifies the number of each LAN port (see “Bottom Label” on page 8). Make sure that the network settings of the computer are correct: 1.
Wireless Router Setup Manual If a port’s light is lit, a link has been established to the connected device. If a LAN port is connected to a 100 Mbps device, verify that the port’s light is green. If the port is 10 Mbps, the light is amber. For more information about the status lights, see “Router Front Panel” on page 3. If the LAN or Internet port lights are not on when the Ethernet connection is made: 1. Make sure that the Ethernet cable connections are secure at the router and at the computer. 2.
Wireless Router Setup Manual Check that the Internet connection is working: 1. Internet connection. First verify that your cable or ADSL modem has a successful connection. The cable or ADSL modem status lights indicate if the modem connection is successful or not. Check your modem documentation, or call your Internet Service Provider for help with verifying that the modem has a successful connection. 2. Wireless router Internet light is green or blinking green.
Wireless Router Setup Manual • Your service provider allows only one Ethernet MAC address to connect to Internet, and might check for your computer’s MAC address. In this case, do one of the following: – Inform your service provider that you have bought a new network device, and ask them to use the wireless router’s MAC address. – Configure your router to spoof your computer’s MAC address. This can be done in the Basic Settings screen.
Wireless Router Setup Manual Restart the computer, and verify that the wireless router address (192.168.1.1) is listed by your computer as the default gateway address. The factory default wireless router address is 192.168.1.1. However, if the router detects a conflict with the address it gets from your modem, it automatically picks a different address for itself. In this case, you can log in to the router using www.routerlogin.net to verify its LAN IP address.
Wireless Router Setup Manual Request timed out If the path is not functioning correctly, you could have one of the following problems: • Wrong physical connections — Make sure that the LAN port light is on. If the light is off, follow the instructions in “If the LAN or Internet port lights are not on when the Ethernet connection is made:” on page 23. — Check that the corresponding lights are on for your computer’s network interface card.
Wireless Router Setup Manual 28 Help with Troubleshooting v1.
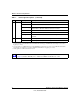
Default Configuration Default Configuration Settings This section provides factory default settings and technical specifications for the RangeMax Dual Band Wireless-N Router WNDR3300. Table 2. Wireless Router Default Configuration Settings Feature Default Setting Smart Wizard Enabled Router Login Router Login URL http://www. routerlogin.net or http://www.routerlogin.
Wireless Router Setup Manual Table 2.
Wireless Router Setup Manual Table 2. Wireless Router Default Configuration Settings (continued) Feature Default Setting Physical Specifications Dimensions: 28 x 175 x 119 mm (1.1 x 6.89 x 4.68 in.) Weight: 0.5 kg (1.
Wireless Router Setup Manual Table 2. Wireless Router Default Configuration Settings (continued) Feature Default Setting Operating Frequency Ranges (5G): 5.18–5.24 + 5.745–5.825 GHz (US) 5.18–5.24 GHz (Europe ETSI) 802.11 Security: 40-bit (also called 64-bit) and 128-bit WEP, WPAPSK and WPA2-PSK.
Related Documents This table provides links to reference documents that you can use to gain a more complete understanding of the technologies used in your NETGEAR product. Table 3. Reference Documents Document Link TCP/IP Networking Basics http://documentation.netgear.com/reference/enu/tcpip/index.htm Preparing Your Network http://documentation.netgear.com/reference/enu/wsdhcp/index.htm Glossary http://documentation.netgear.com/reference/enu/glossary/index.htm Related Documents 33 v1.
Wireless Router Setup Manual 34 Related Documents v1.
Registration and Certifications Product Registration, Support, and Documentation Register your product at http://www.NETGEAR.com/register. You must register before you can use our telephone support service. Product updates and Web support are always available by going to http://www.netgear.com/support. Setup documentation is available on the CD, on the support website, and on the documentation website.
36