
User manual


4. Plug the second Powerline device into a wall outlet where you want to add Internet access.
5. Use the Ethernet cable that came with your adapter to connect the Powerline device to an Ethernet port on a
computer, game console, Blu-ray player, or other peripheral device.
6. Wait until the Pick A Plug LEDs are lit.
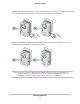
7. To use a private encryption key, press the Security button on one of the adapters for two seconds, and then
press the Security button on the other adapter for two seconds.
Both buttons must be pressed within two minutes.
WARNING:
Do not press the Security button on the Powerline adapter until installation is complete
and the adapters are communicating with each other (indicated by the blinking Power
LED). Pressing this button too soon can temporarily disable Powerline communication.
If this occurs, use the Factory Reset button to return the Powerline adapter to its
factory default settings.
The Security button does not work in power saving mode.Note
8. Wait for the Powerline network to recognize each Powerline device.
This process could take as little as 5 seconds or up to 80 seconds.
When the Power LEDs stop blinking, the process is complete. If the Pick A Plug LEDs are green or amber, the
devices are successfully connected to the Powerline network. A red Pick A Plug LED indicates a slow link rate.
In this case, move the Powerline device to another electrical outlet with a faster connection.
9. If you are installing additional adapters, repeat Step 7 with one of the secure adapters and one of the adapters
that is not yet secured.
See Use the Security Button to Set the Encryption Key on page 14.
Powerline Networks
12
Powerline 1200