
User's Manual


Virtual Private Networking Using SSL Connections
282
ProSafe Wireless-N 8-Port Gigabit VPN Firewall FVS318N
Note: If you have configured SSL VPN user policies, make sure that
secure HTTP remote management is enabled (see
Configure
Remote Management Access on p
age 322). If secure HTTP remote
management is not enabled, all SSL VPN user connections are
disabled.
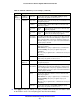
To edit an SSL VPN policy:
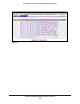
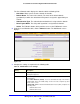
1. On
the Policies screen (see Figure 168 on page 278), click the Edit button in the Action
column for the SSL VPN policy that you want to mo
dify. The Edit SSL VPN Policy
screen displays. This screen is identical to the Add SSL VPN Policy screen (see
previous screen).
2. Modif
y the settings as explained in the previous table.
3. Click Apply to save
your settings.
To delete one or more SSL VPN policies:
1. On
the Policies screen (see Figure 168 on page 278), select the check box to the left of
each SSL VPN policy that you want to
delete, or click the Select All table button to
select all policies.
2. Click the Delete t
able button.
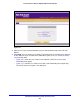
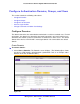
Access the New SSL Portal Login Screen
All screens that you can access from the SSL VPN menu of the web management interface
display a user portal link in the upper right of the screen, above the menu bars ( ).
When you click the User Port
al link, the SSL VPN default portal opens (see Figure 172 on
page 284). This user portal is not the same as the
new SSL portal login screen that you
defined with the help of the SSL VPN Wizard.
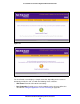
To open the new SSL portal login screen:
1. Select VPN >
SSL VPN > Portal Layouts. The Portal Layouts screen displays (for IPv4,
see Figure 160 on
page 263; for IPv6, see Figure 161 on page 263).
2. In
the Portal URL field of the List of Layouts table, select the URL that ends with the portal
layout name that you defined with the help of the SSL VPN Wizard. The new SSL portal
login screen displays: