Chapter 3 Basic Installation and Configuration This chapter describes how to set up your NETGEAR ProSafe Wireless Access Point 802.11g WG302 for wireless connectivity to your LAN. This basic configuration will enable computers with 802.11b or 802.11g wireless adapters to do such things as connect to the Internet, or access printers and files on your LAN. Note: Indoors, computers can connect over 802.11g wireless networks at ranges of several hundred feet or more.
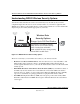
Reference Manual for the NETGEAR ProSafe Wireless Access Point 802.11g WG302 Note: Failure to follow these guidelines can result in significant performance degradation or inability to wirelessly connect to the WG302. For complete performance specifications, see Appendix A, “Specifications”. For best results, place your wireless access point: • • • • • • Near the center of the area in which your PCs will operate.
Reference Manual for the NETGEAR ProSafe Wireless Access Point 802.11g WG302 Default Factory Settings When you first receive your WG302, the default factory settings will be set as shown below. You can restore these defaults with the Factory Default Restore switch on the rear panel — see “WG302 front panel” on page 2-6.
Reference Manual for the NETGEAR ProSafe Wireless Access Point 802.11g WG302 Understanding WG302 Wireless Security Options Your wireless data transmissions can be received well beyond your walls by anyone with a compatible adapter. For this reason, use the security features of your wireless equipment. The WG302 Access Point provides highly effective security features which are covered in detail in this chapter. Deploy the security features appropriate to your needs.
Reference Manual for the NETGEAR ProSafe Wireless Access Point 802.11g WG302 • • Use WPA, WPA-PSK, WPA2, or WPA2-PSK. Wi-Fi Protected Access (WPA and WPA2) data encryption provides data security. The very strong authentication along with dynamic per frame rekeying of WPA make it virtually impossible to compromise. Because this is a new standard, wireless device driver and software availability may be limited. Use AutoCell Enhanced RF Security ‘Stealth Mode.
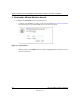
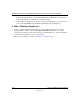
Reference Manual for the NETGEAR ProSafe Wireless Access Point 802.11g WG302 2 CONFIGURE LAN AND WIRELESS ACCESS a. Configure the WG302 Ethernet port for LAN access. • Connect to the WG302 by opening your browser and entering http://192.168.0.228 in the address field. A login window like the one shown below opens: Figure 3-2: Login window • When prompted, enter admin for the user name and password for the password, both in lower case letters. 3-6 Basic Installation and Configuration July 2005 v3.
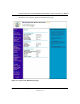
Reference Manual for the NETGEAR ProSafe Wireless Access Point 802.11g WG302 • The Web browser will then display the WG302 settings page. Figure 3-3: Login result: WG302 home page Basic Installation and Configuration 3-7 July 2005 v3.
Reference Manual for the NETGEAR ProSafe Wireless Access Point 802.11g WG302 • – When the wireless access point is connected to the Internet, click the Knowledge Base or the Documentation link under the Web Support menu to view support information or the documentation for the wireless access point. – If you do not click Logout, the wireless access point will wait 5 minutes after there is no activity before it automatically logs you out. Click the Basic Settings link to view the Basic Settings menu.
Reference Manual for the NETGEAR ProSafe Wireless Access Point 802.11g WG302 b. Click the Wireless Settings link in the Setup section of the main menu to view the Wireless Settings menu. Figure 3-5: Basic Wireless Settings menu c. Configure the wireless interface for wireless access. See the online help or the Understanding Basic Wireless Settings topic of this Reference Manual for full instructions. Note: You must set the Regulatory Domain.
Reference Manual for the NETGEAR ProSafe Wireless Access Point 802.11g WG302 Note: By default, WG302 is set to with the DHCP client disabled. If your network uses dynamic IP addresses, you will need to change this setting. d. Connect the power adapter to the wireless access point and plug the power adapter in to a power outlet. The PWR, LAN, and Wireless LAN lights and should light up. 4 VERIFY WIRELESS CONNECTIVITY Using a computer with an 802.11b or 802.
Reference Manual for the NETGEAR ProSafe Wireless Access Point 802.11g WG302 How to Log In to the WG302 Using Its Default IP Address 192.168.0.228 is the default IP address of your access point. The WG302 is set by default with the DHCP client disabled. Note: The computer you are using to connect to the WG302 should be configured with an IP address that starts with 192.168.0.x and a Subnet Mask of 255.255.255.0. 2. Open a Web browser such as Internet Explorer or Netscape Navigator. 3.
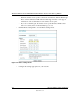
Reference Manual for the NETGEAR ProSafe Wireless Access Point 802.11g WG302 Figure 3-7: IP Settings menu • Access Point Name (NetBIOS) Enter a new name for the wireless access point and click Apply to save your changes. • The IP Address The wireless access point is shipped preconfigured with its DHCP client disabled and with the following private static IP addresses: – IP Address — 192.168.0.228 – IP Subnet Mask — 255.255.255.0 – Gateway — 0.0.0.0 – Primary and Secondary DNS Servers — 0.0.0.
Reference Manual for the NETGEAR ProSafe Wireless Access Point 802.11g WG302 • Spanning Tree Protocol Spanning Tree Protocol in enabled by default for the wireless access point. This provides network traffic optimization in settings with multiple WG302 Access Points. • Time Zone Select the time zone location for your setting. Note: You must have an Internet connection to get the current time.
Reference Manual for the NETGEAR ProSafe Wireless Access Point 802.11g WG302 • Turn Radio On. On by default, you can also turn off the radio to disable access through this device. This can be helpful for configuration, network tuning, or troubleshooting activities. • Wireless Network Name (SSID). The SSID is also known as the wireless network name. Enter a value of up to 32 alphanumeric characters.
Reference Manual for the NETGEAR ProSafe Wireless Access Point 802.11g WG302 – • 11b Only - All 802.11b wireless stations can be used. 802.11g wireless stations can still be used if they can operate in 802.11b mode. Channel. This field identifies which operating frequency will be used. It should not be necessary to change the wireless channel unless you notice interference problems or setting up the WG302 near another access point.
Reference Manual for the NETGEAR ProSafe Wireless Access Point 802.11g WG302 Understanding WEP/WPA Security Options The table below identifies the various WEP/WPA security options. A full explanation of these standards is available in Appendix B, “Wireless Networking Basics”. Figure 3-9: Wireless Security Settings The WEP/WPA settings are explained as follows: • Network Authentication: Specifies the Authentication type used. The default is Open System.
Reference Manual for the NETGEAR ProSafe Wireless Access Point 802.11g WG302 – – – WPA-PSK and WPA2-PSK: This selection allows clients to use either WPA (with TKIP) or WPA2 (with AES). If selected, encryption must be TKIP + AES. The WPA passphrase (Network key) must also be entered. WPA2 with Radius: WPA2 is a later version of WPA. Only select this if all clients support WPA2. If selected, you must use AES encryption, and configure the Radius Server Settings Screen.
Reference Manual for the NETGEAR ProSafe Wireless Access Point 802.11g WG302 Before You Change the SSID and WEP Settings For a new wireless network, print this form and fill in the parameters. For an existing wireless network, get the settings from the person who set up or is responsible for the network. Be sure to set the Regulatory Domain correctly as the first step. Store this information in a safe place.
Reference Manual for the NETGEAR ProSafe Wireless Access Point 802.11g WG302 How to Set Up and Test Basic Wireless Connectivity Follow the instructions below to set up and test basic wireless connectivity. Once you have established basic wireless connectivity, you can enable security settings appropriate to your needs. Log in to the WG302 using its default address of http://192.168.0.228 or at whatever IP address the unit is currently configured.
Reference Manual for the NETGEAR ProSafe Wireless Access Point 802.11g WG302 How to Restrict Wireless Access by MAC Address To restrict access based on MAC addresses, follow these steps: 1. Log in to the WG302 using its default address of http://192.168.0.228 or at whatever IP address the unit is currently configured. Use the default user name of admin and default password of password, or whatever LAN address and password you have set up.
Reference Manual for the NETGEAR ProSafe Wireless Access Point 802.11g WG302 4. Choose to use the local MAC address database stored on the access point, or use the RADIUS MAC address database stored on a RADIUS server. If you choose the RADIUS MAC Address Database, you must configure the RADIUS Server Settings first. 5. Then, either select from the list of available wireless cards the WG302 has found in your area, or enter the MAC address and device name for a device you plan to use.
Reference Manual for the NETGEAR ProSafe Wireless Access Point 802.11g WG302 Select encryption strength. 5. You can manually or automatically program the four data encryption keys. These values must be identical on all PCs and Access Points in your network. • Automatic - enter a word or group of printable characters in the Passphrase box and click the Generate button. The four key boxes will be automatically populated with key values.
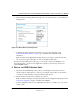
Reference Manual for the NETGEAR ProSafe Wireless Access Point 802.11g WG302 2. Click Radius Server Settings in the Security menu. Figure 3-12: Radius Server Settings 3. Enter the Radius settings. • Authentication/Access Control Radius Server Configuration: This configuration is required for authentication using Radius. IP Address, Port No. and Shared Secret is required for communication with Radius Server.
Reference Manual for the NETGEAR ProSafe Wireless Access Point 802.11g WG302 • Shared Secret: This is shared between the Wireless Access Point and the Radius Server while authenticating the supplicant. • Re-authentication Time: The time interval in seconds after which the supplicant will be authenticated again with the Radius Server. The default is 3600 seconds. • Global-key Re-Key Time: Check on this option to enable Re-keying of Global Key.
Reference Manual for the NETGEAR ProSafe Wireless Access Point 802.11g WG302 6. Choose WPA with Radius from the list. 7. Click Apply to save your settings. How to Configure WPA-PSK Note: Not all wireless adapters support WPA. Furthermore, client software is required on the client. Windows XP and Windows 2000 with Service Pack 3 do include the client software that supports WPA. Nevertheless, the wireless adapter hardware and driver must also support WPA.
Reference Manual for the NETGEAR ProSafe Wireless Access Point 802.11g WG302 How to Configure WPA2 with Radius Note: Not all wireless adapters support WPA2. Furthermore, client software is required on the client. Make sure your client card supports WPA2. Consult the product document for your wireless adapter and WPA2 client software for instructions on configuring WPA2 settings. To configure WPA2, follow these steps: 1. Log in at the default LAN address of http://192.168.0.
Reference Manual for the NETGEAR ProSafe Wireless Access Point 802.11g WG302 3. 4. Enter the Radius settings. • Authentication/Access Control Radius Server Configuration: This configuration is required for authentication using Radius. IP Address, Port No. and Shared Secret is required for communication with Radius Server. A Secondary Radius Server can be configured which is used on failure on Primary Radius Server • IP Address: The IP address of the Radius Server. The default is 0.0.0.0.
Reference Manual for the NETGEAR ProSafe Wireless Access Point 802.11g WG302 5. Click WEP/WPA Settings in the Security menu. Figure 3-16: WEP/WPA Settings menu 6. Choose WPA2 with Radius from the list. 7. Click Apply to save your settings. How to Configure WPA2-PSK Note: Not all wireless adapters support WPA2. Furthermore, client software is required on the client. Make sure your client card supports WPA2.
Reference Manual for the NETGEAR ProSafe Wireless Access Point 802.11g WG302 2. Click WEP/WPA Settings in the Security menu of the WG302. Figure 3-17: WEP/WPA Settings menu 3. Choose WPA2-PSK from the list. 4. Enter the pre-shared key passphrase. 5. Click Apply to save your settings. How to Configure WPA and WPA2 with Radius Note: Not all wireless adapters support WPA. Furthermore, client software is required on the client.
Reference Manual for the NETGEAR ProSafe Wireless Access Point 802.11g WG302 To configure WPA and WPA2, follow these steps: 1. Log in at the default LAN address of http://192.168.0.229 with the default user name of admin and default password of password, or using whatever LAN address and password you have set up. 2. Click Radius Server Settings in the Security menu. Figure 3-18: Radius Server Settings menu 3-30 Basic Installation and Configuration July 2005 v3.
Reference Manual for the NETGEAR ProSafe Wireless Access Point 802.11g WG302 3. 4. Enter the Radius settings. • Authentication/Access Control Radius Server Configuration: This configuration is required for authentication using Radius. IP Address, Port No. and Shared Secret is required for communication with Radius Server. A Secondary Radius Server can be configured which is used on failure on Primary Radius Server • IP Address: The IP address of the Radius Server. The default is 0.0.0.0.
Reference Manual for the NETGEAR ProSafe Wireless Access Point 802.11g WG302 5. Click WEP/WPA Settings in the Security menu. Figure 3-19: WEP/WPA Settings menu 6. Choose WAP and WPA2 with Radius from the list. 7. Click Apply to save your settings. How to Configure WPA2-PSK and WPA2-PSK Note: Not all wireless adapters support WPA. Furthermore, client software is required on the client. Windows XP and Windows 2000 with Service Pack 3 do include the client software that supports WPA.
Reference Manual for the NETGEAR ProSafe Wireless Access Point 802.11g WG302 2. Click WEP/WPA Settings in the Security menu of the WG302. Figure 3-20: WEP/WPA Settings menu 3. Choose WPA-PSK and WPA2-PSK from the list. 4. Enter the pre-shared key passphrase. 5. Click Apply to save your settings. Basic Installation and Configuration 3-33 July 2005 v3.
Reference Manual for the NETGEAR ProSafe Wireless Access Point 802.11g WG302 3-34 Basic Installation and Configuration July 2005 v3.