PS111W Wireless Ready Print Server Installation Guide
NETGEAR, INC. 4500 Great America Parkway Santa Clara, CA 95054 USA Phone: 1-888-NETGEAR E-mail: support@NETGEAR.com www.NETGEAR.com Technical Support YOU MUST REGISTER TO OBTAIN TECHNICAL SUPPORT. PLEASE RETAIN PROOF OF PURCHASE AND THE WARRANTY INFORMATION. To register your product, get product support or obtain product information and product documentation, go to http://www.NETGEAR.com/register. You will find technical support information at http://www.NETGEAR.com/ through the Customer Service area.
Start Here Instructions in this guide are for users with the following: • Microsoft® Windows® 95,Windows® 98,Windows® ME, Windows® 2000, Windows XP®, or Windows NT® • An Ethernet network card with the TCP/IP protocol enabled • A NETGEAR® MA401 802.11b Wireless PCMCIA PC Card* • An optional 802.
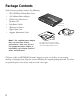
Package Contents Verify that your package contains the following: • PS111W Wireless Ready Print Server • 12V, 800mA Power Adapter • PS100 Series Print Server Resource CD • Installation Guide • Warranty & Owner Registration Card • Support Information Card PS111W Print Server Power adapter Note: If the supplied power adapter does not meet your country requirements, make sure you use the appropriate power adapter as required by your national electrical codes and ordinances.
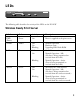
LEDs Wireless Ready PWR Print Server ALERT Model LAN PS111W WLAN The following table describes the activity of the LEDs on the PS111W Wireless Ready Print Server Label Color Activity Description PWR (Power) Green On Power is supplied to the print server. ALERT Amber Off On Blinking Normal Operation Hardware error Upgrading BIOS flash ROM LAN Green Off No LAN connection On Normal Operation – Idle (No data is being transmitted or received from the LAN.
Wireless PC Card Slot To take advantage of the optional wireless capability, you must remove the rubber slot cover before you can put in a NETGEAR MA401 802.11b Wireless PC Card. Insert the PC card very carefully to avoid damaging to the PC card or the print server slot. Apply only enough force to push the PC card firmly and slowly into the print server.
Rear Panel PRINTER NETWORK 12V DC Label Function Description PRINTER Parallel Printer Port Accepts an IEEE1284 printer cable that connects to the printer. NETWORK 10/100 BASE-T Network Port Auto-sensing 10/100 Mbps Ethernet port for direct connection to a 10 Mbps or 100 Mbps port on a switch or hub. A small button with no label Diagnostic and Restoreto-default Button Briefly pressing the button has no effect.
Typical applications You can use only one of the following applications.
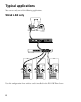
Wired LAN (Infrastructure Mode) Printer PRINTER NETWORK MA401 Card 12V DC PS111W Printer Server Access Point Notebook PC Notebook PC Desktop PC Requires that a NETGEAR MA401 802.11b Wireless PC card be installed in the PS111W Print Server. In Infrastructure mode, the Wired LAN connection on the PS111W CANNOT be used. Note that configuration must be performed via a Wired connection, which can be disconnected once the Wireless configuration is completed.
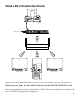
Wired LAN (Ad-hoc Mode) Desktop Notebook PC Printer PRINTER NETWORK MA401 Card 12V DC PS111W Printer Server Requires that a NETGEAR MA401 802.11b Wireless PC card be installed in the PS111W Print Server. Note that configuration must be performed via a Wired connection, which can be disconnected once the Wireless configuration is completed.
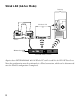
Wired and Ad-hoc Wireless LAN Desktop PC Notebook PC Printer PRINTER NETWORK MA401 Card 12V DC PS111W Printer Server DS108 Hub Requires that a NETGEAR MA401 802.11b Wireless PC card be installed in the PS111W Print Server. The Wireless LAN MUST use Ad-hoc mode in order to use both the wired and wireless connections on the PS111W Print Server.
Invalid Configuration! Desktop PC Notebook PC Notebook PC ME102 Wireless Printer PRINTER NETWORK MA401 Card 12V DC PS111W Printer Server DS108 Hub You CANNOT use both the wired and wireless connections on the PS111W simultaneously if the wireless LAN is in infrastructure mode. A valid setup connects and the Access Point to a hub or switch. In this scenario, there is no need to insert an Wireless PC Card into the PS111W.
Physical Installation If you have a NETGEAR MA401 802.11b Wireless PCMCIA Card, insert if before starting. (There is no PCMCIA Wireless card included in the PS111W print server package. It is sold separately by NETGEAR.) • Remove the rubber slot cover on the side of the PS111W Print Server. • Insert the NETGEAR MA401 802.11b Wireless PCMCIA Card into the side slot. Apply only enough force to firmly and slowly push the PC card into the print server. 1.
If you find any problems: • Check all connections • If required, verify the integrity of the print server by resetting it. Turn power to the print server off and then back on. • Refer to “Troubleshooting Information” at the end of this document for further information. Print Server Configuration An Administration program and Setup Wizard for Windows is provided to simplify Print Server configuration.
5. The "Choose Destination Location" screen lets you choose the location where you want to install the NETGEAR Print Server software. Normally it is "C: \Program Files\NETGEAR Print Server". Click on Next to continue with the default setting. 6. The "Select Program Folder" screen lets you choose the program folder name for your NETGEAR Print Server software. The default name is NETGEAR Print Server. Click on Next to continue with default settings. 7. The "Setup Complete" screen is now displayed.
6. 7. If a wireless card is installed, the next screen provides setup for the wireless printing environment. • Make SSID the same as used in the existing wireless environment. • The Channel number should also match the existing wireless environment. • If WEP is enabled, make sure the encryption keys are identical. Also, confirm that the authentication method (Open system or Shared key) is correct. • For more details, please refer to the User’s manual and reference guide.
setup program is not started, go to "Start – Run …" and type " d:\setup ", where " d " is the drive letter of the CD ROM drive. 2. A welcome screen runs. Click on Next. 3. A message screen shows some important information. Read the message and click on Next. 4. The "Select Components" screen shows the components you can install from the CD. • Select ONLY the "NETGEAR Add Printer Wizard". • Click on Next to continue. 5.
Troubleshooting Problem Cause Solution When running the Print Server Administration Program from the network administrator's PC, the print server cannot be seen. Either a hardware or software problem could prevent you from seeing the print server from the managing station. Make sure that: • There is a proper link established between the print server and the hub or workstation. If the LAN or WLAN LED is on, the link is good. • You should use proper cables.
Replacement Power Adapter PWR-012-101 Power adapter (12 V DC, 800 mA), linear, North America PWR-012-281 Power adapter (12 V DC, 800 mA) linear, Australia PWR-012-381 Power adapter (12 V DC, 800 mA) linear, General Europe PWR-012-401 Power adapter (12 V DC, 800 mA), linear, Japan PWR-012-701 Power adapter (12 V DC, 800 mA), linear, United Kingdom Technical Specifications Network Protocol and Standards Compatibility IEEE 802.3u, 100BASE-TX, Fast Ethernet IEEE 802.3i, 10BASE-T CSMA/CD Interface IEEE 802.
Warranty Information Print server and Power adapter, 2 years Certificate of the Manufacturer/Importer It is hereby certified that the, Model PS111W Print Server has been suppressed in accordance with the conditions set out in the BMPT-AmtsblVfg 243/1991 and Vfg 46/1992.The operation of some equipment (for example, test transmitters) in accordance with the regulations may, however, be subject to certain restrictions. Please refer to the notes in the operating instructions.
installation. If this equipment does cause harmful interference to radio or television reception, which can be determined by turning the equipment off and on, the user is encouraged to try to correct the interference by one or more of the following measures: Reorient or relocate the receiving antenna. Increase the separation between the equipment and receiver. Connect the equipment into an outlet on a circuit different from that to which the receiver is connected.