
Operation Manual


Specify Your Internet Settings
42
AC1750 Smart WiFi Router
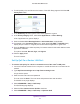
A login window opens.
3. Enter the router user name and password.
The user name is admin. The user name and password are case-sensitive.
The BASIC Home page displays.
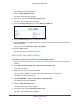
4. Select ADVANCED > Advanced Setup > VLAN / Bridge Settings.
The VLAN/Bridge Settings page displays.
5. Select the Enable VLAN / Bridge group check box.
6. Leave the By VLAN tag group radio button selected.
7. Click the Add button.
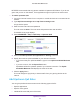
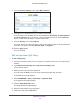
The Add Vlan Rule pop-up window opens.
8. In the Name field, enter a name for the VLAN tag group.
The name can be up to 10 characters.
9. In the VLAN ID field, enter a value from 1 to 4094.
This value is provided by your Internet service provider.
10. In the Priority field, enter a value from 0 to 7.
This value is provided by your Internet service provider.
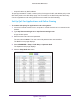
11. Select a Wired Ports check box or a Wireless check box:
• If your device is connected to an Ethernet port on the router, select a Wired Ports
check box that corresponds to the Ethernet port on the router to which the device is
connected.
• If your device is connected to your router’s WiFi network, select a Wireless check box
that corresponds to the router’s WiFi network to which the device is connected to.
Note: You must select at least one Wired Ports or Wireless check box. You
can select more than one check box.
12. Click the Add button.
The VLAN tag group is added.
13. Click the Apply button.
Your settings are saved.