User Manual Nighthawk AC1900 Smart WiFi Router Model R7000 January 2019 202-11973-01 NETGEAR, Inc. 350 E.
Nighthawk AC1900 Smart WiFi Router Support Thank you for purchasing this NETGEAR product. You can visit https://www.netgear.com/support/ to register your product, get help, access the latest downloads and user manuals, and join our community. We recommend that you use only official NETGEAR support resources. Compliance and Conformity For regulatory compliance information including the EU Declaration of Conformity, visit https://www.netgear.com/about/regulatory/.
Contents Chapter 1 Hardware Setup Unpack Your Router...........................................................................10 Top Panel LEDs and Buttons.............................................................11 Rear Panel............................................................................................14 Extend the Antennas..........................................................................15 Router Label..............................................................................
Nighthawk AC1900 Smart WiFi Router Model R7000 Manage the MTU Size........................................................................40 MTU Concepts................................................................................40 Change the MTU Size....................................................................42 Chapter 4 Control Access to the Internet Allow or Block Access to Your Network..........................................44 Use Keywords to Block Internet Sites..........................
Nighthawk AC1900 Smart WiFi Router Model R7000 Set Up a Guest WiFi Network............................................................78 Control the WiFi Radios.....................................................................80 Use the WiFi On/Off Button..........................................................81 Enable or Disable the WiFi Radios...............................................81 Set Up a WiFi Schedule......................................................................
Nighthawk AC1900 Smart WiFi Router Model R7000 Erase the Settings........................................................................111 Chapter 8 Share USB Storage Devices Attached to the Router USB Device Requirements..............................................................114 Connect a USB Storage Device to the Router..............................114 Access a Storage Device Connected to the Router From a Windows-Based Computer.............................................................
Nighthawk AC1900 Smart WiFi Router Model R7000 Set Up the Router’s iTunes Server With the Remote App......141 Set Up the Router to Work With TiVo............................................142 Change the NTP Server...................................................................143 Chapter 11 Share a USB Printer Install the Printer Driver and Cable the Printer.............................146 Download the ReadySHARE Printer Utility....................................
Nighthawk AC1900 Smart WiFi Router Model R7000 Network Settings..........................................................................172 Troubleshoot With the LEDs...........................................................173 Standard LED Behavior When the Router Is Powered On......173 Power LED Is Off or Blinking......................................................173 LEDs Never Turn Off....................................................................173 Internet or Ethernet Port LEDs Are Off.....
1 Hardware Setup This chapter contains the following sections: • • • • • • • Unpack Your Router Top Panel LEDs and Buttons Rear Panel Extend the Antennas Router Label Position Your Router Cable Your Router For more information about the topics covered in this manual, visit the support website at netgear.com/support.
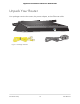
Nighthawk AC1900 Smart WiFi Router Model R7000 Unpack Your Router Your package contains the router, the power adapter, and an Ethernet cable. Figure 1.
Nighthawk AC1900 Smart WiFi Router Model R7000 Top Panel LEDs and Buttons The status LEDs and two buttons are located on the top panel of the router. Figure 2. Top view Table 1. LED descriptions LED and Button Description Power LED Solid amber. The router is starting. Blinking amber. The firmware is upgrading, or the Reset button was pressed. Solid white. The router is ready. Blinking white. The firmware is corrupted. Off. Power is not supplied to the router. Internet LED Solid white.
Nighthawk AC1900 Smart WiFi Router Model R7000 Table 1. LED descriptions (Continued) LED and Button Description 2.4 GHz WiFi LED Solid white. The 2.4 GHz WiFi radio is operating. Blinking white. The router is sending or receiving WiFi traffic. Off. The 2.4 GHz WiFi radio is off. 5 GHz WiFi LED Solid white. The 5 GHz WiFi radio is operating. Blinking white. The router is sending or receiving WiFi traffic. Off. The 5 GHz WiFi radio is off. USB port 1 LED The USB port 1 LED is for the USB 3.
Nighthawk AC1900 Smart WiFi Router Model R7000 Table 1. LED descriptions (Continued) LED and Button Description WiFi LED Pressing the WiFi button for two seconds turns the 2.4 Ghz and 5 GHz WiFi LEDs and WiFi radios on and off. If this LED is lit, the WiFi radios are on. If this LED is off, the WiFi radios are turned off and you cannot use WiFi to connect to the router. WPS LED Pressing the WPS button lets your WPS-enabled device join your router's WiFi network without typing the WiFi password.
Nighthawk AC1900 Smart WiFi Router Model R7000 Rear Panel The following figure shows the rear panel connectors and buttons. Figure 3. Rear panel Viewed from left to right, the rear panel contains the following components: • Reset button. Pressing the Reset button resets the router. If the Reset button is pressed for at least 10 seconds and the Power LED blinks white, the router returns to its factory settings. For information about the factory settings, see Factory Settings on page ?.
Nighthawk AC1900 Smart WiFi Router Model R7000 Extend the Antennas Before you install your router, extend the antennas as shown in the following figure. Figure 4. Position the antennas Router Label The router label shows the login information, WiFi Network Name (SSID), network key (password), serial number, and MAC address. Figure 5. Router label O NETGEAR SPEC. DOC-00093 FOR COLOR NCES. OR IS SHOWN TO THE RIGHT. Hardware Setup S ARE MAGENTA COLOR AND DO NOT PRINT.
Nighthawk AC1900 Smart WiFi Router Model R7000 Position Your Router The router lets you access your network anywhere within the operating range of your WiFi network. However, the operating distance or range of your WiFi connection can vary significantly depending on the physical placement of your router.
Nighthawk AC1900 Smart WiFi Router Model R7000 WiFi access points are routers, repeaters, WiFi range extenders, and any other device that emits a WiFi signal for network access. Cable Your Router Power on your router and connect it to a modem. Figure 6. Cable your router To cable your router: 1. Unplug your modem, remove and reinsert the backup battery if it uses one, and then plug the modem back in. 2. Use the Ethernet cable to connect the modem to the yellow Internet port on the router.
2 Connect to the Network and Access the Router You can connect to the router’s WiFi networks or use a wired Ethernet connection. This chapter explains the ways you can connect and how to access the router and log in.
Nighthawk AC1900 Smart WiFi Router Model R7000 Connect to the Network You can connect to the router’s network through a wired or WiFi connection. If you set up your computer to use a static IP address, change the settings so that it uses Dynamic Host Configuration Protocol (DHCP). Wired Connection You can connect your computer to the router using an Ethernet cable and join the router’s local area network (LAN). To connect your computer to the router with an Ethernet cable: 1.
Nighthawk AC1900 Smart WiFi Router Model R7000 4. Within two minutes, on your WPS-enabled device, press its WPS button or follow its instructions for WPS connections. Your WPS-enabled device connects to the WiFi network. Types of Logins Separate types of logins serve different purposes. It is important that you understand the difference so that you know which login to use when. Several types of logins are associated with the router: • ISP login.
Nighthawk AC1900 Smart WiFi Router Model R7000 If you cannot locate this information, ask your ISP to provide it. When your Internet connection is working, you no longer need to launch the ISP login program on your computer to access the Internet. When you start an Internet application, your router automatically logs you in. The NETGEAR installation assistant runs on any device with a web browser. Installation and basic setup takes about 15 minutes to complete. To automatically set up your router: 1.
Nighthawk AC1900 Smart WiFi Router Model R7000 c. Read You Cannot Access the Internet on page 175. If problems persist, register your NETGEAR product and contact NETGEAR Technical Support. When the router connects to the Internet, you are prompted to download and install the free ReadySHARE Vault app. Log In to the Router When you first connect to your router and launch a web browser, the browser automatically displays the router web interface.
Nighthawk AC1900 Smart WiFi Router Model R7000 Your router’s WiFi network name (SSID) and network key (password) are on the router label. 3. Launch the Nighthawk app on your mobile device. 4. Follow the instructions that display on the app to install your router and connect to the Internet. Change the Language By default, the language is set to Auto. To change the language: 1. Launch a web browser from a computer or WiFi device that is connected to the network. 2. Enter http://www.routerlogin.net.
3 Specify Your Internet Settings Usually, the quickest way to set up the router to use your Internet connection is to allow your router to detect the Internet connection when you first access the router with a web browser. You can also customize or specify your Internet settings.
Nighthawk AC1900 Smart WiFi Router Model R7000 Use the Internet Setup Wizard You can use the Setup Wizard to detect your Internet settings and automatically set up your router. The Setup Wizard is not the same as the pages that display the first time you connect to your router to set it up. To use the Setup Wizard: 1. Launch a web browser from a computer or mobile device that is connected to the router network. 2. Enter http://www.routerlogin.net. A login window opens. 3.
Nighthawk AC1900 Smart WiFi Router Model R7000 3. Enter the router admin user name and password. The user name is admin. The password is the one that you specified the first time that you logged in. The user name and password are case-sensitive. The BASIC Home page displays. 4. Select Internet. The Internet Setup page displays. 5. In the Does your Internet connection require a login? section, leave the No radio button selected. 6.
Nighthawk AC1900 Smart WiFi Router Model R7000 12. Click the Test button to test your Internet connection. If the NETGEAR website does not display within one minute, see You Cannot Access the Internet on page 175. Specify an Internet Connection That Uses a Login To view or change the basic Internet setup: 1. Launch a web browser from a computer or mobile device that is connected to the router network. 2. Enter http://www.routerlogin.net. A login window opens. 3.
Nighthawk AC1900 Smart WiFi Router Model R7000 • Get Dynamically from ISP. Your ISP uses DHCP to assign your IP address. Your ISP automatically assigns these addresses. • Use Static IP Address. Enter the IP address, IP subnet mask, and the gateway IP address that your ISP assigned. The gateway is the ISP router to which your router connects. 13. Select a Domain Name Server (DNS) Address radio button: • Get Automatically from ISP. Your ISP uses DHCP to assign your DNS servers.
Nighthawk AC1900 Smart WiFi Router Model R7000 4. Select ADVANCED > Advanced Setup > IPv6. The IPv6 page displays. 5. From the Internet Connection Type menu, select the IPv6 connection type: • If you are not sure, select Auto Detect so that the router detects the IPv6 type that is in use. • If your Internet connection does not use PPPoe or DHCP, or is not fixed, but is IPv6, select Auto Config. Your Internet service provider (ISP) can provide this information. 6. Click the Apply button.
Nighthawk AC1900 Smart WiFi Router Model R7000 The page adjusts. The router automatically detects the information in the following fields: • Connection Type. This field indicates the connection type that is detected. • Router’s IPv6 Address on WAN. This field shows the IPv6 address that is acquired for the router’s WAN (or Internet) interface. The number after the slash (/) is the length of the prefix, which is also indicated by the underline (_) under the IPv6 address.
Nighthawk AC1900 Smart WiFi Router Model R7000 To set up an IPv6 Internet connection by using a 6to4 tunnel: 1. Launch a web browser from a computer or mobile device that is connected to the router network. 2. Enter http://www.routerlogin.net. A login window opens. 3. Enter the router admin user name and password. The user name is admin. The password is the one that you specified the first time that you logged in. The user name and password are case-sensitive. The BASIC Home page displays. 4.
Nighthawk AC1900 Smart WiFi Router Model R7000 • Secured. In secured mode, which is the default mode, the router inspects both TCP and UDP packets. • Open. In open mode, the router inspects UDP packets only. 10. Click the Apply button. Your settings are saved. Set Up an IPv6 Pass Through Internet Connection In pass-through mode, the router works as a Layer 2 Ethernet switch with two ports (LAN and WAN Ethernet ports) for IPv6 packets. The router does not process any IPv6 header packets.
Nighthawk AC1900 Smart WiFi Router Model R7000 3. Enter the router admin user name and password. The user name is admin. The password is the one that you specified the first time that you logged in. The user name and password are case-sensitive. The BASIC Home page displays. 4. Select ADVANCED > Advanced Setup > IPv6. The IPv6 page displays. 5. From the Internet Connection Type menu, select Fixed. The page sdjusts. 6. Configure the fixed IPv6 addresses for the WAN connection: • IPv6 Address/Prefix Length.
Nighthawk AC1900 Smart WiFi Router Model R7000 • Secured. In secured mode, which is the default mode, the router inspects both TCP and UDP packets. • Open. In open mode, the router inspects UDP packets only. 10. Click the Apply button. Your settings are saved. Set Up an IPv6 DHCP Internet Connection To set up an IPv6 Internet connection with a DHCP server: 1. Launch a web browser from a computer or mobile device that is connected to the router network. 2. Enter http://www.routerlogin.net.
Nighthawk AC1900 Smart WiFi Router Model R7000 7. (Optional) In the Domain Name (If Required) field, enter a domain name. You can type the domain name of your IPv6 ISP. Do not enter the domain name for the IPv4 ISP here. For example, if your ISP’s mail server is mail.xxx.yyy.zzz, type xxx.yyy.zzz as the domain name. If your ISP provided a domain name, type it in this field. For example, Earthlink Cable might require a host name of home, and Comcast sometimes supplies a domain name. 8.
Nighthawk AC1900 Smart WiFi Router Model R7000 4. Select ADVANCED > Advanced Setup > IPv6. The IPv6 page displays. 5. From the Internet Connection Type menu, select PPPoE. The page adjusts. The router automatically detects the information in the following fields: • Router’s IPv6 Address on WAN. This field shows the IPv6 address that is acquired for the router’s WAN (or Internet) interface.
Nighthawk AC1900 Smart WiFi Router Model R7000 10. (Optional) Select the Use This Interface ID check box and specify the interface ID to be used for the IPv6 address of the router’s LAN interface. If you do not specify an ID here, the router generates one automatically from its MAC address. 11. Select an IPv6 Filtering radio button: • Secured. In secured mode, which is the default mode, the router inspects both TCP and UDP packets. • Open. In open mode, the router inspects UDP packets only. 12.
Nighthawk AC1900 Smart WiFi Router Model R7000 prefix, which is also indicated by the underline (_) under the IPv6 address. If no address is acquired, the field displays Not Available. 6. (Optional) In the DHCP User Class (If Required) field, enter a host name. Most people can leave this field blank, but if your ISP gave you a specific host name, enter it here. 7. (Optional) In the DHCP Domain Name (If Required) field, enter a domain name. You can type the domain name of your IPv6 ISP.
Nighthawk AC1900 Smart WiFi Router Model R7000 mechanism relies on an algorithmic mapping between the IPv6 and IPv4 addresses that are assigned for use within the service provider’s network. This mapping allows for automatic determination of IPv4 tunnel endpoints from IPv6 prefixes, allowing stateless operation of 6rd. With a 6rd tunnel configuration, the router follows the RFC5969 standard, supporting two ways to establish a 6rd tunnel IPv6 WAN connection: • Auto Detect mode.
Nighthawk AC1900 Smart WiFi Router Model R7000 • Get Automatically from ISP. Your ISP uses DHCP to assign your DNS servers. Your ISP automatically assigns this address. • Use These DNS Servers. If you know that your ISP requires specific servers, select this option. Enter the IP address of your ISP’s primary DNS server. If a secondary DNS server address is available, enter it also. 7. Select an IP Address Assignment radio button: • Use DHCP Server.
Nighthawk AC1900 Smart WiFi Router Model R7000 The best MTU setting for NETGEAR equipment is often the default value. In some situations, changing the value fixes one problem but causes another. Leave the MTU unchanged unless one of these situations occurs: • You experience problems connecting to your ISP or other Internet service, and the technical support of either the ISP or NETGEAR recommends changing the MTU setting.
Nighthawk AC1900 Smart WiFi Router Model R7000 Table 2. Common MTU sizes (Continued) MTU Application 1458 Used in PPPoA environments. 1436 Used in PPTP environments or with VPN. Change the MTU Size To change the MTU size: 1. Launch a web browser from a computer or mobile device that is connected to the router network. 2. Enter http://www.routerlogin.net. A login window opens. 3. Enter the router admin user name and password. The user name is admin.
4 Control Access to the Internet The router comes with a built-in firewall that helps protect your home network from unwanted intrusions from the Internet.
Nighthawk AC1900 Smart WiFi Router Model R7000 Allow or Block Access to Your Network You can use access control to block or allow access to your network. To set up access control: 1. Launch a web browser from a computer or mobile device that is connected to the router network. 2. Enter http://www.routerlogin.net. A login window opens. 3. Enter the router admin user name and password. The user name is admin. The password is the one that you specified the first time that you logged in.
Nighthawk AC1900 Smart WiFi Router Model R7000 8. To allow the WiFi-enabled computer or mobile device you’re currently using to continue to access the network, select the check box next to your computer or device, and click the Allow button. 9. Click the Apply button. Your settings are saved. Use Keywords to Block Internet Sites You can use keywords to block certain Internet sites from your network. You can use blocking all the time or based on a schedule. To block Internet sites: 1.
Nighthawk AC1900 Smart WiFi Router Model R7000 • Enter a period (.) to block all Internet browsing access. 7. Click the Add Keyword button. The keyword is added to the keyword list. The keyword list supports up to 32 entries. 8. Click the Apply button. Keyword blocking takes effect.
Nighthawk AC1900 Smart WiFi Router Model R7000 Block Services From the Internet You can block Internet services on your network based on the type of service. You can block the services all the time or based on a schedule. To block services: 1. Launch a web browser from a computer or mobile device that is connected to the router network. 2. Enter http://www.routerlogin.net. A login window opens. 3. Enter the router admin user name and password. The user name is admin.
Nighthawk AC1900 Smart WiFi Router Model R7000 9. Select a filtering option: • Only This IP Address. Block services for a single computer. • IP Address Range. Block services for a range of computers with consecutive IP addresses on your network. • All lP Addresses. Block services for all computers on your network. 10. Click the Add button. Your settings are saved. Delete Keywords From the Blocked List To delete keywords from the list: 1.
Nighthawk AC1900 Smart WiFi Router Model R7000 To specify a trusted computer: 1. Launch a web browser from a computer or mobile device that is connected to the router network. 2. Enter http://www.routerlogin.net. A login window opens. 3. Enter the router admin user name and password. The user name is admin. The password is the one that you specified the first time that you logged in. The user name and password are case-sensitive. The BASIC Home page displays. 4. Select ADVANCED > Security > Block Sites.
Nighthawk AC1900 Smart WiFi Router Model R7000 6. Click the View list of allowed devices not currently connected to the network link. The list displays. 7. Select the check box for a device. 8. Use the Add button, Edit button, and Remove from the list button as needed. 9. Click the Apply button. Your settings are saved. Schedule When to Block Internet Sites and Services When you schedule blocking, the same schedule is used to block sites and to block services. To schedule blocking: 1.
Nighthawk AC1900 Smart WiFi Router Model R7000 Set Up Security Event Email Notifications The router can email you its logs of router activity. The log records router activity and security events such as attempts to access blocked sites or services. To set up email notifications: 1. Launch a web browser from a computer or mobile device that is connected to the router network. 2. Enter http://www.routerlogin.net. A login window opens. 3. Enter the router admin user name and password. The user name is admin.
Nighthawk AC1900 Smart WiFi Router Model R7000 11. To send alerts when someone attempts to visit a blocked site, select the Send Alerts Immediately check box. Email alerts are sent immediately when someone attempts to visit a blocked site. 12. To send logs based on a schedule, specify these settings: a. From Send logs according to this schedule menu, select the schedule type. b. From the Day menu, select the day. c. From the Time menu, select the time, and select the am or pm radio button. 13.
5 Optimize Performance This chapter contains the following sections: • • • • Optimize Internet Streaming With Dynamic QoS Improve Network Connections With Universal Plug-N-Play Manage Wi-Fi Multimedia Quality of Service Enable or Disable Smart Connect 53
Nighthawk AC1900 Smart WiFi Router Model R7000 Optimize Internet Streaming With Dynamic QoS Dynamic Quality of Service (QoS) helps improve your router’s Internet traffic management capabilities through better application and device identification, bandwidth allocation, and traffic prioritization techniques. Dynamic QoS resolves traffic congestion when the Internet bandwidth is limited and different demands compete for bandwidth.
Nighthawk AC1900 Smart WiFi Router Model R7000 • QoS by LAN Port. For more information, see Add a QoS Rule by LAN pot on page 56. 9. Click the Apply button. Your settings are saved. Add a QoS Rule by Service To add a QoS rule by service: 1. Launch a web browser from a computer or mobile device that is connected to the router network. 2. Enter http://www.routerlogin.net. A login window opens. 3. Enter the router admin user name and password. The user name is admin.
Nighthawk AC1900 Smart WiFi Router Model R7000 To add a QoS rule by device: 1. Launch a web browser from a computer or mobile device that is connected to the router network. 2. Enter http://www.routerlogin.net. A login window opens. 3. Enter the router admin user name and password. The user name is admin. The password is the one that you specified the first time that you logged in. The user name and password are case-sensitive. The BASIC Home page displays. 4. Select QoS. The QoS page displays. 5.
Nighthawk AC1900 Smart WiFi Router Model R7000 The user name is admin. The password is the one that you specified the first time that you logged in. The user name and password are case-sensitive. The BASIC Home page displays. 4. Select QoS. The QoS page displays. 5. Make sure that the Enable QoS check box is selected. 6. Make sure that the Advance QoS radio button is selected. 7. Select the QoS by LAN Port radio button. The page adjusts. 8. In the QoS Policy for field, enter a name for the QoS rule. 9.
Nighthawk AC1900 Smart WiFi Router Model R7000 6. Click the Edit button. The page adjusts. 7. Change the settings. 8. Click the Apply button. Your settings are saved. Delete a QoS Rule To delete a QoS rule: 1. Launch a web browser from a computer or mobile device that is connected to the router network. 2. Enter http://www.routerlogin.net. A login window opens. 3. Enter the router admin user name and password. The user name is admin.
Nighthawk AC1900 Smart WiFi Router Model R7000 4. Select ADVANCED > Setup > QoS Setup. The QoS Setup page displays. 5. Click the Delete All button. All QoS rules are deleted. Enable Dynamic QoS You can enable dynamic QoS and let the router automatically prioritize Internet traffic. To enable dynamic QoS: 1. Launch a web browser from a computer or mobile device that is connected to the router network. 2. Enter http://www.routerlogin.net. A login window opens. 3. Enter the router user name and password.
Nighthawk AC1900 Smart WiFi Router Model R7000 • I want to define my Internet Bandwidth. If you know what your download and upload speed are, select this radio button and enter your download and upload speeds in the fields. 8. Click the Apply button. Your settings are saved. Enable or Disable the Automatic QoS Database Update The router uses a QoS database of the most popular applications and services to implement Dynamic QoS. By default, the router automatically updates this database.
Nighthawk AC1900 Smart WiFi Router Model R7000 Improve Network Connections With Universal Plug-N-Play Universal Plug-N-Play (UPnP) helps devices such as Internet appliances and computers access the network and connect to other devices as needed. UPnP devices can automatically discover the services from other registered UPnP devices on the network. If you use applications such as multiplayer gaming, peer-to-peer connections, or real-time communications such as instant messaging, enable UPnP.
Nighthawk AC1900 Smart WiFi Router Model R7000 hops, which should be fine for most home networks. If you notice that some devices are not being updated or reached correctly, it might be necessary to increase this value. 8. Click the Apply button. The UPnP Portmap Table displays the IP address of each UPnP device that is accessing the router and which ports (internal and external) that device opened.
Nighthawk AC1900 Smart WiFi Router Model R7000 7. Click the Apply button. Your settings are saved. Enable or Disable Smart Connect Smart Connect selects the fastest WiFi band for your device. For Smart Connect to work, the 2.4 GHz and 5 GHz bands must use the same WiFi network name (SSID) and network key (password). That means that when you connect to the router with WiFi, you see only one SSID that connects to both bands. Note: If you enable Smart Connect and the SSID and passwords for the 2.
6 Manage Network Settings The router comes ready for WiFi, Ethernet, and USB connections. You can customize the router’s network settings. We recommend that you install the router and connect it to the Internet before you change its network settings.
Nighthawk AC1900 Smart WiFi Router Model R7000 View or Change WAN Settings You can view or configure wide area network (WAN) settings for the Internet port. You can set up a DMZ (demilitarized zone) server, change the maximum transmit unit (MTU) size, and enable the router to respond to a ping to its WAN (Internet) port. To view or change the WAN settings: 1. Launch a web browser from a computer or mobile device that is connected to the router network. 2. Enter http://www.routerlogin.net.
Nighthawk AC1900 Smart WiFi Router Model R7000 • Disable IGMP Proxying. IGMP proxying allows a computer on the local area network (LAN) to receive the multicast traffic it is interested in from the Internet. If you do not need this feature, you can select this check box to disable it. 5. Click the Apply button. Your settings are saved.
Nighthawk AC1900 Smart WiFi Router Model R7000 5. Select the Default DMZ Server check box. 6. Type the IP address. 7. Click the Apply button. Your settings are saved. Change the Router’s Device Name The router’s default device name is based on its model number. This device name displays in the file manager when you browse your network. To change the router’s device name: 1. Launch a web browser from a computer or mobile device that is connected to the router network. 2. Enter http://www.routerlogin.net.
Nighthawk AC1900 Smart WiFi Router Model R7000 These addresses are part of the designated private address range for use in private networks and are suitable for most applications. If your network requires a different IP addressing scheme, you can change these settings. You might want to change these settings if you need a specific IP subnet that one or more devices on the network use, or if you use competing subnets with the same IP scheme. To change the LAN TCP/IP settings: 1.
Nighthawk AC1900 Smart WiFi Router Model R7000 • RIP-2. This format carries more information. Both RIP-2B and RIP-2M send the routing data in RIP-2 format. RIP-2B uses subnet broadcasting. RIP-2M uses multicasting. 8. Click the Apply button. Your settings are saved. If you changed the LAN IP address of the router, you are disconnected when this change takes effect. 9. To reconnect, close your browser, relaunch it, and log in to the router.
Nighthawk AC1900 Smart WiFi Router Model R7000 6. Specify the range of IP addresses that the router assigns: a. In the Starting IP Address field, type the lowest number in the range. This IP address must be in the same subnet as the router. b. In the Ending IP Address field, type the number at the end of the range of IP addresses. This IP address must be in the same subnet as the router. 7. Click the Apply button. Your settings are saved.
Nighthawk AC1900 Smart WiFi Router Model R7000 The LAN Setup page displays. 5. Clear the Use Router as DHCP Server check box. 6. Click the Apply button. Your settings are saved. 7. (Optional) If this service is disabled and no other DHCP server is on your network, set your computer IP addresses manually so that the computers can access the router.
Nighthawk AC1900 Smart WiFi Router Model R7000 8. Click the Apply button. The reserved address is entered into the table. The reserved address is not assigned until the next time the computer contacts the router’s DHCP server. Reboot the computer, or access its IP configuration and force a DHCP release and renew. Edit a Reserved IP Address To edit a reserved address entry: 1. Launch a web browser from a computer or mobile device that is connected to the router network. 2. Enter http://www.routerlogin.net.
Nighthawk AC1900 Smart WiFi Router Model R7000 The user name is admin. The password is the one that you specified the first time that you logged in. The user name and password are case-sensitive. The BASIC Home page displays. 4. Select ADVANCED > Setup > LAN Setup. The LAN Setup page displays. 5. Select the radio button next to the reserved address that you want to delete. 6. Click the Delete button. The address is removed.
Nighthawk AC1900 Smart WiFi Router Model R7000 The WPS process automatically sets up yourr WPS-enabled device with the network password when it connects. The router WPS page displays a confirmation message. Specify Basic WiFi Settings The router comes with preset security. This means that the WiFi network name (SSID), network key (password), and security option (encryption protocol) are preset in the factory. You can find the preset SSID and password on the router label.
Nighthawk AC1900 Smart WiFi Router Model R7000 When this check box is selected, the router broadcasts its network name (SSID) so that it displays when you scan for local WiFi networks on your computer or mobile device. 7. To change the network name (SSID), type a new name in the Name (SSID) field. The name can be up to 32 characters long and it is case-sensitive. The default SSID is randomly generated and is on the router label.
Nighthawk AC1900 Smart WiFi Router Model R7000 To change the WiFi Mbps settings: 1. Launch a web browser from a computer or mobile device that is connected to the router network. 2. Enter http://www.routerlogin.net. A login window opens. 3. Enter the router admin user name and password. The user name is admin. The password is the one that you specified the first time you logged in. The user name and password are case-sensitive. The BASIC Home page displays. 4. Select Wireless.
Nighthawk AC1900 Smart WiFi Router Model R7000 7. Click the Apply button. Your settings are saved. Change the WiFi Password or the WiFi Security The WiFi password is different from the admin password that you use to log in to the router. Your router comes with preset WPA2 or WPA security. We recommend that you use the preset security, but you can change the settings. Do not disable the preset security. To change the WiFi password or the WiFi security: 1.
Nighthawk AC1900 Smart WiFi Router Model R7000 • WPA2-PSK [AES]. This option is the default setting. This type of security enables WiFi devices that support WPA2 to join the router’s WiFi network. If you did not change the WiFi password, the default password displays. The default password is printed on the router label.WPA2 provides a secure connection but some older WiFi devices do not detect WPA2 and support only WPA.
Nighthawk AC1900 Smart WiFi Router Model R7000 To set up a guest network: 1. Launch a web browser from a computer or mobile device that is connected to the router network. 2. Enter http://www.routerlogin.net. A login window opens. 3. Enter the router admin user name and password. The user name is admin. The password is the one that you specified the first time that you logged in. The user name and password are case-sensitive. The BASIC Home page displays. 4. Select Guest Network.
Nighthawk AC1900 Smart WiFi Router Model R7000 network at the fastest speed. If your network includes older devices that do not support WPA2, select WPA-PSK [TKIP] + WPA2-PSK [AES] security. To use WPA2 security, in the Password (Network Key) field, enter a phrase of 8 to 63 characters. To join the 2.4 GHz or 5 GHz guest WiFi network, a user must enter this password. • WPA-PSK [TKIP] + WPA2-PSK [AES]. This type of security enables WiFi devices that support either WPA or WPA2 to join the 2.
Nighthawk AC1900 Smart WiFi Router Model R7000 Use the WiFi On/Off Button To turn the WiFi radios off and on with the WiFi On/Off button: Press the WiFi On/Off button on the top of the router for two seconds. If you turned off the WiFi radios, the WiFi On/Off LED and the WPS LED turn off. If you turned on the WiFi radios, the WiFi On/Off LED and the WPS LED light.
Nighthawk AC1900 Smart WiFi Router Model R7000 To set up the WiFi schedule: 1. Launch a web browser from a computer or mobile device that is connected to the router network. 2. Enter http://www.routerlogin.net. A login window opens. 3. Enter the router admin user name and password. The user name is admin. The password is the one that you specified the first time that you logged in. The user name and password are case-sensitive. The BASIC Home page displays. 4.
Nighthawk AC1900 Smart WiFi Router Model R7000 The user name is admin. The password is the one that you specified the first time that you logged in. The user name and password are case-sensitive. The BASIC Home page displays. 4. Select ADVANCED > Advanced Setup > Wireless Settings. The Wireless Settings page displays. The Router’s PIN field displays the fixed PIN that you can use to configure the router’s WiFi settings from another device through WPS. 5.
Nighthawk AC1900 Smart WiFi Router Model R7000 The user name is admin. The default password is password. The user name and password are case-sensitive. The BASIC Home page displays. 5. Select ADVANCED > Advanced Setup > Router/ AP / Bridge Mode. The Router / AP / Bridge Mode page displays. 6. Select AP Mode. The page adjusts. 7. Select an IP address setting: • Get dynamically from existing router. The other router on the network assigns an IP address to this router while it is in AP mode.
Nighthawk AC1900 Smart WiFi Router Model R7000 For example, you can install the first router in a room like a home office where your Internet connection is located, then set up the second router in bridge mode. Place the router in bridge mode in a different room with your home entertainment center. Cable the router in bridge mode to your Smart TV, DVR, game console or Blu-ray player, and use its 802.11ac WiFi connection to the first router. To set up the router in bridge mode: 1.
Nighthawk AC1900 Smart WiFi Router Model R7000 10. Click the Apply button on the Router / AP / Bridge Mode page. Your settings are saved. Set Up the Router as a WiFi Repeater You can set up your router as a wireless repeater. In this mode, the router communicates with another base station or wireless station. Use a wired Ethernet connection to set up the repeater unit to avoid conflicts with the wireless connection.
Nighthawk AC1900 Smart WiFi Router Model R7000 9. To prevent wireless clients from associating with the repeater and allow LAN client associations only, select Disable Wireless Client Association. You can leave the check box cleared if you prefer wireless clients to be able to associate with the repeater. 10. In the Base Station MAC Address field, enter the MAC addresses for the access point that will be the base station. 11. Click the Apply button. Your settings are saved. 12.
Nighthawk AC1900 Smart WiFi Router Model R7000 To configure a port group and enable the bridge: 1. Launch a web browser from a computer or mobile device that is connected to the router network. 2. Enter http://www.routerlogin.net. A login window opens. 3. Enter the router admin user name and password. The user name is admin. The password is the one that you specified the first time that you logged in. The user name and password are case-sensitive. The BASIC Home page displays. 4.
Nighthawk AC1900 Smart WiFi Router Model R7000 packets that are sent between the IPTV device and the router’s Internet port from being processed through the router’s network address translation (NAT) service. You can add VLAN tag groups to a bridge and assign VLAN IDs and priority values to each VLAN tag group. To add a VLAN tag group and enable the bridge: 1. Launch a web browser from a computer or mobile device that is connected to the network. 2. Enter http://www.routerlogin.net. A login window opens.
Nighthawk AC1900 Smart WiFi Router Model R7000 (Continued) Field Description Priority Enter a value from 0 to 7. Select the check box for a wired LAN port or WiFi port. If your device is connected to an Ethernet port on the router, select the LAN port check box that corresponds to the Ethernet port on the router to which the device is connected.
Nighthawk AC1900 Smart WiFi Router Model R7000 • The Gateway IP Address field specifies that all traffic for these addresses will be forwarded to the ISDN router at 192.168.1.100. • A metric value of 1 works because the ISDN router is on the LAN. • The Private check box is selected only as a precautionary security measure in case RIP is activated. Set Up a Static Route To set up a static route: 1. Launch a web browser from a computer or mobile device that is connected to the router network. 2.
Nighthawk AC1900 Smart WiFi Router Model R7000 • Gateway IP Address. Enter the IP address of the gateway. The IP address of the gateway must be on the same LAN segment as the router. • Metric. Enter a number from 1 through 15. This value represents the number of routers between your network and the destination. Usually, a setting of 2 or 3 works, but if this is a direct connection, set it to 1. 10. Click the Apply button. Your settings are saved.
Nighthawk AC1900 Smart WiFi Router Model R7000 Delete a Static Route To delete a static route: 1. Launch a web browser from a computer or mobile device that is connected to the router network. 2. Enter http://www.routerlogin.net. A login window opens. 3. Enter the router admin user name and password. The user name is admin. The password is the one that you specified the first time that you logged in. The user name and password are case-sensitive. The BASIC Home page displays. 4.
7 Manage Your Router This chapter describes the router settings for administering and maintaining your router and home network.
Nighthawk AC1900 Smart WiFi Router Model R7000 Update the Router Firmware You can log in to the router and check if new firmware is available, or you can manually load a specific firmware version to your router. Check for New Firmware and Update the Router The router firmware (routing software) is stored in flash memory. You might see a message at the top of the router pages when new firmware is available.
Nighthawk AC1900 Smart WiFi Router Model R7000 When the upload is complete, your router restarts. The update process typically takes about one minute. Read the new firmware release notes to find out if you must reconfigure the router after updating. Manually Upload Firmware to the Router If you want to upload a specific firmware version, or your router fails to update its firmware automatically, follow these instructions.
Nighthawk AC1900 Smart WiFi Router Model R7000 Change the admin Password You can change the default password that is used to log in to the router with the user name admin. This password is not the one that you use for WiFi access. Note: Be sure to change the password for the user name admin to a secure password. The ideal password contains no dictionary words from any language and contains uppercase and lowercase letters, numbers, and symbols. It can be up to 30 characters.
Nighthawk AC1900 Smart WiFi Router Model R7000 To enable password recovery: 1. Launch a web browser from a computer or mobile device that is connected to the router network. 2. Enter http://www.routerlogin.net. A login window opens. 3. Enter the router admin user name and password. The user name is admin. The password is the one that you specified the first time that you logged in. The user name and password are case-sensitive. The BASIC Home page displays. 4.
Nighthawk AC1900 Smart WiFi Router Model R7000 6. Enter the saved answers to your security questions. 7. Click the Continue button. A window opens and displays your recovered password. 8. Click the Login again button. A login window opens. 9. With your recovered password, log in to the router. View Information About the Router and the Internet and WiFi Settings You can view router information, the Internet port status, and WiFi settings.
Nighthawk AC1900 Smart WiFi Router Model R7000 Display Internet Port Statistics To display Internet port statistics: 1. Launch a web browser from a computer or mobile device that is connected to the router network. 2. Enter http://www.routerlogin.net. A login window opens. 3. Enter the router admin user name and password. The user name is admin. The password is the one that you specified the first time that you logged in. The user name and password are case-sensitive. The BASIC Home page displays. 4.
Nighthawk AC1900 Smart WiFi Router Model R7000 6. To change the polling frequency, enter a time in seconds in the Poll Interval field and click the Set Interval button. To stop the polling entirely, click the Stop button. Check the Internet Connection Status To check the Internet connection status: 1. Launch a web browser from a computer or mobile device that is connected to the router network. 2. Enter http://www.routerlogin.net. A login window opens. 3. Enter the router admin user name and password.
Nighthawk AC1900 Smart WiFi Router Model R7000 8. To exit the screen, click the Close Window button. View and Manage Logs of Router Activity The log is a detailed record of the websites you accessed or attempted to access and other router actions. Up to 256 entries are stored in the log. To view and manage logs: 1. Launch a web browser from a computer or mobile device that is connected to the router network. 2. Enter http://www.routerlogin.net. A login window opens. 3.
Nighthawk AC1900 Smart WiFi Router Model R7000 View Devices Currently on the Network You can view all computers or devices that are currently connected to your network. To view devices on the network: 1. Launch a web browser from a computer or mobile device that is connected to the router network. 2. Enter http://www.routerlogin.net. A login window opens. 3. Enter the router admin user name and password. The user name is admin. The password is the one that you specified the first time that you logged in.
Nighthawk AC1900 Smart WiFi Router Model R7000 3. Enter the router admin user name and password. The user name is admin. The password is the one that you specified the first time that you logged in. The user name and password are case-sensitive. The BASIC Home page displays. 4. Select ADVANCED > Advanced Setup > Traffic Meter. The Traffic Meter page displays. 5. Select the Enable Traffic Meter check box. 6.
Nighthawk AC1900 Smart WiFi Router Model R7000 12. To display more information about the data traffic on your router and to change the poll interval, click the Traffic Status button. Manage the Router Configuration File The configuration settings of the router are stored within the router in a configuration file. You can back up (save) this file to your computer, restore it, or reset it to the factory default settings. Back Up Settings To back up the router’s configuration settings: 1.
Nighthawk AC1900 Smart WiFi Router Model R7000 3. Enter the router user name and password. The user name is admin. The password is the one that you specified the first time that you logged in. The user name and password are case-sensitive. The BASIC Home page displays. 4. Select ADVANCED > Administration > Backup Settings. The Backup Settings page displays. 5. Click the Erase button. The configuration is reset to factory default settings. When the reset is complete, the router restarts.
Nighthawk AC1900 Smart WiFi Router Model R7000 Remote Access You can access your router over the Internet to view or change its settings. You must know the router’s WAN IP address to use this feature. Note: Be sure to change the password for the user name admin to a secure password. The ideal password contains no dictionary words from any language and contains uppercase and lowercase letters, numbers, and symbols. It can be up to 30 characters. See Change the admin Password on page 97.
Nighthawk AC1900 Smart WiFi Router Model R7000 7. Specify the port number for accessing the router web interface. Normal web browser access uses the standard HTTP service port 80. For greater security, enter a custom port number for the remote router web interface. Choose a number from 1024 to 65535, but do not use the number of any common service port. The default is 8443, which is a common alternate for HTTP. 8. Click the Apply button. Your settings are saved. Use Remote Access To use remote access: 1.
Nighthawk AC1900 Smart WiFi Router Model R7000 Disable LED Blinking or Turn Off LEDs The LEDs on the top panel of the router indicate activities and behavior. You can disable LED blinking for network communications, or turn off all LEDs except the Power LED. To disable LED blinking or turn off the LEDs: 1. Launch a web browser from a computer or mobile device that is connected to the router network. 2. Enter http://www.routerlogin.net. A login window opens. 3. Enter the router user name and password.
Nighthawk AC1900 Smart WiFi Router Model R7000 The BASIC Home page displays. 4. Select ADVANCED > Administration > NTP Settings. The NTP Settings page displays. 5. Select your time zone from the menu. 6. If you live in a region that observes daylight saving time, select the Automatically adjust for daylight savings time check box. 7. Click the Apply button. Your settings are saved. Change the NTP Server By default, the router uses the NETGEAR NTP server to sync the network time.
Nighthawk AC1900 Smart WiFi Router Model R7000 Return the Router to Its Factory Default Settings Under some circumstances (for example, if you lost track of the changes that you made to the router settings or you move the router to a different network), you might want to erase the configuration and reset the router to factory default settings.
Nighthawk AC1900 Smart WiFi Router Model R7000 To erase the settings: 1. Launch a web browser from a computer or mobile device that is connected to the router network. 2. Enter http://www.routerlogin.net. A login window opens. 3. Enter the router user name and password. The user name is admin. The password is the one that you specified the first time that you logged in. The user name and password are case-sensitive. The BASIC Home page displays. 4. Select ADVANCED > Administration > Backup Settings.
8 Share USB Storage Devices Attached to the Router This chapter describes how to access and manage storage devices attached to your router. ReadySHARE lets you access and share USB storage devices connected to the router. (If your storage device uses special drivers, it is not compatible.) Note: The USB ports on the router can be used only to connect USB storage devices like flash drives or hard drives. Do not connect computers, USB modems, CD drives, or DVD drives to the router USB port.
Nighthawk AC1900 Smart WiFi Router Model R7000 USB Device Requirements The router works with most USB-compliant external flash and hard drives. For the most up-to-date list of USB devices that the router supports, visit kb.netgear.com/app/answers/detail/a_id/18985/~/readyshare-usb-drives-compatibility-list. Some USB external hard drives and flash drives require you to load the drivers onto the computer before the computer can access the USB storage device.
Nighthawk AC1900 Smart WiFi Router Model R7000 Access a Storage Device Connected to the Router From a Windows-Based Computer To access the USB storage device from a Windows-based computer: 1. Connect a USB storage device to a USB port on your router. 2. If your USB storage device uses a power supply, connect it. You must use the power supply when you connect the USB storage device to the router.
Nighthawk AC1900 Smart WiFi Router Model R7000 6. Right-click the USB device and select Map network drive. The Map Network Drive window opens. 7. Select the drive letter to map to the new network folder. 8. Click the Finish button. The USB storage device is mapped to the drive letter that you specified. 9. To connect to the USB storage device as a different user, select the Connect using different credentials check box, click the Finish button, and do the following: a. Type the user name and password. b.
Nighthawk AC1900 Smart WiFi Router Model R7000 A window automatically opens and displays the files and folders on the USB storage device. Back Up Windows-Based Computers With ReadySHARE Vault Your router comes with free backup software for all the Windows-based computers in your home. Connect a USB hard disk drive (HDD) to the router for centralized, continuous, and automatic backup. The following operating systems support ReadySHARE Vault: • Windows 7 • Windows 8 • Windows 8.
Nighthawk AC1900 Smart WiFi Router Model R7000 Note: The following instructions might be different depending on the macOS your computer is using. For more instructions about backing up your computer with Time Machine, see the Apple support site. Set Up a USB Hard Drive on a Mac We recommend that you use a new USB HDD or format your old USB HDD to do the Time Machine backup for the first time. Use a blank partition to prevent some issues during backup using Time Machine.
Nighthawk AC1900 Smart WiFi Router Model R7000 Prepare to Back Up a Large Amount of Data Before you back up a large amount of data with Time Machine, we recommend that you follow this procedure. To prepare to back up a large amount of data: 1. Upgrade the operating system of the Mac computer. 2. Verify and repair the backup disk and the local disk. 3. Verify and repair the permissions on the local disk. 4. Set Energy Saver: a. From the Apple menu, select System Preferences.
Nighthawk AC1900 Smart WiFi Router Model R7000 To back up your Mac onto a USB hard disk drive: 1. Prepare your USB device with a compatible format and partitions. For more information, see Set Up a USB Hard Drive on a Mac on page 118. 2. If you plan to back up a large amount of data, see Prepare to Back Up a Large Amount of Data on page 119. 3. If your USB HDD uses a power supply, connect it. You must use the power supply when you connect the USB HDD to the router.
Nighthawk AC1900 Smart WiFi Router Model R7000 Enable FTP Access Within Your Network File Transfer Protocol (FTP) lets you download (receive) and upload (send) large files faster. To enable FTP access within your network: 1. Launch a web browser from a computer or mobile device that is connected to the router network. 2. Enter http://www.routerlogin.net. A login window opens. 3. Enter the router admin user name and password. The user name is admin.
Nighthawk AC1900 Smart WiFi Router Model R7000 4. Select ADVANCED > USB Functions > ReadySHARE Storage. The USB Storage (Advanced Settings) page displays. 5. Scroll down to the Available Networks Folder section and adjust the following settings: • Share Name. If only one USB device is connected, the default share name is USB_Storage. You can click the name or you can type it in the address field of your web browser.
Nighthawk AC1900 Smart WiFi Router Model R7000 4. Select ADVANCED > USB Functions > ReadySHARE Storage. The USB Storage (Advanced Settings) page displays. 5. In the Available Network Folders section, select the USB storage device. If a single device is attached to the USB port, the radio button is selected automatically. 6. Click the Create Network Folder button. The Add Folder window opens. If this window does not open, your web browser might be blocking pop-ups.
Nighthawk AC1900 Smart WiFi Router Model R7000 To edit a network folder: 1. Launch a web browser from a computer or mobile device that is connected to the router network. 2. Enter http://www.routerlogin.net. A login window opens. 3. Enter the router admin user name and password. The user name is admin. The password is the one that you specified the first time that you logged in. The user name and password are case-sensitive. The BASIC Home page displays. 4.
Nighthawk AC1900 Smart WiFi Router Model R7000 3. Launch a web browser from a computer or mobile device that is connected to the network. 4. Enter http://www.routerlogin.net. A login window opens. 5. Enter the router user name and password. The user name is admin. The default password is password. The user name and password are case-sensitive. The BASIC Home page displays. 6. Select NETGEAR Downloader (BETA). The Download Manager psge displays. 7. Select the Enable NETGEAR Downloader check box.
Nighthawk AC1900 Smart WiFi Router Model R7000 The user name is admin. The default password is password. The user name and password are case-sensitive. The BASIC Home page displays. 4. Select ADVANCED > NETGEAR Downloader (BETA) > Downloader Settings. The NETGEAR Downloader Settigns page displays. 5. Click the Configure Email button. The E-mail page displays. 6. Select the Send E-mail notifications when a downloader task is finished check box. 7. Click the Apply button. Your settings are saved.
Nighthawk AC1900 Smart WiFi Router Model R7000 Manage NETGEAR Downloader Tasks To manage NETGEAR Downloader tasks: 1. Launch a web browser from a computer or mobile device that is connected to the network. 2. Enter http://www.routerlogin.net. A login window opens. 3. Enter the router user name and password. The user name is admin. The default password is password. The user name and password are case-sensitive. The BASIC Home page displays. 4. Select ADVANCED > NETGEAR Downloader (BETA) > Download Manager.
Nighthawk AC1900 Smart WiFi Router Model R7000 6. Click the Safely Remove USB Device button. This takes the device offline. 7. Physically disconnect the USB storage device.
9 Use Dynamic DNS to Access USB Storage Devices Through the Internet With Dynamic DNS, you can use the Internet to access USB devices attached to the router’s USB ports when you’re not home.
Nighthawk AC1900 Smart WiFi Router Model R7000 Set Up and Manage Dynamic DNS Internet service providers (ISPs) assign numbers called IP addresses to identify each Internet account. Most ISPs use dynamically assigned IP addresses. This means that the IP address can change at any time. You can use the IP address to access your network remotely, but most people don’t know what their IP addresses are or when this number changes.
Nighthawk AC1900 Smart WiFi Router Model R7000 If only one device is connected, it is automatically selected. 8. Click the Edit button. The Edit page displays. 9. In the Read Access menu, select admin. 10. In the Write Access menu, select admin. 11. Click the Apply button. Your settings are saved. Your Personal FTP Server With your customized free URL, you can use FTP to access your network when you aren’t home through Dynamic DNS.
Nighthawk AC1900 Smart WiFi Router Model R7000 See Set Up FTP Access Through the Internet on page 130. 6. On a remote computer with Internet access, you can use FTP to access your router using ftp://yourname.mynetgear.com. Set Up a New Dynamic DNS Account To set up Dynamic DNS and register for a free NETGEAR account: 1. Launch a web browser from a computer or mobile device that is connected to the router network. 2. Enter http://www.routerlogin.net. A login window opens. 3.
Nighthawk AC1900 Smart WiFi Router Model R7000 To set up Dynamic DNS if you already created an account: 1. Launch a web browser from a computer or mobile device that is connected to the router network. 2. Enter http://www.routerlogin.net. A login window opens. 3. Enter the router admin user name and password. The user name is admin. The password is the one that you specified the first time that you logged in. The user name and password are case-sensitive. The BASIC Home page displays. 4.
Nighthawk AC1900 Smart WiFi Router Model R7000 To change your settings: 1. Launch a web browser from a computer or mobile device that is connected to the router network. 2. Enter http://www.routerlogin.net. A login window opens. 3. Enter the router admin user name and password. The user name is admin. The password is the one that you specified the first time that you logged in. The user name and password are case-sensitive. The BASIC Home page displays. 4. Select ADVANCED > Advanced Setup > Dynamic DNS.
Nighthawk AC1900 Smart WiFi Router Model R7000 Access USB Storage Devices Through the Internet You can access USB storage devices through the Internet when you’re not home. To access devices from a remote computer: 1. Launch a web browser on a computer that is not on your home network. 2. Connect to your home router: • To connect with Dynamic DNS, type the DNS name. To use a Dynamic DNS account, you must enter the account information on the Dynamic DNS page. See Set Up and Manage Dynamic DNS on page 130.
Nighthawk AC1900 Smart WiFi Router Model R7000 4. Click the Create Account link. The Create a MyNETGEAR account page displays. 5. Complete the fields to set up your account, and click the Create button. You are now ready to register your router with your ReadyCLOUD account. Register Your Router With ReadyCLOUD After you create a ReadyCLOUD account, you must register your router with your ReadyCLOUD account. To register your router with your ReadyCLOUD account: 1.
Nighthawk AC1900 Smart WiFi Router Model R7000 8. After registration, visit readycloud.netgear.com. 9. Click the Sign In link, enter your ReadyCLOUD user name and password, and click the Sign In button. The ReadyCLOUD page displays the router that you registered and the contents of the USB storage device that is connected to the router.
10 Use the Router as a Media Server This chapter contains the following sections: • • • • Specify ReadyDLNA Media Server Settings Play Music From a Storage Device With iTunes Server Set Up the Router to Work With TiVo Change the NTP Server 138
Nighthawk AC1900 Smart WiFi Router Model R7000 Specify ReadyDLNA Media Server Settings By default, the router acts as a ReadyDLNA media server, which lets you view movies and photos on DLNA/UPnP AV-compliant media players, such as Xbox360, Playstation, and NETGEAR media players. To specify media server settings: 1. Launch a web browser from a computer or mobile device that is connected to the router network. 2. Enter http://www.routerlogin.net. A login window opens. 3.
Nighthawk AC1900 Smart WiFi Router Model R7000 All – no password in Read Access can be scanned for media files. To scan for new media files immediately, click the Rescan media files button. 6. Click the Apply button. Your settings are saved. Play Music From a Storage Device With iTunes Server iTunes server lets you play music from a USB device that is connected to a USB port on your router with iTunes on your Windows-based or Mac computer or with the Apple Remote app on your iPhone or iPad.
Nighthawk AC1900 Smart WiFi Router Model R7000 The user name is admin. The password is the one that you specified the first time that you logged in. The user name and password are case-sensitive. The BASIC Home page displays. 6. Select ADVANCED > USB Functions > ReadySHARE Storage > Media Server. The Media Server (Settings) page displays. 7. Select the Enable iTunes Server (Music Only) check box. 8. Click the Apply button. Your settings are saved. 9. On your Windows-based or Mac computer, launch iTunes.
Nighthawk AC1900 Smart WiFi Router Model R7000 5. Launch the Remote app from your iPhone or iPad. 6. In the Remote app, click the Add a Device button. The passcode displays in the Remote app. 7. Specify the passcode in the router to set up your iTunes server. a. Launch a web browser from a computer or mobile device that is connected to your router's network. b. Enter http://www.routerlogin.net. A login window opens. c. Enter the router admin user name and password. The user name is admin.
Nighthawk AC1900 Smart WiFi Router Model R7000 • Pictures. View images in .jpg format. You can use the TiVo (Series 2 and later) Home Media Option to play photos and music on your Windows or Mac computer in your TiVo user interface. To set up the router to work with TiVo: 1. Launch a web browser from a computer or mobile device that is connected to the router network. 2. Enter http://www.routerlogin.net. A login window opens. 3. Enter the router admin user name and password. The user name is admin.
Nighthawk AC1900 Smart WiFi Router Model R7000 The NTP Settings page displays. 5. Select the Set your preferred NTP server radio button. 6. Enter the NTP server domain name or IP address in the Primary NTP server field. 7. Click the Apply button. Your settings are saved.
11 Share a USB Printer The ReadySHARE Printer utility lets you share a USB printer that is connected to the USB port on your router. You can share this USB printer among the Windows-based and Mac computers on your network. For more information about the features available in the NETGEAR USB Control Center, see the ReadySHARE Printer User Manual, which is available at http://downloadcenter.netgear.com.
Nighthawk AC1900 Smart WiFi Router Model R7000 Install the Printer Driver and Cable the Printer Some USB printer manufacturers (for example, HP and Lexmark) request that you do not connect the USB cable until the installation software prompts you to do so. To install the driver and cable the printer: 1. On each computer on your network that shares the USB printer, install the driver software for the USB printer. If you cannot locate the printer driver, contact the printer manufacturer. 2.
Nighthawk AC1900 Smart WiFi Router Model R7000 4. Select a language from the menu and click the OK button. The NETGEAR USB Control Center opens. Some firewall software, such as Comodo, blocks the NETGEAR USB Control Center from accessing the USB printer. If you do not see the USB printer displayed on the page, you can disable the firewall temporarily to allow the utility to work. 5. Select the printer and click the Connect button. The printer status changes to Manually connected by Mycomputer.
Nighthawk AC1900 Smart WiFi Router Model R7000 5. To release the printer so that all computers on the network can use it, click the Disconnect button. The status changes to Available. Now any computers on the network can use the printer. 6. To exit the utility, select System > Exit.
12 Use VPN to Access Your Network You can use OpenVPN software to remotely access your router using virtual private networking (VPN). This chapter explains how to set up and use VPN access.
Nighthawk AC1900 Smart WiFi Router Model R7000 Set Up a VPN Connection A virtual private network (VPN) lets you use the Internet to securely access your network when you aren’t home. This type of VPN access is called a client-to-gateway tunnel. The computer is the client, and the router is the gateway. To use the VPN feature, you must log in to the router and enable VPN, and you must install and run VPN client software on the computer. VPN uses DDNS or a static IP address to connect with your router.
Nighthawk AC1900 Smart WiFi Router Model R7000 6. To change the service type, scroll down and select the TCP radio button. 7. To change the port, scroll down to the Service Port field, and type the port number that you want to use. 8. Click the Apply button. Your changes are saved. VPN is enabled in the router, but you must install and set up OpenVPN software on your computer before you can use a VPN connection.
Nighthawk AC1900 Smart WiFi Router Model R7000 9. In the Windows Installer section of the page, double-click the openVPN-install-xxx.exe link. 10. Download and install the Open VPN software on your computer, click the openVPN-install-xxx.exe file. 11. Click the Next button. 12. Read the License Agreement and click the I Agree button. 13. Leave the check boxes selected as shown, and click the Next button.
Nighthawk AC1900 Smart WiFi Router Model R7000 14. To specify the destination folder, click the Browse button and select a destination folder. 15. Click the Install button. The window displays the progress of the installation and then displays the final installation page. 16. Click the Finish button. 17. Unzip the configuration files that you downloaded and copy them to the folder where the VPN client is installed on your device.
Nighthawk AC1900 Smart WiFi Router Model R7000 c. Select the local area connection and change its name (not its device name) to NETGEAR-VPN. If you do not change the VPN interface name, the VPN tunnel connection will fail. For more information about using OpenVPN on your Windows computer, visit https://openvpn.net/index.php/open-source/documentation/howto.html#quick.
Nighthawk AC1900 Smart WiFi Router Model R7000 Install OpenVPN Software on an iOS Device You must install this software on each iOS device that you plan to use for VPN connections to your router. To install VPN client software on an iOS device: 1. Launch a web browser from a computer or mobile device that is connected to the router network. 2. Enter http://www.routerlogin.net. A login window opens. 3. Enter the router user name and password. The user name is admin.
Nighthawk AC1900 Smart WiFi Router Model R7000 To install VPN client software on an Android device: 1. Launch a web browser from a computer or mobile device that is connected to the router network. 2. Enter http://www.routerlogin.net. A login window opens. 3. Enter the router user name and password. The user name is admin. The password is the one that you specified the first time that you logged in. The user name and password are case-sensitive. The BASIC Home page displays. 4.
Nighthawk AC1900 Smart WiFi Router Model R7000 established, you cannot access your home router or your home network with the OpenVPN software. The default LAN IP address scheme for the router is 192.x.x.x. The most common IP schemes are 192.x.x.x, 172.x.x.x, and 10.x.x.x. If you experience a conflict, change the IP scheme either for your home network or for the network with the client VPN computer. For information about changing these settings, see Change the LAN TCP/IP Settings on page 67.
Nighthawk AC1900 Smart WiFi Router Model R7000 Use VPN to Access the Router’s USB Device and Media To access a USB device and download files from you Windows-based computer using VPN: 1. On your Windows-based computer, open the Windows file manager and select Network. Note: See your computer's documentation for information about how to display the network resources. The network resources display.
Nighthawk AC1900 Smart WiFi Router Model R7000 Set Up VPN Client Internet Access in the Router By default, the router is set up to allow VPN connections only to your home network, but you can change the settings to allow Internet access. Accessing the Internet remotely through a VPN might be slower than accessing the Internet directly. To allow VPN clients to use your home Internet service: 1. Launch a web browser from a computer or mobile device that is connected to the router network. 2.
Nighthawk AC1900 Smart WiFi Router Model R7000 To allow VPN clients to access only your home network: 1. Launch a web browser from a computer or mobile device that is connected to the router network. 2. Enter http://www.routerlogin.net. A login window opens. 3. Enter the router user name and password. The user name is admin. The password is the one that you specified the first time that you logged in. The user name and password are case-sensitive. The BASIC Home page displays. 4.
Nighthawk AC1900 Smart WiFi Router Model R7000 4. When the VPN connection is established, launch your Internet browser.
13 Manage Port Forwarding and Port Triggering You can use port forwarding and port triggering to set up rules for Internet traffic. You need networking knowledge to set up these features.
Nighthawk AC1900 Smart WiFi Router Model R7000 Manage Port Forwarding to a Local Server If your home network includes a server, you can allow certain types of incoming traffic to reach the server. For example, you might want to make a local web server, FTP server, or game server visible and available to the Internet. The router can forward incoming traffic with specific protocols to computers on your local network.
Nighthawk AC1900 Smart WiFi Router Model R7000 11. Click the Add button. The service displays in the menu. Add a Custom Port Forwarding Service The router lists default services and applications that you can use in port forwarding rules. If the service or application is not predefined, you can add a port forwarding rule with a custom service or application. To add a custom service: 1. Find out which port number or range of numbers the application uses.
Nighthawk AC1900 Smart WiFi Router Model R7000 You can enter a port range and fixed ports in one rule, for example, external (30–50, 78, 100–102), internal (40–60, 99, 200–202). With this rule, external ports 30–50 are forwarded to internal ports 40–60. 12. In the Internal IP address field, type the IP address or select the radio button for an attached device listed in the table. 13. Click the Apply button. The service is now in the list on the Port Forwarding/Port Triggering page.
Nighthawk AC1900 Smart WiFi Router Model R7000 Delete a Port Forwarding Entry To delete a port forwarding entry: 1. Launch a web browser from a computer or mobile device that is connected to the router network. 2. Enter http://www.routerlogin.net. A login window opens. 3. Enter the router admin user name and password. The user name is admin. The password is the one that you specified the first time that you logged in. The user name and password are case-sensitive. The BASIC Home page displays. 4.
Nighthawk AC1900 Smart WiFi Router Model R7000 How the Router Implements the Port Forwarding Rule The following sequence shows the effects of a port forwarding rule: 1. When you type the URL www.example.com in your browser, the browser sends a web page request message with the following destination information: • Destination address. The IP address of www.example.com, which is the address of your router. • Destination port number. 80, which is the standard port number for a web server process. 2.
Nighthawk AC1900 Smart WiFi Router Model R7000 Note: If you use applications such as multiplayer gaming, peer-to-peer connections, real-time communications such as instant messaging, or remote assistance (a feature in Windows XP), enable Universal Plug and Play (UPnP). Add a Port Triggering Service To add a port triggering service: 1. Launch a web browser from a computer or mobile device that is connected to the router network. 2. Enter http://www.routerlogin.net. A login window opens. 3.
Nighthawk AC1900 Smart WiFi Router Model R7000 Enable Port Triggering To enable port triggering: 1. Launch a web browser from a computer or mobile device that is connected to the router network. 2. Enter http://www.routerlogin.net. A login window opens. 3. Enter the router admin user name and password. The user name is admin. The password is the one that you specified the first time that you logged in. The user name and password are case-sensitive. The BASIC Home page displays. 4.
Nighthawk AC1900 Smart WiFi Router Model R7000 you can tell the router, “When you initiate a session with destination port 6667, you must also allow incoming traffic on port 113 to reach the originating computer.” The following sequence shows the effects of this port triggering rule: 1. You open an IRC client program to start a chat session on your computer. 2.
14 Troubleshooting This chapter provides information to help you diagnose and solve problems you might experience with your router. If you do not find the solution here, check the NETGEAR support site at http://support.netgear.com for product and contact information.
Nighthawk AC1900 Smart WiFi Router Model R7000 Quick Tips This section describes tips for troubleshooting some common problems. Sequence to Restart Your Network If you must restart your network, follow this sequence: 1. Turn off and unplug the modem. 2. Turn off the router. 3. Plug in the modem and turn it on. Wait two minutes. 4. Turn on the router and wait two minutes. Check Ethernet Cable Connections If your device does not power on, make sure that the Ethernet cables are securely plugged in.
Nighthawk AC1900 Smart WiFi Router Model R7000 Troubleshoot With the LEDs By default, the router is set with standard LED settings. Standard LED Behavior When the Router Is Powered On After you turn on power to the router, verify that the following sequence of events occurs: 1. When power is first applied, verify that the Power LED is lit. 2. After about two minutes, verify the following: • The Power LED is lit. • The Internet LED is lit. • The WiFi LED is lit (unless you turned off the WiFi radio).
Nighthawk AC1900 Smart WiFi Router Model R7000 If the error persists, a hardware problem might be the cause. Contact Technical Support at netgear.com/support. Internet or Ethernet Port LEDs Are Off If either the Ethernet port LEDs or the Internet LED does not light when the Ethernet connection is made, check the following: • Make sure that the Ethernet cable connections are secure at the router and at the modem or computer. • Make sure that power is turned on to the connected modem or computer.
Nighthawk AC1900 Smart WiFi Router Model R7000 • Make sure that Java, JavaScript, or ActiveX is enabled in your browser. If you are using Internet Explorer, click the Refresh button to be sure that the Java applet is loaded. • Try quitting the browser and launching it again. • Make sure that you are using the correct login information. The user name is admin, and the default password is password. Make sure that Caps Lock is off when you enter this information.
Nighthawk AC1900 Smart WiFi Router Model R7000 If your router is still unable to obtain an IP address from the ISP, the problem might be one of the following: • Your Internet service provider (ISP) might require a login program. Ask your ISP whether they require PPP over Ethernet (PPPoE) or some other type of login. • If your ISP requires a login, the login name and password might be set incorrectly. • Your ISP might check for your computer’s host name.
Nighthawk AC1900 Smart WiFi Router Model R7000 Typically, your ISP provides the addresses of one or two DNS servers for your use. If you entered a DNS address during the router’s configuration, restart your computer. Alternatively, you can configure your computer manually with a DNS address, as explained in the documentation for your computer. • The router might not be configured as the default gateway on your computer. Restart the computer and verify that the router address (www.routerlogin.
Nighthawk AC1900 Smart WiFi Router Model R7000 Note: Be sure to click the Apply button if you change settings. If your WiFi device finds your network but the signal strength is weak, check these conditions: • Is your router too far from your computer or too close? Place your computer near the router but at least 6 feet (1.8 meters) away and see whether the signal strength improves.
Nighthawk AC1900 Smart WiFi Router Model R7000 If the path is not functioning correctly, one of the following problems might be occurring: • Wrong physical connections For a wired connection, make sure that the numbered LAN port LED is lit for the port to which you are connected. Check to see that the appropriate LEDs are lit for your network devices.
Nighthawk AC1900 Smart WiFi Router Model R7000 of a single computer connected to that modem. If your ISP does this, configure your router to “clone” or “spoof” the MAC address from the authorized computer.
15 Supplemental Information This appendix includes technical information about your router.
Nighthawk AC1900 Smart WiFi Router Model R7000 Factory Settings You can reset the router to the factory default settings that are shown in the following table. For more information about resetting the router to its factory settings, see Return the Router to Its Factory Default Settings on page 111. The following table shows the factory default settings for the router. Table 3. Router factory default settings Feature Default Settings Router login User login URL www.routerlogin.net (or www.routerlogin.
Nighthawk AC1900 Smart WiFi Router Model R7000 Table 3.
Nighthawk AC1900 Smart WiFi Router Model R7000 Table 3. Router factory default settings (Continued) Feature Default Settings Guest WiFi network WiFi communication Disabled SSID name 2.
Nighthawk AC1900 Smart WiFi Router Model R7000 Technical Specifications The following table shows the technical specifications for the router. Table 4. Router specifications Feature Description Data and routing protocols TCP/IP, RIP-1, RIP-2, DHCP, PPPoE, PPTP, Bigpond, Dynamic DNS, UPnP, and SMB Power adapter North America: 120V, 60 Hz, input UK, Australia: 240V, 50 Hz, input Europe: 230V, 50 Hz, input All regions (output): 12V/3.5A DC output Dimensions Dimensions: 11 x 7.17 x 1.9 in.
Nighthawk AC1900 Smart WiFi Router Model R7000 Table 4. Router specifications (Continued) Feature Description Operating frequency range 2.4 GHz band • US: 2.412–2.462 GHz • Europe: 2.412–2.472 GHz • Australia: 2.412–2.472 GHz • Japan: 2.412–2.472 GHz 5 GHz band • US: 5.18–5.24 + 5.745–5.825 GHz • Europe: 5.18–5.24 GHz • Australia: 5.18–5.24 + 5.745–5.825 GHz • Japan: 5.18–5.24 GHz 802.