
User Manual
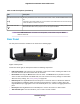
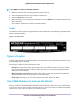
Table Of Contents
- Contents
- 1. Hardware Setup
- 2. Connect to the Network and Access the
- 3. Specify Your Internet Settings
- Use the Internet Setup Wizard
- Manually Set Up the Internet Connection
- Specify IPv6 Internet Connections
- Requirements for Entering IPv6 Addresses
- Use Auto Config for an IPv6 Internet Connection
- Use Auto Detect for an IPv6 Internet Connection
- Set Up an IPv6 6to4 Tunnel Internet Connection
- Set Up an IPv6 6rd Internet Connection
- Set Up an IPv6 Pass Through Internet Connection
- Set Up an IPv6 Fixed Internet Connection
- Set Up an IPv6 DHCP Internet Connection
- Set Up an IPv6 PPPoE Internet Connection
- Change the MTU Size
- 4. Control Access to the Internet
- 5. Network Settings
- View or Change WAN Settings
- Set Up a Default DMZ Server
- Change the ’s Device Name
- Change the LAN TCP/IP Settings
- Specify the IP Addresses That the Assigns
- Disable the DHCP Server Feature in the
- Manage Reserved LAN IP Addresses
- Use the WPS Wizard for WiFi Connections
- Specify Basic WiFi Settings
- Change the WiFi Mbps Settings
- Change the WiFi Password or Security Level
- Set Up a Guest WiFi Network
- Control the WiFi Radios
- Set Up a WiFi Schedule
- Specify WPS Settings
- Use the Router as a WiFi Access Point
- Set Up the Router in Bridge Mode
- Set Up a Bridge for a Port Group or VLAN Tag Group
- Custom Static Routes
- Ethernet Port Aggregation
- 6. Optimize Performance
- 7. Manage Your Network
- Update the Router Firmware
- Change the admin Password and Enable Password Recovery
- Set Up Password Recovery
- Recover the admin Password
- View Status
- Display Internet Port Statistics
- Check the Internet Connection Status
- View and Manage Logs of Router Activity
- View Devices Currently on the Network
- Monitor Internet Traffic
- Manage the Router Configuration File
- Remote Access
- Remotely Access Your Router Using the genie App
- 8. Share USB Storage Devices Attached to the Router
- USB Device Requirements
- Connect a USB Storage Device to the
- Access a Storage Device Connected to the Router From a Windows Computer
- Map a USB Device to a Windows Network Drive
- Access a Storage Device That Is Connected to the Router From a Mac
- Back Up Windows Computers With ReadySHARE Vault
- Back Up Mac Computers With Time Machine
- Install and Back Up Files to Amazon Drive
- Use FTP Within the Network
- View or Change Network Folders on a Storage Device
- Add a Network Folder on a USB Storage Device
- Edit a Network Folder on a USB Storage Device
- Set Up NETGEAR Downloader
- Safely Remove a USB Storage Device
- 9. Use Dynamic DNS to Access USB Storage Devices Through the Internet
- 10. Use the as a Media Server
- 11. Share a USB Printer
- 12. Use VPN to Access Your Network
- 13. Customize Internet Traffic Rules for Ports
- 14. Troubleshooting
- 15. Supplemental Information

Table 1. LED descriptions (Continued)
DescriptionLED
• Solid white. The 2.4 GHz WiFi radio is operating.
• Blinking. The router is sending or receiving WiFi traffic.
• Off. The 2.4 GHz WiFi radio is off.
2.4 GHz WiFi
• Solid white. The 5 GHz WiFi radio is operating.
• Blinking. The router is sending or receiving WiFi traffic.
• Off. The 5 GHz WiFi radio is off.
5 GHz WiFi
• Solid white. The 60 GHz WiFi radio is operating.
• Blinking. The router is sending or receiving WiFi traffic.
• Off. The 60 GHz WiFi radio is off.
60 GHz WiFi
• Solid white. The 2.4 GHz guest WiFi radio or the 5 guest GHz WiFi radio is operating.
• Off. The guest WiFi radio is off.
Guest WiFi
• Solid white. A USB device is connected and is ready.
• Blinking. A USB device is plugged in and is trying to connect.
• Off. No USB device is connected, or someone clicked the Safely Remove Hardware button
and it is now safe to remove the attached USB device.
USB 3.0 port 1 and USB 2.0
port 2
• Solid white. A powered-on device is connected to the 10G LAN SFP+ port.
• Blinking. The port is sending or receiving traffic.
• Off. No device is connected to the 10G LAN SFP+ port.
10G
The LED color indicates the speed: white for Gigabit Ethernet connections and amber for 100
Mbps or 10 Mbps Ethernet connections.
• Solid. A powered-on device is connected to the Ethernet port.
• Blinking. The port is sending or receiving traffic.
• Off. No device is connected to this Ethernet port.
Ethernet ports 1–4
Hardware Setup
11
Nighthawk X10 AD7200 Smart WiFi Router