
Owner's Manual


Table Of Contents
- User Manual
- Table of Contents
- Overview
- Connect to the Network and Access the Router
- Specify Your Internet Settings
- Use the Internet Setup Wizard
- Manually Set Up the Internet Connection
- Specify IPv6 Internet Connections
- Requirements for Entering IPv6 Addresses
- Use Auto Detect for an IPv6 Internet Connection
- Use Auto Config for an IPV6 Internet Connection
- Set Up an IPv6 6rd Tunnel Internet Connection
- Set Up an IPv6 6to4 Tunnel Internet Connection
- Set Up an IPv6 Pass Through Internet Connection
- Set Up an IPv6 Fixed Internet Connection
- Set Up an IPv6 DHCP Internet Connection
- Set Up an IPv6 PPPoE Internet Connection
- Change the MTU Size
- Control Access to the Internet
- Optimize Performance
- Specify Network Settings
- View or Change WAN Settings
- Dynamic DNS
- Set Up a Default DMZ Server
- Change the Router’s Device Name
- Change the LAN TCP/IP Settings
- Specify the IP Addresses That the Router Assigns
- Disable the DHCP Server Feature in the Router
- Manage Reserved LAN IP Addresses
- Custom Static Routes
- Specify Basic WiFi Settings
- Set Up a Guest WiFi Network
- View or Change Advanced WiFi Settings
- Use the Router as a WiFi Access Point
- Generate a New Backhaul Password
- Manage Your Network
- Customize Internet Traffic Rules for Ports
- Use VPN to Access Your Network
- Troubleshooting
- Supplemental Information
- Specs
- Quick Start Guide
- Spec Sheet
Manage Your Network
85
Orbi High-Performance AC3000 Tri-band WiFi System
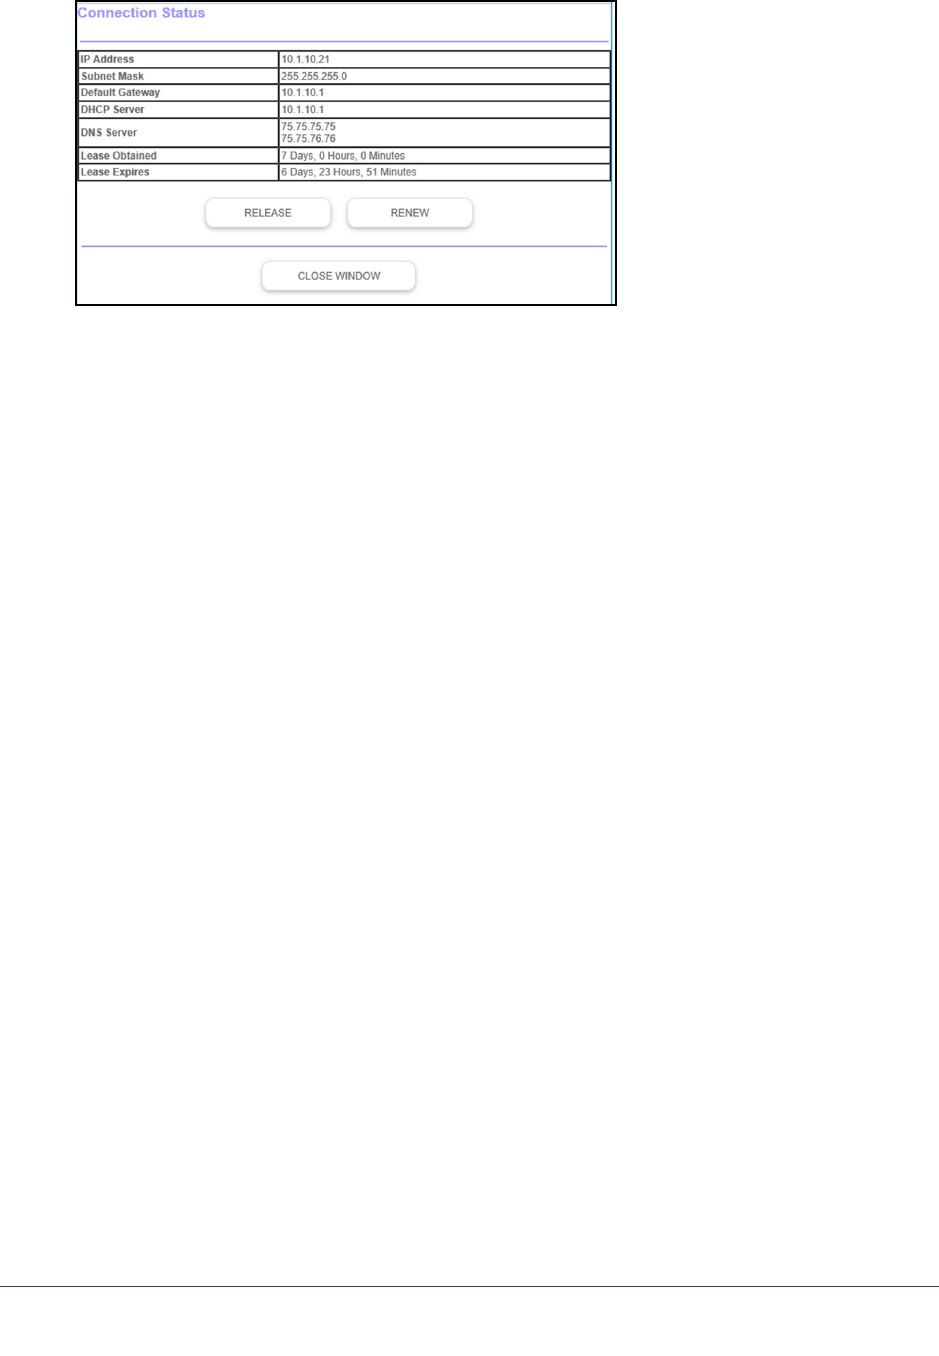
The following information displays:
• IP Address.
The IP address that is assigned to the router.
• Subnet Mask.
The subnet mask that is assigned to the router.
• Default Gateway.
The IP address for the default gateway that the router
communicates with.
• DHCP Server.
The IP address for the Dynamic Host Configuration Protocol server
that provides the TCP/IP configuration for all the computers that are connected to the
router.
• DNS Server.
The IP address of the Domain Name Service server that provides
translation of network names to IP addresses.
• Lease Obtained.
The date and time when the lease was obtained.
• Lease Expires.
The date and time that the lease expires.
6. T
o return the status of all items to 0, click the Release button.
7. T
o refresh the page, click the Renew button.
8. T
o exit the page, click the Close Window button.
View and Manage Logs of Router Activity
The log is a detailed record of the websites you accessed or attempted to access and other
router actions. Up to 256 entries are stored in the log.
To view and manage logs:
1. Launch a web browser from a WiFi-enabled computer or mobile device that is
connected to the network.
2. Enter orbilogin.com.
A login window opens.
3. Enter the router user name and password.