
User Guide

DNS
DNS is short for Domain Name System. Because IP addresses are strings of numbers, they are hard to
remember. It is easier to remember a name (for example, www.netgear.com) than a string of numbers when
you want to visit a website. A DNS server translates IP addresses into website names and website names
into IP addresses.
If you selected the option to assign an IP address automatically when you configured your Ethernet settings,
the DNS fields are populated with the DNS settings from your DHCP server and cannot be edited.
If you selected the option to assign an IP address manually when you configured your Ethernet settings,
you must manually specify the IP addresses of the DNS servers and the domain name to access your
ReadyNAS system over the Internet.Your network administrator can help you determine your Domain Name
Server IP address.
Configure the Ethernet Interfaces
All ReadyNAS systems provide at least one physical Ethernet interface.
On ReadyNAS systems with two or more Ethernet interfaces, the interfaces can be used independently as
individual links or combined into a bonded adapter. Bonding can provide redundancy or increased throughput.
For each Ethernet interface, you can configure the following settings:
• MTU
• IPv4 settings including DNS servers
• IPv6 settings including DNS servers
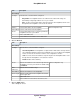
The following table shows the default network configuration.
Table 8. Default network settings
Default SettingItem
Physical Ethernet interface
1500MTU
IPv4 using DHCP IPv6 using DHCPTCP/IP
Retrieved using DHCPDNS
Configure General and TCP/IP Settings
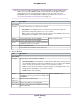
To configure an Ethernet interface:
1. Log in to your ReadyNAS.
2. Select Network.
The Ethernet interfaces display.
3. Click the gear icon for an Ethernet interface:
• Ethernet interfaces with active links are colored green.
• Ethernet interfaces with inactive links are colored gray.
System Settings
161
ReadyNAS OS 6.7