
User Guide


4. Click the New Volume button.
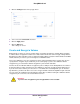
5. Enter a name.
6. Leave the protection level as selected by ReadyNAS OS, or change it.
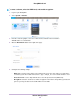
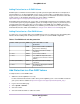
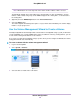
The graphic shows the balance of capacity, performance, and reliabilty for the selected protection level
and number of disks. As you change the RAID level, the graphic updates to show the changed balance.
If more drives than the minimum necessary for the selected RAID level are available, the Number of
RAID Groups, Number of drives for RAID Group, and Remaining drives allocated to Global Spare
fields are active.You can chose to organize the volume with RAID groups, or assign disks to the global
spares pool, or a combination of the two.
7. Click the Next button.
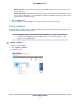
8. (Optional) Select the Encryption check box, and select one of the following options:
• USB to store key
• Send key by Email
9. Click the Create button.
The New Volume window closes and the ReadyNAS starts to build the new volume (resync the drives).
Maintain Volumes
This section covers volume maintenance.Volumes can be scrubbed to check for errors, defragmented to
improve disk performance, and balanced to use space more efficently and speed allocation of new chunks.
Scrub a Volume
Scrubbing cleans and validates all data on a volume and checks the volume for errors. No data is deleted.
Folders, LUNs, and snapshots on the volume remain intact. Scrubbing every six to eight weeks is common.
Scrubbing is not an erase function.Note
Volume Configuration
40
ReadyNAS OS 6.7