ReadyNAS OS 6 Desktop Storage Systems Installation Guide
Contents Package Contents . . . . . . . . . . . . . . . . . . . . . . . . . . . . . . . . . . . . . . 3 Basic Setup . . . . . . . . . . . . . . . . . . . . . . . . . . . . . . . . . . . . . . . . . . . 4 Reformat Disks . . . . . . . . . . . . . . . . . . . . . . . . . . . . . . . . . . . . . . . . 7 Additional Information . . . . . . . . . . . . . . . . . . . . . . . . . . . . . . . . . . .
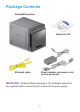
Package Contents ReadyNAS system Resource CD Ethernet cable Power adapter and power cord (varies by model) IMPORTANT: Read all safety warnings in the hardware manual for your system before connecting the system to the power supply.
Basic Setup After you follow these instructions, your ReadyNAS is ready to use in a production environment. Setup takes approximately 15 minutes. To set up your storage system: 1. Install all available disks that you want to use in your ReadyNAS system. Note: If you are using previously formatted disks that contain data, you must reformat these disks before continuing. See Reformat Disks on page 7. For a list of supported disks, see the Hardware Compatibility List at http://www.netgear.com/readynas-hcl.
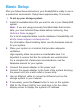
8. Visit http://readycloud.netgear.com on a computer that uses the same local area network (LAN) and Internet connection as your ReadyNAS system. Note: If your computer does not have Internet access, install and run the RAIDar utility instead. RAIDar is on the resource CD that came with your system. 9. Click the Discover button. ReadyCLOUD automatically detects your ReadyNAS system on the network. Your new ReadyNAS system is marked with a NEW label. 10. Click the Setup button.
11. Select the mode that you want to use to set up your system. • Option 1. Select ReadyCLOUD mode. a Sign in to ReadyCLOUD or create a user account. b Follow the prompts to configure your ReadyNAS system. • Option 2. Select Offline mode. An SSL certificate security warning displays. This warning ensures an encrypted authentication and secure access to the ReadyNAS local admin page for your storage system. a Accept the certificate. A login prompt displays.
Reformat Disks If you are using previously formatted disks that contain data, you must reformat the disks before you can use them with your ReadyNAS system. Warning: This process erases all data and reformats all disks into a single X-RAID2 volume. If you want to preserve the data on the disks, you must back up the data to an external drive before using the disks in your ReadyNAS storage system. To reformat previously formatted disks: 1. If your system is powered on, gracefully power off the system.
6. Select the factory default option from the boot menu. • If you have a 2-bay storage system, do the following: a • Scroll through the boot menu options by pressing the Backup button. b When only the Disk 1 LED is lit, press and release the Reset button. If you have a 4-bay storage system, do the following: a • Scroll through the boot menu options by pressing the Backup button. b When the status display screen shows the factory default option, press and release the Reset button.
Additional Information To help keep your storage system healthy and prevent the risk of data loss, follow these rules of usage: • • Never replace more than one disk at a time while the system is powered on. If you need to power off your system, power it off gracefully, when possible. To gracefully power off a 2-bay storage system: Press the Power button twice. To gracefully power off a 4-bay or 6-bay storage system: Press the Power button three times.
Support Thank you for purchasing this NETGEAR product. After installing your device, locate the serial number on the label of your product and use it to register your product at https://my.netgear.com. You must register your product before you can use NETGEAR telephone support. NETGEAR recommends registering your product through the NETGEAR website. For product updates and web support, visit http://support.netgear.com. NETGEAR recommends that you use only the official NETGEAR support resources.