
Quick Reference Guide


138 | Chapter 4. Content Filtering and Optimizing Scans
ProSecure Web/Email Security Threat Management (STM) Appliance
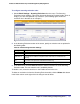
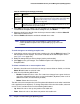
4. Click Apply to save your settings. The new exception rule is added to the Exceptions table.
To return to the Exception screen without adding the rule, click Return.
5. Select the check box to the left of the rule that you want to enable, or click the Select All
table button to select all rules.
6. Click the Enable table button to enable the selected rule or rules.
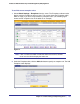
Note: Enabled exception rules are preceded by a green circle in the !
column; disabled exception rules are preceded by a gray circle in the
! column.
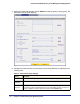
To make changes to an existing exception rule:
1. In the Action column to the right of to the exception rule, click the Edit table button. The
Edit Exception screen displays. This screen is identical to the Add Exception screen
(see Figure 74 on page 133).
2. Modify the settings that you wish to change (see the previous table).
3. Click Apply to save your changes. The modified exception rule is displayed in the
Exceptions table.
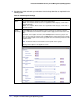
To delete or disable one or more exception rules:
1. Select the check box to the left of the rule that you want to delete or disable, or click the
Select All table button to select all rules.
2. Click one of the following table buttons:
• Disable. Disables the rule or rules. The ! status icon changes from a green circle to a
gray circle, indicating that the rule is or rules are disabled. (By default, when a rule is
added to the table, it is automatically enabled.)
• Delete. Deletes the rule or rules.
The table rank of the exception rule in the Exceptions table determines the order in which the
rule ia applied (from the top down). To change the position of the rules in the table, select one
or more a rules, and then click one of the following table buttons:
• Up. Moves the rule or rules up one position in the table rank.
• Down. Moves the rule or rules down one position in the table rank.
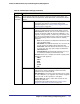
Category
(and related
information)
(continued)
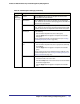
Web Categories The action applies to a Web category. Select a Web category from
the Sub Category drop-down list. For information about custom Web
categories, see Creating Custom Categories for Web Access
Exceptions on page 142.
Note A description of the exception rule for identification and management purposes or any other
relevant information that you wish to include.
Table 40. Add Exception Settings (Continued)
Setting Description