
Quick Reference Guide


32 | Chapter 2. Using the Setup Wizard to Provision the STM in Your Network
ProSecure Web/Email Security Threat Management (STM) Appliance
• Cancel. Cancel the operation.
• Send Now. Send a file or report.
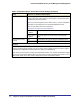
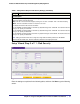
When a screen includes a table, table buttons are displayed to let you configure the table
entries. The nature of the screen determines which table buttons are shown. The following
figure shows an example:
Figure 19.
Any of the following table buttons might be displayed on screen:
• Select All. Select all entries in the table.
• Delete. Delete the selected entry or entries from the table.
• Enable. Enable the selected entry or entries in the table.
• Disable. Disable the selected entry or entries in the table.
• Add. Add an entry to the table.
• Edit. Edit the selected entry.
• Up. Move the selected entry up in the table.
• Down. Move the selected entry down in the table.
Almost all screens and sections of screens have an accompanying help screen. To open the
help screen, click the question mark icon. ( ).
Using the Setup Wizard to Perform the Initial
Configuration
The Setup Wizard facilitates the initial configuration of the STM by taking you through
11 screens, the last of which allows you to save the configuration.
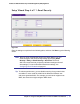
To start the Setup Wizard:
1. Select Global Settings > Network Settings from the menu. The Network Settings
submenu tabs display with the Network Settings screen in view.
2. From the Network Settings configuration menu, select Setup Wizard.
The following sections explain the 11 configuration screens of the Setup Wizard. On the 10th
screen, you can save your configuration. The 11th screen is just an informational screen.
The tables in the following sections explain the buttons and fields of the Setup Wizard
screens. Additional information about the settings in the Setup Wizard screens is provided in
other chapters that explain manual configuration; each following section provides a specific
link to a section in another chapter.