
User Manual
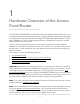
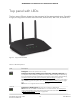
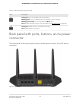
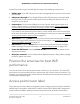
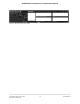

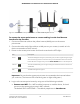
Table Of Contents
- Contents
- 1. Hardware Overview of the Access Point/Router
- 2. Install and Access the Access Point/Router in Your Network
- Connect the access point/router to your existing router and log in for the first time
- Update the access point/router firmware if you cannot complete the initial log-in process
- About router mode
- Use the access point/router in router mode
- Log in to the access point/router when it is connected to the Internet
- Log in to the access point/router when it is not connected to the Internet
- Use the NETGEAR Insight mobile app to discover the access point/router
- Find the IP address of the access point/router
- Change the language
- Change the local login admin password
- Set up password recovery for the local login admin user name
- Connect a wired or WiFi device to the access point/router’s network after installation
- 3. Specify the Access Point/Router Internet Settings Manually
- Use the Internet Setup Wizard
- Access point mode: Specify a fixed LAN IP address
- Router mode: Manually set up the access point/router Internet connection
- Router mode: Specify an IPv6 Internet connection
- Router mode: Requirements for entering IPv6 addresses
- Router mode: Use Auto Detect for an IPv6 Internet connection
- Router mode: Use Auto Config for an IPv6 Internet connection
- Router mode: Set up an IPv6 6to4 tunnel Internet connection
- Router mode: Set up an IPv6 6rd Internet connection
- Router mode: Set up an IPv6 passthrough Internet connection
- Router mode: Set up an IPv6 fixed Internet connection
- Router mode: Set up an IPv6 DHCP Internet connection
- Router mode: Set up an IPv6 PPPoE Internet connection
- 4. Manage the Basic WiFi and Radio Features
- 5. Manage the Firewall and Security
- Router mode: Manage the basic firewall settings
- Allow or block device access to your network
- Router mode: Specify keywords and domains to block Internet sites
- Router mode: Block specific services and applications from the Internet
- Router mode: Set up a schedule for blocking
- Set up security event email notifications
- 6. Optimize Performance
- 7. Manage the Network Settings
- 8. Maintain and Monitor the Access Point/Router
- Update the firmware of the access point/router
- Manage the configuration file of the access point/router
- Recover the local login admin password
- Return the access point/router to its factory default settings
- Manage the time settings
- Manage the activity log
- View the status and statistics of the access point/router
- Access point mode: View information about the access point/router, LAN port, and WiFi settings
- Router mode: View information about the access point/router, Internet port, and WiFi settings
- Check the Internet connection status
- Display Internet port statistics
- View devices currently on the access point/router network
- Router mode: Monitor and meter Internet traffic
- Router mode: Start the traffic meter without traffic restrictions
- Router mode: Restrict Internet traffic by volume
- Router mode: Restrict Internet traffic by connection time
- Router mode: View the Internet traffic volume and statistics
- Router mode: Unblock the traffic meter after the traffic limit is reached
- Router mode: Manage and use remote access
- Change the system mode to router mode or back to access point mode
- Disable LED blinking or turn off LEDs
- 9. Share a USB Storage Device Attached to the Access Point/Router
- USB device requirements
- Connect a USB storage device to the access point/router
- Access a USB storage device that is connected to the access point/router
- Map a USB storage device to a Windows network drive
- Back up a Windows-based computer with ReadySHARE Vault
- Back up a Mac with Time Machine
- Manage access to a USB storage device
- Enable FTP access within the access point/router network
- View and manage network folders on a USB storage device
- Router mode: Approve a USB storage device
- Safely remove a USB storage device
- 10. Use the Access Point/Router as a Media Server
- 11. Router Mode: Manage Dynamic DNS and FTP Access Through the Internet
- 12. Router Mode: Set up VPN Connections with OpenVPN
- Router mode: Enable and configure OpenVPN and VPN client access on the access point/router
- Router mode: Install OpenVPN client software on a remote client
- Router mode: Install the OpenVPN client utility and VPN configuration files on a Windows-based computer
- Router mode: Install the OpenVPN client utility and VPN configuration files on a Mac
- Router mode: Install the OpenVPN client utility and VPN configuration files on an iOS device
- Router mode: Install the OpenVPN client utility and VPN configuration files on an Android device
- Router mode: Set up an OpenVPN connection
- 13. Manage the Advanced WiFi and Radio Features
- Add a WiFi schedule for a radio
- Change the channel for a radio
- Change the WiFi throughput mode for a radio band
- Change the transmission output power for a radio
- Manage advanced WiFi and broadcast settings
- Manage the WPS settings
- Specify how the access point/router manages WiFi clients
- Set Up a WiFi bridge between the access/point router and another device
- 14. Router Mode: Manage Port Forwarding and Port Triggering
- Router mode: Manage port forwarding to a local server for services and applications
- Router mode: Forward incoming traffic for a default service or application
- Router mode: Add a port forwarding rule for a custom service or application
- Router mode: Change a port forwarding rule
- Router mode: Remove a port forwarding rule
- Router mode application example: Make a local web server public
- Router mode: How the access/point router implements a port forwarding rule
- Router mode: Manage port triggering for services and applications
- Router mode: Manage port forwarding to a local server for services and applications
- 15. Diagnostics and Troubleshooting
- Reboot the access point/router from its local browser interface
- Quick tips
- Standard LED behavior when the access point/router is powered on
- Troubleshoot with the LEDs
- You cannot log in to the access point/router
- Router mode: You cannot access the Internet
- Troubleshoot Internet browsing
- Troubleshoot the WiFi connectivity
- Changes are not saved
- Troubleshoot your network using the ping utility of your computer
- A. Factory Default Settings and Technical Specifications
- B. Position and Wall-Mount the Access Point/Router

Viewed from left to right, the back panel contains the following components:
•
USB 2.0 port. One USB 2.0 port to connect a storage device or printer to the access
point/router.
•
LAN ports 4 through 1. Four Gigabit Ethernet RJ-45 LAN ports numbered LAN4
through LAN1 to connect the access point/router to Ethernet devices such as a
computer and a switch.
•
Internet port. One Internet (WAN) port to connect the access point/router to a
router, network switch, or network hub in your network (see Connect the access
point/router to your existing router and log in for the first time on page 17). This
port must provide the Internet connection to the access point/router.
If you want to use the access point/router in router mode, do not connect this port
to an Internet modem until after you complete the initial log-in process (see Use the
access point/router in router mode on page 23).
•
WPS button. Press the WPS button to join the access point/router’s WiFi network
without typing the WiFi password. For more information, see Use WPS to add a
device to the WiFi network on page 70.
•
Reset button. Press the Reset button to reset the access point/router to factory
default settings. For more information, see Use the Reset button on page 138.
•
Power On/Off button. Press the Power On/Off button to provide power to the
access point/router.
•
DC power connector. Connect the power adapter that came in the product package
to the DC power connector.
Position the antennas for best WiFi
performance
You can swivel the three access point/router antennas in any direction. For best WiFi
performance, we recommend that you experiment with various antenna positions. For
example, you could position the center antenna vertically and aim the other two antennas
outward at 45-degree angles.
Access point/router label
The access point/router label on the bottom panel of the access point/router shows the
default login information, default WiFi network name (SSID), default WiFi passphrase,
serial number and MAC address of the access point/router, and other information.
User Manual14Hardware Overview of the
Access Point/Router
AC2000 802.11ac Wireless Access Point/Router WAC124