
User's Manual


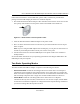


Table Of Contents
- User’s Manual for the NETGEAR Super AG Wireless USB 2.0 Adapter WG111U
- Technical Support
- Statement of Conditions
- FCC Information to User
- Regulatory Compliance Information
- Export Restrictions
- Europe - EU Declaration of Conformity
- Requirements For Operation in the European Community
- Canadian Department of Communications Radio Interference Regulations
- Chapter 1 About This Manual
- Chapter 2 Introduction
- Chapter 3 Basic Setup
- Chapter 4 Configuration
- Chapter 5 Wireless Security Configuration
- Chapter 6 Troubleshooting
- Basic Tips
- Frequently Asked Questions
- General Questions
- Why do I see no more than 54 Mbps on the Configuration Utility status line?
- The WG111U Smart Configuration Utility keeps asking me to save my settings
- Ad Hoc mode is not working correctly
- How to know if the WG111U card has received a valid IP address
- How to use XP’s own Wireless configuration utility
- I cannot connect to the AP that I want from the Networks browser list
- New Hardware Wizard appears after installation has completed
- How to get a PDF copy of the Manual
- General Questions
- Appendix A Technical Specifications
- Appendix B Wireless Networking Basics
- What You Need To Use a Router with a Broadband Modem
- Preparing Your Computers for TCP/IP Networking
- Configuring Windows 95, 98, and Me for TCP/IP Networking
- Configuring Windows NT4, 2000 or XP for IP Networking
- Configuring the Macintosh for TCP/IP Networking
- Verifying the Readiness of Your Internet Account
- Restarting the Network
- Glossary
- Index

User’s Manual for the NETGEAR Super AG Wireless USB 2.0 Adapter WG111U
Basic Setup 3-3
202-10065-01
Follow these instructions to use the USB cable, plastic cradle, and fasteners provided in the
package for better USB Adapter placement on a notebook computer:
1. The WG111U Wireless USB 2.0 Adapter comes with three black fasteners. Locate the one that
has a prickly side and attach it to the plastic cradle on the middle of the outside rear.
Figure 3-2: Attach fastener to back of plastic cradle
2.
Insert the WG111U Wireless USB 2.0 Adapter in the plastic cradle.
3. Place one of the other black fasteners on the back of your notebook monitor near the top for
better reception.
Note: If you are using the USB Adapter with a desktop PC, you can place the last fastener on
the side of your desktop PC monitor nearest your wireless access point.
4. Join the black fasteners to attach the USB Adapter in the plastic cradle to the notebook or
desktop monitor.
See the installation instructions for your operating system before attaching the USB cable to the
USB Adapter and your computer.
Two Basic Operating Modes
The WG111U Wireless USB 2.0 Adapter can operate in the following two modes:
•
Infrastructure Mode: An 802.11 networking framework in which devices and computers
communicate with each other by first going through an access point (AP). For example, this
mode is used when computers in a house connect to an Access Point that is attached to a router
that lets multiple computers share a single cable or DSL broadband Internet connection.
•
Ad-Hoc Mode: An 802.11 networking framework in which devices or computers
communicate directly with each other, without the use of an AP. For example, Ad-Hoc Mode
is used when two Windows computers are configured with file and print sharing enabled and
you want to exchange files directly between them.