
User's Manual


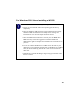

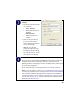

Table Of Contents
- Installation Guide for the Model WG511 802.11g Wireless PC Card
- Contents
- Chapter 1 Introduction
- Chapter 2 Installing the WG511 802.11g Wireless PC Card
- What You Will Need Before You Begin
- Two Basic Operating Modes
- WG511 Default Wireless Configuration Settings
- Using the WG511 to Connect to a Wireless Access Point Network in Infrastructure Mode
- Setup Instructions
- Using the WG511 to Connect in Ad-Hoc Mode
- WG511 Wireless Connection Indicators
- Troubleshooting Tips
- Chapter 3 Protecting Your Wireless Connection

9
Install the WG511 driver
and configuration utility
software.
a. A Found New Hardware
Wizard is displayed. Select
Install the software
automatically
(Recommended) and then
click Next.
b. Windows XP looks into the
CD-ROM for the necessary
software to be installed.
The wizard will
automatically install both
the driver and the
configuration utility onto
the hard drive.
c. After the installation
completes, click Finish to
close the wizard.
d. After installing the WG511,
Windows XP will display a
“Wireless Network
Connection #” message.
e. Click on the X to close this
message.
f. You should see the WG511
system tray icon on the
right in the lower right
portion of the Windows
task bar.
Windows XP Add New Hardware Wizard
Windows XP Wireless Network
Connection Alert
Note: The Netgear and Windows XP
utilities let you set up your WG511.
The Netgear installation utility
defaults to turning off the Windows
XP utilities. You cannot use both at
the same time. The Netgear screens
are presented in step 3 below.
WG511 LAN Configuration Utility
System Tray Icon