Installation Guide for the NETGEAR 54 Mbps Wireless PC Card WG511 NETGEAR, Inc.
Technical Support Please refer to the support information card that shipped with your product. By registering your product at www.NETGEAR.com/register, we can provide you with faster expert technical support and timely notices of product and software upgrades. NETGEAR, INC. Support Information Phone: 1-888-NETGEAR (For US & Canada only) For other countries see your Support information card. E-mail: Support@NETGEAR.com Web site: www.NETGEAR.
transmitters) in accordance with the regulations may, however, be subject to certain restrictions. Please refer to the notes in the operating instructions. Federal Office for Telecommunications Approvals has been notified of the placing of this equipment on the market and has been granted the right to test the series for compliance with the regulations.
iv
Contents Chapter 1 Introduction About the NETGEAR 54 Mbps Wireless PC Card WG511 ................................................ 1 Key Features and Related NETGEAR Products ............................................................... 1 What’s in the Box? ............................................................................................................. 2 A Road Map for ‘How to Get There From Here’ ................................................................
Appendix A Technical Specifications Appendix B Wireless Networking Basics Wireless Networking Overview ........................................................................................ 35 Infrastructure Mode ................................................................................................... 35 Ad Hoc Mode (Peer-to-Peer Workgroup) .................................................................. 36 Network Name: Extended Service Set Identification (ESSID) .............................
Installation Guide for the NETGEAR 54 Mbps Wireless PC Card WG511 Chapter 1 Introduction This chapter introduces the features, package contents, and appearance of the NETGEAR® 54 Mbps Wireless PC Card WG511. About the NETGEAR 54 Mbps Wireless PC Card WG511 The NETGEAR 54 Mbps Wireless PC Card WG511 gives you ultimate mobility in your office or while you are traveling.
Installation Guide for the NETGEAR 54 Mbps Wireless PC Card WG511 • Highest level of data encryption using128-bit Shared Key WEP data encryption method. Lower level of data encryption or no data encryption is available to simplify your network setup or to improve data transfer rate. The following Netgear products can be configured to communicate with the WG511 Wireless PC Card.
Installation Guide for the NETGEAR 54 Mbps Wireless PC Card WG511 A Road Map for ‘How to Get There From Here’ The introduction and adoption of any new technology can be a difficult process. Wireless technology has removed one of the barriers to networking: running wires. It allows more people to try networking while at the same time exposes them to the inherent complexity of networking. General networking concepts, set up, and maintenance can be difficult to understand.
Installation Guide for the NETGEAR 54 Mbps Wireless PC Card WG511 Table 1-1. A Road Map for How to Get There From Here ... If I Want To ... ? What Do I Do? What’s Needed? Protect my 1. Assure that the 1. A wireless network with wireless wireless authentication and WEP connection from network has encryption enabled. snooping, security 2. Wireless networking hacking, or features equipment that supports WEP information enabled. encryption, such as the theft. 2.
Installation Guide for the NETGEAR 54 Mbps Wireless PC Card WG511 Table 1-1. A Road Map for How to Get There From Here ... If I Want To ... ? What Do I Do? What’s Needed? Exchange files 1. Use the 1. The notebook computer I am Windows using to connect to the between Network wireless network needs to be wirelessly Neighborhood configured with the Windows connected feature to Client and File and Print notebook browser for Sharing. computer and computers in 2.
Installation Guide for the NETGEAR 54 Mbps Wireless PC Card WG511 Table 1-1. A Road Map for How to Get There From Here ... If I Want To ... ? What Do I Do? What’s Needed? Use printers in 1. Use the 1. The notebook computer I am Windows using to connect to the a combined Printers and wireless network needs to be wireless and Fax features to configured with the Windows wired locate Client and File and Print network. available Sharing. printers in the 2.
Chapter 2 Basic Setup This section describes how to install your NETGEAR 54 Mbps Wireless PC Card WG511 and set up basic wireless connectivity on your Wireless Local Area Network (WLAN). Advanced wireless network configuration is covered in Chapter 3, Configuration in this manual. Note: Indoors, computers can easily connect to 802.11 wireless networks at distances of several hundred feet. Because walls do not always block wireless signals, others outside your immediate area could access your network.
Installation Guide for the NETGEAR 54 Mbps Wireless PC Card WG511 Observe Location and Range Guidelines Computers can connect over 802.11g wireless networks indoors at a range which vary significantly based on the physical location of the computer with the NETGEAR 54 Mbps Wireless PC Card WG511. For best results, avoid potential sources of interference, such as: • • • Large metal surfaces Microwaves 2.4 GHz Cordless phones In general, 802.11g wireless devices can communicate through walls.
Installation Guide for the NETGEAR 54 Mbps Wireless PC Card WG511 WG511 Default Wireless Configuration Settings If this is a new wireless network installation, use the factory default settings to set up the network and verify wireless connectivity. If this is an addition to an existing wireless network, you will need to identify the wireless configuration and security parameters already defined.
Installation Guide for the NETGEAR 54 Mbps Wireless PC Card WG511 Basic Installation Instructions Use the procedure below that corresponds to the version of Windows you are using. For Windows XP Users Installing a WG511 Install the WG511 driver and configuration utility software. a. Power on your notebook, let the operating system boot up completely, and log in as needed. b. Insert the Resource CD for the WG511 into your CD-ROM drive. The CD index page shown at the right will load.
Installation Guide for the NETGEAR 54 Mbps Wireless PC Card WG511 Install the NETGEAR 54 Mbps Wireless PC Card WG511. a. Locate an available CardBus slot on the side of your notebook. Hold the PC Card with the Netgear logo facing up and insert it into the CardBus slot. The Found New Hardware Wizard is displayed. b. Click Next and follow the prompts to proceed. Click Continue Anyway if you are prompted with a Windows XP Logo testing message.
Installation Guide for the NETGEAR 54 Mbps Wireless PC Card WG511 Configure your WG511. a. Right click on the network icon in the Windows XP system tray to open the network options menu. b. Click on the View Available Wireless Networks menu item. c. If there is more than one wireless network in your vicinity, click on the one to which you will connect. d. Click on the “Allow me to connect to the selected wireless network even though this is not secure” check box. e. Click Connect.
Installation Guide for the NETGEAR 54 Mbps Wireless PC Card WG511 Verify wireless connectivity to your network. a. Open the WG511 utility by clicking on the icon in the Windows system tray. Note: When the Windows XP wireless configuraton utility is enabled (the default), only these two tab pages appear. To use the full Netgear utility, please see “Understanding the Configuration Options” on page 3-21. b. Verify that your Connection and Status Monitor information matches your wireless network.
Installation Guide for the NETGEAR 54 Mbps Wireless PC Card WG511 For Windows 2000 & 98/Me Users Installing a WG511 Install the WG511 driver and configuration utility software. Note: Windows 2000, may require you to be logged on with administrator rights. a. Power on your notebook, let the operating system boot up completely, and log in as needed. b. Insert the Resource CD for the WG511 into your CD-ROM drive.
Installation Guide for the NETGEAR 54 Mbps Wireless PC Card WG511 Install the NETGEAR 54 Mbps Wireless PC Card WG511. a. Locate an available CardBus slot on the side of your notebook. Hold the PC Card with the Netgear logo facing up and insert it into the CardBus slot. The Found New Hardware Wizard is displayed. b. Click Next and follow the prompts to proceed. After the installation completes, click Finish to close the wizard.
Installation Guide for the NETGEAR 54 Mbps Wireless PC Card WG511 Configure your WG511 and save the Profile. a. Click on the WG511 systray icon in the Click here to open the configuration utility. to open the WG511 configuration utility. The WG511 Wireless PC Card configuration utility displays. b. WG511 system tray icon Change the Network Name SSID to match your network.
Installation Guide for the NETGEAR 54 Mbps Wireless PC Card WG511 Verify wireless connectivity to your network. a. Open the WG511 utility by clicking on the icon in the Windows system tray. Note: You can use the Site Survey to verify the availability of wireless networks and their SSIDs. For more on information, please see “Understanding the Configuration Options” on page 3-21. b. Click the Status tab page. Verify that your Connection and Status Monitor information matches your wireless network.
Installation Guide for the NETGEAR 54 Mbps Wireless PC Card WG511 WG511 Wireless Connection Indicators The NETGEAR 54 Mbps Wireless PC Card WG511 provides the following three indicators which give you feedback on the status of your wireless connection: • • The two LEDs on the NETGEAR 54 Mbps Wireless PC Card WG511 indicate the condition of wireless link. The color of the SysTray icon is on the System Tray portion of the taskbar in the Microsoft Windows desktop indicates the status of the connection.
Installation Guide for the NETGEAR 54 Mbps Wireless PC Card WG511 Interpreting System Tray Icon Colors The System Tray (SysTray) resides on one end of the taskbar in the Microsoft Windows desktop. Color Condition Description Red The wireless PC Card has no connection to any other wireless node. The wireless PC Card is not able to link to any other wireless node or the link is lost. Check your configuration or try moving to a location where the wireless signal quality is better.
Installation Guide for the NETGEAR 54 Mbps Wireless PC Card WG511 Basic Troubleshooting Tips If you have problems connected to your wireless network, try the tips below. Symptom Cause Solution The PC Card LINK LED is not lit. The WG511 is not inserted into the slot properly or the WG511 software is not loaded. Remove and reinsert the WG511. Check the Windows device manager to see if the PC Card is recognized and enabled. Reload the WG511 software, if necessary.
Chapter 3 Configuration This section describes how to configure your NETGEAR 54 Mbps Wireless PC Card WG511 for wireless connectivity on your Wireless Local Area Network (WLAN) and use the data security encryption features. Note: The instructions in this section refer to the Netgear WG511 configuration utility.
Installation Guide for the NETGEAR 54 Mbps Wireless PC Card WG511 For example, if you use your notebook PC to connect to a wireless network in an office and a wireless network in your home, you can create a profile for each wireless network. Then, you can easily load the profile that has all the configuration settings you need to join the network you are using at the time. There are two types of wireless network connections you can configure: • Infrastructure Mode -- uses the 802.11 infrastructure mode.
Installation Guide for the NETGEAR 54 Mbps Wireless PC Card WG511 How to Configure an Infrastructure Mode Profile Follow the instructions below to configure an infrastructure mode profile for connecting to an access point. 1. Run the WG511 Configuration Utility. a. Make sure the WG511 software is installed and the WG511 is fully inserted in an available CardBus slot in your PC. b. Open the configuration utility by clicking on the WG511 icon system tray.
Installation Guide for the NETGEAR 54 Mbps Wireless PC Card WG511 Note: You will not get a wireless network connection unless the network SSID matches exactly what is configured in the access point. Tip: You can click the Site Survey tab to view a list of the available wireless networks and their SSIDs at the location where you are. 3. Save your settings in a Profile. a. Click the Profiles tab to view the screen below. Figure 3-3: Profiles tab page b. Type a descriptive name for the Profile Name. c.
Installation Guide for the NETGEAR 54 Mbps Wireless PC Card WG511 Verify connectivity by using a browser such as Netscape or Internet Explorer to connect to the Internet, or check for file and printer access on your network. Note: If you cannot connect, please see the “Basic Troubleshooting Tips” on page 2-20. Also, for problems with accessing network resources, the Windows Client and File and Print Sharing software might not be installed and configured properly on your computers. Please refer to.
Installation Guide for the NETGEAR 54 Mbps Wireless PC Card WG511 How to Configure an Ad-hoc Moce Profile Note: Ad-hoc mode will not work using DHCP settings. Ad-hoc mode requires either static IP addresses (such as 192.168.0.1) or other appropriate Windows networking configuration parameters such as adding the IPX protocol support.
Installation Guide for the NETGEAR 54 Mbps Wireless PC Card WG511 Figure 3-6: Profiles tab page b. Type a descriptive name for the Profile Name. c. Click the Save button to save this profile. All the configuration settings are saved in this profile. d. Click Activate to activate your settings. e. Click OK to exit the configuration utility. 3. Configure the PC network settings. a. Configure each PC with either a static IP address or with the IPX protocol.
Installation Guide for the NETGEAR 54 Mbps Wireless PC Card WG511 a. On the Windows taskbar click the Start button, and then click Run. b. Assuming the target PC is configured with 192.168.0.1 as its IP address, type ping -t 192.168.0.1 and then click OK. c. This will cause a continuous ping to be sent to the device with the 192.168.0.1 static IP address. The ping response should change to “reply.” At this point the connection is established.
Installation Guide for the NETGEAR 54 Mbps Wireless PC Card WG511 The procedures below identify how to configure the WEP encryption settings of your NETGEAR 54 Mbps Wireless PC Card WG511. Identifying the Wireless Network Name (SSID) and WEP Security Settings Print this form, fill in the configuration parameters and put it in a safe place for possible future reference. For an existing wireless network, the person who set up the network will be able to provide this information.
Installation Guide for the NETGEAR 54 Mbps Wireless PC Card WG511 How to Configure WEP Encryption Security Following the steps below to perform this procedure. connecting to an access point. 1. Run the WG511 Configuration Utility. a. Make sure the WG511 software is installed and the WG511 is fully inserted in an available CardBus slot in your PC. b. Open the configuration utility by clicking on the WG511 icon system tray. in the Windows Figure 3-7: Security tab page c.
Installation Guide for the NETGEAR 54 Mbps Wireless PC Card WG511 b. Enter the SSID. This is also called the Wireless Network Name. Note: You will not get a wireless network connection unless the network SSID matches exactly what is configured in the access point. Tip: You can click the Site Survey tab to view a list of the available wireless networks and their SSIDs at the location where you are. 3. Save your settings in a Profile. a. Click the Profiles tab to view the screen below.
Installation Guide for the NETGEAR 54 Mbps Wireless PC Card WG511 2. Select the WEP encryption strength you will use. The choices are: • • 64-bit WEP data encryption 128-bit WEP data encryption Note: Larger encryption keys require more processing and may slow the communications response times. 3. Check the Create with Passphrase radio button and enter the passphrase. Click Apply and the configuration utility automatically generates the WEP keys. Note: The characters are case sensitive.
Appendix A Technical Specifications This appendix provides technical specifications for the NETGEAR 54 Mbps Wireless PC Card WG511. Antennae Radio Data Rate Frequency Power Consumption Emissions Bus interface Provided drivers Dimensions Weight Status LED Operating Environment Safety Encryption Warranty Technical Specifications 2 Integrated internal diversity antennae 1, 2, 5.5, 6, 9, 12, 18, 24, 36, 48, and 54 Mbps (Auto Rate Sensing) 2.4GHz to 2.5GHz CCK and OFDM Modulation) 3.
Installation Guide for the NETGEAR 54 Mbps Wireless PC Card WG511 A-34 Technical Specifications
Appendix B Wireless Networking Basics This chapter provides an overview of Wireless networking. Wireless Networking Overview The WG511 Wireless PC Card conforms to the Institute of Electrical and Electronics Engineers (IEEE) 802.11b standard for wireless LANs (WLANs) and a product update will bring the WG511 into conformance to the 802.11g standard when it is ratified. On an 802.
Installation Guide for the NETGEAR 54 Mbps Wireless PC Card WG511 Ad Hoc Mode (Peer-to-Peer Workgroup) In an ad hoc network, computers are brought together as needed; thus, there is no structure or fixed points to the network - each node can generally communicate with any other node. There is no Access Point involved in this configuration.
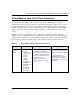
Installation Guide for the NETGEAR 54 Mbps Wireless PC Card WG511 802.11 Authentication The 802.11 standard defines several services that govern how two 802.11 devices communicate. The following events must occur before an 802.11 Station can communicate with an Ethernet network through an access point such as the one built in to the WG511: 1. Turn on the wireless station. 2. The station listens for messages from any access points that are in range. 3.
Installation Guide for the NETGEAR 54 Mbps Wireless PC Card WG511 802.11 Authentication Open System Steps 1) Authentication request sent to AP Access Point (AP) 2) AP authenticates IN TER N ET Cable/DSL ProSafeWirelessVPN Security Firewall PWR W LA N ACT FVM318 100 Enable LNK/ACT 1 Client attempting to connect MODEL LO CA L LNK TEST 2 3 4 5 6 7 3) Client connects to network 8 Cable or DLS modem Figure 3-9: 802.
Installation Guide for the NETGEAR 54 Mbps Wireless PC Card WG511 802.
Installation Guide for the NETGEAR 54 Mbps Wireless PC Card WG511 Key Size The IEEE 802.11 standard supports two types of WEP encryption: 40-bit and 128-bit. The 64-bit WEP data encryption method, allows for a five-character (40-bit) input. Additionally, 24 factory-set bits are added to the forty-bit input to generate a 64-bit encryption key. (The 24 factory-set bits are not user-configurable). This encryption key will be used to encrypt/decrypt all data transmitted via the wireless interface.
Installation Guide for the NETGEAR 54 Mbps Wireless PC Card WG511 Note: Whatever keys you enter for an AP, you must also enter the same keys for the client adapter in the same order. In other words, WEP key 1 on the AP must match WEP key 1 on the client adapter, WEP key 2 on the AP must match WEP key 2 on the client adapter, etc. Note: The AP and the client adapters can have different default WEP Keys as long as the keys are in the same order.
Installation Guide for the NETGEAR 54 Mbps Wireless PC Card WG511 The radio frequency channels used are listed in Table 3-1: Table 3-1. 802.11b and g Radio Frequency Channels Channel Center Frequency Frequency Spread 1 2412 MHz 2399.5 MHz - 2424.5 MHz 2 2417 MHz 2404.5 MHz - 2429.5 MHz 3 2422 MHz 2409.5 MHz - 2434.5 MHz 4 2427 MHz 2414.5 MHz - 2439.5 MHz 5 2432 MHz 2419.5 MHz - 2444.5 MHz 6 2437 MHz 2424.5 MHz - 2449.5 MHz 7 2442 MHz 2429.5 MHz - 2454.5 MHz 8 2447 MHz 2434.
Appendix C Preparing Your PCs for Network Access This appendix describes how to prepare your PCs to connect to the Internet through the NETGEAR 54 Mbps Wireless PC Card WG511. For adding file and print sharing to your network, please consult the Windows help information included with the version of Windows installed on each computer on your network.
Installation Guide for the NETGEAR 54 Mbps Wireless PC Card WG511 1. On the Windows taskbar, click the Start button, point to Settings, and then click Control Panel. 2. Double-click the Network icon. The Network window opens, which displays a list of installed components: You must have an Ethernet adapter or an WG511, the TCP/IP protocol, and the Client for Microsoft Networks.
Installation Guide for the NETGEAR 54 Mbps Wireless PC Card WG511 a. b. c. d. 3. Click the Add button. Select Client, and then click Add. Select Microsoft. Select File and Print Sharing for Microsoft Networks, and then click OK. Restart your PC for the changes to take effect.
Installation Guide for the NETGEAR 54 Mbps Wireless PC Card WG511 Verify the following settings as shown: • Client for Microsoft Network exists • Ethernet adapter is present • TCP/IP is present • Primary Network Logon is set to Windows logon Click on the Properties button. The following TCP/IP Properties window will display.
Installation Guide for the NETGEAR 54 Mbps Wireless PC Card WG511 By default, the IP Address tab is open on this window. • Verify the following: Obtain an IP address automatically is selected. If not selected, click in the radio button to the left of it to select it. This setting is required to enable the DHCP server to automatically assign an IP address. • Click OK to continue. Restart the PC. Repeat these steps for each PC with this version of Windows on your network.
Installation Guide for the NETGEAR 54 Mbps Wireless PC Card WG511 2. Type winipcfg, and then click OK. The IP Configuration window opens, which lists (among other things), your IP address, subnet mask, and default gateway. 3. From the drop-down box, select your Ethernet adapter. The window is updated to show your settings, which should match the values below if you are using the default TCP/IP settings that NETGEAR recommends for connecting through a router or gateway: • The IP address is between 192.
Installation Guide for the NETGEAR 54 Mbps Wireless PC Card WG511 DHCP Configuration of TCP/IP in Windows XP or 2000 You will find there are many similarities in the procedures for different Windows systems when using DHCP to configure TCP/IP. The following steps will walk you through the configuration process for each of these versions of Windows. DHCP Configuration of TCP/IP in Windows XP Locate your Network Neighborhood icon. • Select Control Panel from the Windows XP Start Menu.
Installation Guide for the NETGEAR 54 Mbps Wireless PC Card WG511 Now you should be at the Local Area Network Connection Status window. This box displays the connection status, duration, speed, and activity statistics. Administrator logon access rights are needed to use this window. • Click the Properties button to view details about the connection. The TCP/IP details are presented on the Support tab page. • Select Internet Protocol, and click Properties to view the configuration information.
Installation Guide for the NETGEAR 54 Mbps Wireless PC Card WG511 Verify that Obtain an IP address automatically radio button is selected and that the Obtain DNS server address automatically radio button is selected. • Click the OK button. This completes the DHCP configuration in Windows XP. Repeat these steps for each PC with this version of Windows on your network.
Installation Guide for the NETGEAR 54 Mbps Wireless PC Card WG511 The Local Area Connection Properties dialog box appears. Verify that you have the correct Ethernet card selected in the Connect using: box and that the following two items are displayed and selected in the box of “Components checked are used by this connection:” • • Client for Microsoft Networks and Internet Protocol (TCP/IP) Click OK.
Installation Guide for the NETGEAR 54 Mbps Wireless PC Card WG511 Verifying TCP/IP Properties for Windows XP or 2000 To check your PC’s TCP/IP configuration: 1. On the Windows taskbar, click the Start button, and then click Run. The Run window opens. 2. Type cmd and then click OK. A command window opens 3.
Installation Guide for the NETGEAR 54 Mbps Wireless PC Card WG511 C-54 Preparing Your PCs for Network Access
Glossary List of Glossary Terms Use the list below to find definitions for technical terms used in this manual. 802.11b IEEE specification for wireless networking at 11 Mbps using direct-sequence spread-spectrum (DSSS) technology and operating in the unlicensed radio spectrum at 2.5GHz. DHCP See Dynamic Host Configuration Protocol. Dynamic Host Configuration Protocol DHCP.
Installation Guide for the NETGEAR 54 Mbps Wireless PC Card WG511 2 MAC address Media Access Control address. A unique 48-bit hardware address assigned to every Ethernet node. Usually written in the form 01:23:45:67:89:ab. Mbps Megabits per second. packet A block of information sent over a network. A packet typically contains a source and destination network address, some protocol and length information, a block of data, and a checksum. router A device that forwards data between networks.
Index Numerics W 802.11b B-35 WEP 1-4, 3-28, B-36 Wi-Fi B-35 A Windows, configuring for IP routing C-43, C-48 ad-hoc mode B-36 winipcfg utility C-47 Wired Equivalent Privacy.