
User's Manual


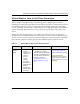
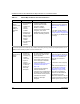
Table Of Contents
- Installation Guide for the NETGEAR 54 Mbps Wireless PC Card WG511
- Technical Support
- Statement of Conditions
- Contents
- Chapter 1 Introduction
- Chapter 2 Basic Setup
- What You Will Need Before You Begin
- Two Basic Operating Modes
- WG511 Default Wireless Configuration Settings
- Basic Installation Instructions
- For Windows XP Users Installing a WG511
- a. Power on your notebook, let the operating system boot up completely, and log in as needed.
- b. Insert the Resource CD for the WG511 into your CD-ROM drive. The CD index page shown at the right will load.
- c. Click the INSTALL button and an Install Software window opens. Read the instructions for running the software setup utility.
- d. Click the Install Software link. When the browser warning message appears, click Open to start the Install Shield Wizard.
- e. Follow the Install Shield Wizard steps, and click Finish when done to restart your computer.
- a. Locate an available CardBus slot on the side of your notebook. Hold the PC Card with the Netgear logo facing up and insert it into the CardBus slot.
- b. Click Next and follow the prompts to proceed.
- a. Right click on the network icon in the Windows XP system tray to open the network options menu.
- b. Click on the View Available Wireless Networks menu item.
- c. If there is more than one wireless network in your vicinity, click on the one to which you will connect.
- d. Click on the “Allow me to connect to the selected wireless network even though this is not secure” check box.
- e. Click Connect.
- a. Open the WG511 utility by clicking on the icon in the Windows system tray.
- b. Verify that your Connection and Status Monitor information matches your wireless network.
- c. Check the two WG511 LEDs:
- d. Verify connectivity to the Internet or network resources.
- For Windows 2000 & 98/Me Users Installing a WG511
- a. Power on your notebook, let the operating system boot up completely, and log in as needed.
- b. Insert the Resource CD for the WG511 into your CD-ROM drive. The CD index page shown at the right will load.
- c. Click the INSTALL button and an Install Software window opens. Read the instructions for running the software setup utility.
- d. Click the Install Software link. When the browser warning message appears, click Open to start the Install Shield Wizard.
- e. Follow the steps in the Install Shield Wizard, and click Finish when done to restart your computer.
- a. Locate an available CardBus slot on the side of your notebook. Hold the PC Card with the Netgear logo facing up and insert it into the CardBus slot.
- b. Click Next and follow the prompts to proceed. After the installation completes, click Finish to close the wizard.
- a. Click on the WG511 systray icon in the to open the WG511 configuration utility.
- b. Change the Network Name SSID to match your network.
- c. Click the Profile tab. Enter a name for your profile.
- d. Click the Save button to save all your settings in the Profile, and then click the Activate button. You can save multiple profiles and activate whichever one you need to use.
- e. Click OK to close the utility.
- a. Open the WG511 utility by clicking on the icon in the Windows system tray.
- b. Click the Status tab page. Verify that your Connection and Status Monitor information matches your wireless network.
- c. Check the two WG511 LEDs:
- d. Verify connectivity to the Internet or network resources.
- For Windows XP Users Installing a WG511
- WG511 Wireless Connection Indicators
- Basic Troubleshooting Tips
- Chapter 3 Configuration
- Understanding the Configuration Options
- Using Configuration Profiles
- Connect to an Access Point in Infrastructure Mode
- How to Configure an Infrastructure Mode Profile
- 1. Run the WG511 Configuration Utility.
- 2. Configure the wireless Network settings.
- 3. Save your settings in a Profile.
- 4. Verify wireless connectivity to your network.
- Connecting to Another PC in Ad-hoc Mode
- Figure 34: NETGEAR WG511 Wireless PC Card in Peer-to-Peer Mode
- How to Configure an Ad-hoc Moce Profile
- 1. Run the WG511 Configuration Utility.
- a. Make sure the WG511 software is installed and the WG511 is fully inserted in an available CardBus slot in your PC.
- b. Open the configuration utility by clicking on the WG511 icon in the Windows system tray.
- c. Click the Configuration tab to display the view shown above.
- d. Select Ad-hoc from the Network mode drop-down list.
- e. Click Apply to apply your settings
- 2. Save your settings in a Profile.
- 3. Configure the PC network settings.
- 4. Verify wireless connectivity between your peer devices.
- a. On the Windows taskbar click the Start button, and then click Run.
- b. Assuming the target PC is configured with 192.168.0.1 as its IP address, type ping -t 192.168.0.1 and then click OK.
- c. This will cause a continuous ping to be sent to the device with the 192.168.0.1 static IP address. The ping response should change to “reply.”
- 1. Run the WG511 Configuration Utility.
- Enabling Wireless Security Features
- Identifying the Wireless Network Name (SSID) and WEP Security Settings
- How to Configure WEP Encryption Security
- 1. Run the WG511 Configuration Utility.
- 2. Configure the Security settings.
- 3. Save your settings in a Profile.
- 1. Run the Configuration Utility and select the Encryption tab page.
- 2. Select the WEP encryption strength you will use. The choices are:
- 3. Check the Create with Passphrase radio button and enter the passphrase. Click Apply and the configuration utility automatically generates the WEP keys. Note: The characters are case sensitive. Be sure to use the same passphrase for all the...
- 4. The Default Key setting must match what is set in the access point and the other 802.11 wireless devices.
- 5. Click Apply then OK for the changes to take effect.
- Appendix A Technical Specifications
- Appendix B Wireless Networking Basics
- Wireless Networking Overview
- Authentication and WEP
- 802.11 Authentication
- 1. Turn on the wireless station.
- 2. The station listens for messages from any access points that are in range.
- 3. The station finds a message from an access point that has a matching SSID.
- 4. The station sends an authentication request to the access point.
- 5. The access point authenticates the station.
- 6. The station sends an association request to the access point.
- 7. The access point associates with the station.
- 8. The station can now communicate with the Ethernet network through the access point.
- Open System Authentication
- Shared Key Authentication
- 1. The station sends an authentication request to the access point.
- 2. The access point sends challenge text to the station.
- 3. The station uses its configured 64-bit or 128-bit default key to encrypt the challenge text, and sends the encrypted text to the access point.
- 4. The access point decrypts the encrypted text using its configured WEP Key that corresponds to the station’s default key. The access point compares the decrypted text with the original challenge text. If the decrypted text matches the origi...
- 5. The station connects to the network.
- Overview of WEP Parameters
- Key Size
- WEP Configuration Options
- 802.11 Authentication
- Wireless Channels
- Appendix C Preparing Your PCs for Network Access
- Preparing Your Computers for TCP/IP Networking
- Configuring Windows 98 and Me for TCP/IP Networking
- Install or Verify Windows Networking Components
- 1. On the Windows taskbar, click the Start button, point to Settings, and then click Control Panel.
- 2. Double-click the Network icon.
- a. Click the Add button.
- b. Select Protocol, and then click Add.
- c. Select Microsoft.
- d. Select TCP/IP, and then click OK.
- a. Click the Add button.
- b. Select Client, and then click Add.
- c. Select Microsoft.
- d. Select Client for Microsoft Networks, and then click OK.
- a. Click the Add button.
- b. Select Client, and then click Add.
- c. Select Microsoft.
- d. Select File and Print Sharing for Microsoft Networks, and then click OK.
- 3. Restart your PC for the changes to take effect.
- Enabling DHCP to Automatically Configure TCP/IP Settings in Windows 98 and Me
- Selecting Windows’ Internet Access Method
- 1. On the Windows taskbar, click the Start button, point to Settings, and then click Control Panel.
- 2. Double-click the Internet Options icon.
- 3. Select “I want to set up my Internet connection manually” or “I want to connect through a Local Area Network” and click Next.
- 4. Select “I want to connect through a Local Area Network” and click Next.
- 5. Uncheck all boxes in the LAN Internet Configuration screen and click Next.
- 6. Proceed to the end of the Wizard.
- Verifying TCP/IP Properties
- Install or Verify Windows Networking Components
- Configuring Windows 2000 or XP for TCP/IP Networking
- Install or Verify Windows Networking Components
- 1. On the Windows taskbar, click the Start button, point to Settings, and then click Control Panel.
- 2. Double-click the Network and Dialup Connections icon.
- 3. If an Ethernet adapter is present in your PC, you should see an entry for Local Area Connection. Double-click that entry.
- 4. Select Properties.
- 5. Verify that ‘Client for Microsoft Networks’ and ‘Internet Protocol (TCP/IP)’ are present. If not, select Install and add them.
- 6. Select ‘Internet Protocol (TCP/IP)’, click Properties, and verify that “Obtain an IP address automatically is selected.
- 7. Click OK and close all Network and Dialup Connections windows.
- 8. Then, restart your PC.
- DHCP Configuration of TCP/IP in Windows XP or 2000
- DHCP Configuration of TCP/IP in Windows XP
- DHCP Configuration of TCP/IP in Windows 2000
- Verifying TCP/IP Properties for Windows XP or 2000
- Install or Verify Windows Networking Components
- Glossary
- Index

Installation Guide for the NETGEAR 54 Mbps Wireless PC Card WG511V2H1
Introduction 1-3
A Road Map for ‘How to Get There From Here’
The introduction and adoption of any new technology can be a difficult process. Wireless
technology has removed one of the barriers to networking: running wires. It allows more people to
try networking while at the same time exposes them to the inherent complexity of networking.
General networking concepts, set up, and maintenance can be difficult to understand. In addition,
wireless technology adds issues, such as range, interference, signal quality, and security to the
picture.
To help overcome potential barriers to successfully using wireless networks, the table below
identifies how to accomplish such things as connecting to a wireless network, assuring appropriate
security measures are taken, browsing the Internet through your wireless connection, exchanging
files with other computers and using printers in the combined wireless and wired network.
Table 1-1. A Road Map for How to Get There From Here ...
If I Want To ... ? What Do I Do? What’s Needed? How Do I?
Connect to a
wireless
network
1. Identify the
wireless
network name
(SSID) and, if
used the
wireless
security
settings.
2. Set up the
NETGEAR 54
Mbps Wireless
PC Card
WG511V2H1
with the settings
from step 1.
1. A wireless network
2. A notebook PC within the
operating range of the wireless
network. For guidelines about
the range of 802.11b wireless
networks, please see
2“Observe Location and
Range Guidelines” on page
2-8.
To set up the WG511V2H1 , see
Chapter 2, Basic Setup and
follow the instructions provided.
To learn about wireless
networking technology, please
see Appendix B-35, “Wireless
Networking Basics” for a general
introduction.