
User's Manual
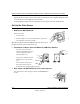

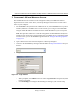
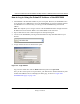
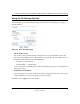
Table Of Contents
- Trademarks
- Statement of Conditions
- Federal Communications Commission (FCC) Compliance Notice: Radio Frequency Notice
- Canadian Department of Communications Compliance Statement
- Product and Publication Details
- Contents
- Chapter 1 About This Manual
- Chapter 2 Introduction
- Chapter 3 Basic Installation and Configuration
- Overview of Wireless USB Print Server Setup
- Verify Printer and Network Readiness
- Understanding WGPS606 Wireless Security Options
- Observe these Precautions
- Set Up the Print Server
- Now, Set Up a PC
- Troubleshooting Tips
- Two Ways to Log In to the WGPS606
- Using the IP Settings Options
- Understanding the Basic Wireless Settings
- Chapter 4 Management
- Chapter 5 Advanced Configuration
- Chapter 6 Troubleshooting
- Appendix A Specifications
- Appendix B Wireless Networking Basics
- Glossary

Reference Manual for the NETGEAR 54 Mbps Wireless USB Print Server with 4-Port Switch
3-6 Basic Installation and Configuration
Draft 1, 01 Feb 05
c. Follow the step-by-step instructions to complete setting up the PC to use the printer you just set up
on the wireless USB print server.
d. Verify connectivity to the printer.
Troubleshooting Tips
Here are some tips for correcting simple problems you may have.
Once the wireless USB print server is connected, always restart your network in
this sequence:
1. Turn off and unplug the modem, turn off the router, shut off the wireless USB print server, turn
off the printer, and shut down the computer.
2. Plug in and turn on the modem. Wait about 2 minutes.
3. Turn on the router. Wait about 1 minute.
4. Turn on the wireless USB print server and printer.
5. Turn on the computer.
Make sure the cables are plugged in.
For each powered on computer connected to the wireless USB print server with an Ethernet cable,
the corresponding LAN status light will be lit. The label on the bottom of the wireless USB print
server identifies the number of each LAN port.
Verify the wireless settings.
The Wireless Network Name (SSID) and security settings of the router and wireless USB print
server must match exactly. For example, entering nETgear for the SSID is not the same as entering
NETGEAR.
Make sure the network settings of the computer are correct.
Both Ethernet cable and wirelessly connected computers must be configured to obtain IP and DNS
addresses automatically via DHCP.
Check the router status lights to verify correct router operation.
The Power light should turn solid green. If after 2 minutes it is not, reset the wireless USB print
server as described in the Setup Manual on the CD.
If after completing the setup, the Wireless light does not come on, log in to the router and verify
that the wireless feature is turned on.
I don’t have a working CD drive.
Follow the setup instructions in the manual on the CD.