
User Manual


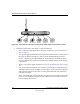


Table Of Contents
- NETGEAR Wireless Router Setup Manual
- Contents
- Chapter 1 About This Guide
- Chapter 2 Getting to Know Your NETGEAR Wireless Router
- Chapter 3 Connecting the Router to the Internet
- Chapter 4 Optimizing Wireless Connectivity and Security
- Chapter 5 Doing Basic Router Housekeeping
- Chapter 6 Troubleshooting Common Problems
- Appendix A Technical Specifications
- Appendix C Preparing Your Network
- What You Need To Use a Router with a Broadband Modem
- Preparing Your Computers for TCP/IP Networking
- Configuring Windows 95, 98, and Me for TCP/IP Networking
- Configuring Windows NT4, 2000 or XP for IP Networking
- Configuring the Macintosh for TCP/IP Networking
- Verifying the Readiness of Your Internet Account
- Restarting the Network
- Glossary

Connecting the Router to the Internet 3-1
September 2004
Chapter 3
Connecting the Router to the Internet
This chapter describes how to set up the router on your local area network (LAN) and connect to
the Internet. You will find out how to configure your wireless router for Internet access.
Follow these instructions to set up your router.
Prepare to Install Your Wireless Router
• For Cable Modem Service: When you perform the wireless router setup steps be sure to use
the computer you first registered with your cable ISP.
• For DSL Service: You may need information such as the DSL login name/e-mail address and
password in order to complete the wireless router setup.
Before proceeding with the wireless router installation, familiarize yourself with the contents of
the Setup CD, especially this manual and the tutorials for configuring computers for networking.
First, Connect the Wireless Router to Your Network
1. CONNECT THE WIRELESS ROUTER, THE COMPUTER, AND THE MODEM
a. Turn off your computer.
b. Turn off the cable or DSL broadband modem.