
User Manual
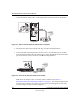
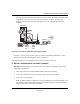
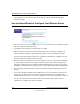
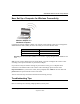
Table Of Contents
- NETGEAR Wireless Router Setup Manual
- Contents
- Chapter 1 About This Guide
- Chapter 2 Getting to Know Your NETGEAR Wireless Router
- Chapter 3 Connecting the Router to the Internet
- Chapter 4 Optimizing Wireless Connectivity and Security
- Chapter 5 Doing Basic Router Housekeeping
- Chapter 6 Troubleshooting Common Problems
- Appendix A Technical Specifications
- Appendix C Preparing Your Network
- What You Need To Use a Router with a Broadband Modem
- Preparing Your Computers for TCP/IP Networking
- Configuring Windows 95, 98, and Me for TCP/IP Networking
- Configuring Windows NT4, 2000 or XP for IP Networking
- Configuring the Macintosh for TCP/IP Networking
- Verifying the Readiness of Your Internet Account
- Restarting the Network
- Glossary

NETGEAR Wireless Router Setup Manual
Connecting the Router to the Internet 3-5
September 2004
3. OPEN A BROWSER AND LOG IN TO THE ROUTER
For DSL customers, if your Internet service provider had you install software logs you in to the
Internet, do not run that software. If such software automatically starts when you open a browser,
you may need to go to the Internet Explorer Tools menu, Internet Options, Connections tab page
where you can select “Never dial a connection.”
1. From the Ethernet connected computer you just set up, open a browser such as Internet
Explorer or Netscape® Navigator.
Note: If your browser connects you to the Internet, you can skip this section and proceed to the
Now, Set Up a Computer for Wireless Connectivity section below.
2. Connect to the wireless router by typing http://192.168.61.1 in the address field of your
browser, then click Enter.
3. For security reasons, the router has its own user name and password. When prompted, enter
admin for the router user name and password for the router password, both in lower case
letters.
Note: The router user name and password are not the same as any user name or password you
may use to log in to your Internet connection.
A login window like the one shown below opens:
Figure 3-5: Login window
Note: If you cannot connect to the wireless router, verify your cables are connected correctly,
that the router is powered on, and that the networking setup of your computer is set to obtain
its settings automatically via DHCP. It should be set to obtain both IP and DNS server
addresses automatically, which is usually so. For help with this, please see the tutorials on the
CD.