Reference Manual for the 108 Mbps Wireless Firewall Router WGR624v3 Log action buttons are described in Table 5-2 Table 5-2. Log action buttons Field Description Refresh Click this button to refresh the log screen. Clear Log Click this button to clear the log entries. Send Log Click this button to E-mail the log immediately.
Reference Manual for the 108 Mbps Wireless Firewall Router WGR624v3 • Turn e-mail notification on Check this box if you wish to receive e-mail logs and alerts from the router. • Your outgoing mail server Enter the name of your ISP’s outgoing (SMTP) mail server (such as mail.myISP.com). You may be able to find this information in the configuration menu of your e-mail program. If you leave this box blank, log and alert messages will not be sent via e-mail.
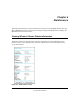
Chapter 6 Maintenance This chapter describes how to use the maintenance features of your 108 Mbps Wireless Firewall Router WGR624v3. These features can be found by clicking on the Maintenance heading in the Main Menu of the browser interface. Viewing Wireless Router Status Information The Router Status menu provides status and usage information. From the Main Menu of the browser interface, click on Maintenance, then select Router Status to view the System Status screen, shown below.
Reference Manual for the 108 Mbps Wireless Firewall Router WGR624v3 This screen shows the following parameters: Table 6-1. Wireless Router Status Fields Field Description Account Name This field displays the Host Name assigned to the router. Firmware Version This field displays the router firmware version. Internet Port These parameters apply to the Internet (WAN) port of the router.
Reference Manual for the 108 Mbps Wireless Firewall Router WGR624v3 Table 6-1. Wireless Router Status Fields Field Description Wireless Port These parameters apply to the Wireless port of the router. MAC Address This field displays the Media Access Control address being used by the Wireless port of the router. Name (SSID) This field displays the wireless network name (SSID) being used by the wireless port of the router. The default is NETGEAR.
Reference Manual for the 108 Mbps Wireless Firewall Router WGR624v3 Table 6-2: Connection Status Items Item Description Default Gateway The WAN (Internet) default gateway the router communicates with. DHCP Server The IP address of the DHCP server which provided the IP configuration addresses. DNS Server The IP address of the DNS server which provides network name to IP address translation. Lease Obtained When the DHCP lease was obtained. Lease Expires When the DHCP lease was expires.
Reference Manual for the 108 Mbps Wireless Firewall Router WGR624v3 Table 6-3: Item Router Statistics Items Description Rx B/s The current reception (inbound) bandwidth used on the WAN and LAN ports. Up Time The amount of time since the router was last restarted. Up Time The time elapsed since this port acquired the link. Poll Interval Specifies the intervals at which the statistics are updated in this window. Click on Stop to freeze the display.
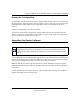
Reference Manual for the 108 Mbps Wireless Firewall Router WGR624v3 From the Main Menu of the browser interface, under the Maintenance heading, select the Settings Backup heading to bring up the menu shown below. Figure 6-5: Settings Backup menu Three options are available, and are described in the following sections. Restoring and Backing Up the Configuration The Restore and Backup options in the Settings Backup menu allow you to save and retrieve a file containing your router’s configuration settings.
Reference Manual for the 108 Mbps Wireless Firewall Router WGR624v3 Erasing the Configuration It is sometimes desirable to restore the router to original default settings. This can be done by using the Erase function, which will restore all factory settings. After an erase, the router's password will be password, the LAN IP address will be 192.168.0.1, and the router's DHCP client will be enabled. To erase the configuration, click the Erase button.
Reference Manual for the 108 Mbps Wireless Firewall Router WGR624v3 Figure 6-6: Router Upgrade menu To upload new firmware: 1. Download and unzip the new software file from NETGEAR. In the Router Upgrade menu, click the Browse button and browse to the location of the upgrade file 3. Click Upload. Note: When uploading software to the WGR624v3 router, it is important not to interrupt the Web browser by closing the window, clicking a link, or loading a new page.
Reference Manual for the 108 Mbps Wireless Firewall Router WGR624v3 Figure 6-7: Set Password menu To change the password, first enter the old password, then enter the new password twice. Click Apply.
Reference Manual for the 108 Mbps Wireless Firewall Router WGR624v3 6-10 Maintenance July 2004 202-10036-01
Chapter 7 Advanced Configuration of the Router This chapter describes how to configure the advanced features of your 108 Mbps Wireless Firewall Router WGR624v3. These features can be found under the Advanced heading in the Main Menu of the browser interface. . Note: If you are unfamiliar with networking and routing, refer to Appendix B, “Network, Routing, Firewall, and Basics,” to become more familiar with the terms and procedures used in this chapter.
Reference Manual for the 108 Mbps Wireless Firewall Router WGR624v3 port triggering will only allow request from Internet after a designated port is 'triggered'. Port triggering applies to chat and Internet games. Figure 7-1: Port Triggering Menu Note: If Disable Port Triggering box is checked after configuring port triggering, port triggering will be disabled but any port triggering configuration information you added to the router will be retained even though it will not be used.
Reference Manual for the 108 Mbps Wireless Firewall Router WGR624v3 Follow these steps to set up a computer to play Internet games or use Internet applications: 1. Click Add. Figure 7-2: Add Port Trigger Menu 2. Enter a service name in the Service Name box. 3. Under Service User, selecting Any (default) will allow this service to be used by everyone in your network. Otherwise, select Single address and enter the IP address of one computer to restrict the service to a particular computer. 4.
Reference Manual for the 108 Mbps Wireless Firewall Router WGR624v3 interface, under Advanced, click on Port Forwarding to view the port forwarding menu, shown below. Figure 7-3: Port Forwarding Menu Use the Port Forwarding menu to configure the router to forward incoming protocols to computers on your local network. In addition to servers for specific applications, you can also specify a Default DMZ Server to which all other incoming protocols are forwarded.
Reference Manual for the 108 Mbps Wireless Firewall Router WGR624v3 Adding a Custom Service To define a service, game or application that does not appear in the Services & Games list, you must determine what port numbers are used by the service. For this information, you may need to contact the manufacturer of the program that you wish to use. When you have the port number information, follow these steps: 1. Click the Add Custom Service button. Figure 7-4: Ports - Custom Services Menu 2.
Reference Manual for the 108 Mbps Wireless Firewall Router WGR624v3 2. Click Edit or Delete. Local Web and FTP Server Example If a local computer with a private IP address of 192.168.0.33 acts as a Web and FTP server, configure the Ports menu to forward HTTP (port 80) and FTP (port 21) to local address 192.168.0.33 In order for a remote user to access this server from the Internet, the remote user must know the IP address that has been assigned by your ISP. If this address is 172.16.1.
Reference Manual for the 108 Mbps Wireless Firewall Router WGR624v3 Some online games and videoconferencing applications are incompatible with NAT. The WGR624v3 router is programmed to recognize some of these applications and to work properly with them, but there are other applications that may not function well. In some cases, one local computer can run the application properly if that computer’s IP address is entered as the default in the PORTS Menu.
Reference Manual for the 108 Mbps Wireless Firewall Router WGR624v3 Disabling the SPI Firewall The SPI (Stateful Inspection) Firewall protects your LAN against Denial of Service attacks. This should only be disabled in special circumstances. Setting Up a Default DMZ Server The default DMZ server feature is helpful when using some online games and videoconferencing applications that are incompatible with NAT.