
User Manual
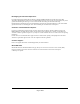

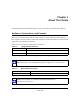
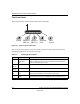
Table Of Contents
- NETGEAR Wireless Router Setup Manual
- Contents
- Chapter 1 About This Guide
- Chapter 2 Getting to Know Your NETGEAR Wireless Router
- Chapter 3 Connecting the Router to the Internet
- Prepare to Install Your Wireless Router
- First, Connect the Wireless Router to Your Network
- Use the Smart Wizard to Configure Your Wireless Router
- Now, Set Up a Computer for Wireless Connectivity
- Troubleshooting Tips
- How to Manually Configure Your Internet Connection
- NETGEAR Product Registration, Support, and Documentation
- Chapter 4 Optimizing Wireless Connectivity and Security
- Chapter 5 Doing Basic Router Housekeeping
- Chapter 6 Troubleshooting Common Problems
- Appendix A Technical Specifications
- Glossary

NETGEAR Wireless Router Setup Manual
2-2 Getting to Know Your NETGEAR Wireless Router
August 2004
The Front Panel
The front panel of the wireless router includes these status lights.
Figure 2-1: wireless router Front Panel
You can use the status lights to verify connections. Viewed from left to right, the table below
describes the lights on the front panel of the router.
Table 2-1. Status Light Descriptions
Label Activity Description
Power On Green Solid
Amber Blink
Off
Power is supplied to the router.
Power is supplied to the router and it is performing its diagnostic test.
Power is not supplied to the router.
Wireless
802.11a
On The 802.11a wireless interface is enabled.
Wireless
802.11g
On The 802.11g wireless interface is enabled.
Internet
Port
On
Blink
The Internet port has detected a link with an attached device.
Data is being transmitted or received by the Internet port.
LAN Green
Amber
The LAN port has detected a 100 Mbps link with an attached device.
The LAN port has detected a 100 Mbps link with an attached device.
0OWER )NTERNET
0ORT
7IRELESS
G
,!.
0ORT
7IRELESS
A