ProSafe 16 AP Wireless Management System WMS5316 Reference Manual 350 East Plumeria Drive San Jose, CA 95134 USA July 2010 202-10601-02 v1.
ProSafe 16 AP Wireless Management System WMS5316 Reference Manual ©2010 NETGEAR, Inc. All rights reserved. No part of this publication may be reproduced, transmitted, transcribed, stored in a retrieval system, or translated into any language in any form or by any means without the written permission of NETGEAR, Inc. Technical Support Thank you for choosing NETGEAR. To register your product, get the latest product updates, or get support online, visit us at http://support.netgear.com.
Table of Contents Chapter 1 Getting Started Logging In . . . . . . . . . . . . . . . . . . . . . . . . . . . . . . . . . . . . . . . . . . . . . . . . . . 6 Basic System Settings . . . . . . . . . . . . . . . . . . . . . . . . . . . . . . . . . . . . . . . . . 7 General Settings . . . . . . . . . . . . . . . . . . . . . . . . . . . . . . . . . . . . . . . . . . . 7 Time Settings. . . . . . . . . . . . . . . . . . . . . . . . . . . . . . . . . . . . . . . . . . . . . . 8 IP Settings . . . . . . . . . . . .
ProSafe 16 AP Wireless Management System WMS5316 Reference Manual Guest Access Show . . . . . . . . . . . . . . . . . . . . . . . . . . . . . . . . . . . . . . . .33 Chapter 5 Monitoring Monitoring Summary . . . . . . . . . . . . . . . . . . . . . . . . . . . . . . . . . . . . . . . . .34 Access Point Status . . . . . . . . . . . . . . . . . . . . . . . . . . . . . . . . . . . . . . . .34 Rogue Access Points . . . . . . . . . . . . . . . . . . . . . . . . . . . . . . . . . . . . . . .
ProSafe 16 AP Wireless Management System WMS5316 Reference Manual Access Point Logs . . . . . . . . . . . . . . . . . . . . . . . . . . . . . . . . . . . . . . . . . 56 Diagnostic Ping Screen . . . . . . . . . . . . . . . . . . . . . . . . . . . . . . . . . . . . . 56 Using Discovery OUI . . . . . . . . . . . . . . . . . . . . . . . . . . . . . . . . . . . . . . . . . 57 Appendix A Access Point Firmware Compatibility Compatible Access Point Supported Firmware Versions . . . . . . . . . . . . . .
1. Getting Started 1 The ProSafe 16 AP Wireless Management System allows you to manage up to 16 NETGEAR wireless access points on a LAN. You can use the wireless management system to: • Discover NETGEAR access points on the LAN. • Optimize wireless access point performance with centralized RF management, QoS, and load balancing. • Streamline security configuration tasks and set up guest access. • Monitor network usage.
ProSafe 16 AP Wireless Management System WMS5316 Reference Manual To log in to the wireless management system you must use a computer that is configured with a static IP address of 192.168.0.210 and a subnet mask of 255.255.255.0. Connect the computer to a LAN port on the wireless management system with an Ethernet cable. 1. In the address field of your Internet browser, type the IP address for the ProSafe 16 AP Wireless Management System. Its default IP address is http://192.168.0.250.
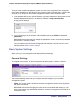
ProSafe 16 AP Wireless Management System WMS5316 Reference Manual • Country/Region: This field displays the region of operation for the wireless management system and the access points managed by the wireless management system. In the United States, the country is preset and cannot be changed on the access points. If the country/region is not set up correctly, the wireless management system might not be able to access the access points.
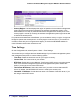
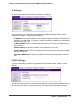
ProSafe 16 AP Wireless Management System WMS5316 Reference Manual IP Settings On the Configuration tab select System > Basic > IP Settings: This screen lets you to configure the management IP address settings of the wireless management system. It has the following options: • IP Address: This is the IP address of the wireless management system. The default IP address is 192.168.0.250. To change it, enter an available IP address from the address range used on your LAN.
ProSafe 16 AP Wireless Management System WMS5316 Reference Manual Untagged VLANs When the Untagged VLAN check box is selected, one VLAN can be configured as an untagged VLAN. For each profile group up to 8 VLANS can be configured per radio, for example, a maximum of 15 SSIDs per group for both the radios. The active VLANs depend on the active SSIDs and access points that are deployed. If the access point is a ProSafe dual band, such as the WNDAP350, then all 16 can be active.
ProSafe 16 AP Wireless Management System WMS5316 Reference Manual DHCP Server Settings The wireless management system can function as a DHCP server. Multiple DHCP server pools can be added for different VLANs. Click the Configuration tab and select System > Basic > DHCP Server Settings to display the following screen: This screen lets you to enable and configure the DHCP server.
ProSafe 16 AP Wireless Management System WMS5316 Reference Manual • Primary DNS Server: Enter the IP address of the primary DNS server for the network. • Secondary DNS Server: Enter the IP address of the secondary DNS server for the network. • DHCP Server List: This displays DHCP server configuration for all configured VLANs. Syslog Settings This screen lets you configure the settings to connect to a syslog server, if you have one configured in your network.
2. Access Point Discovery 2 You can discover supported NETGEAR access points on the LAN that can be managed by the wireless management system. See Appendix A, Access Point Firmware Compatibility for a list of compatible access points. The wireless management system supports Auto Discovery and IP Discovery. • Auto Discovery: Use this feature if the wireless management system and all access points on the LAN are in the same IP subnet. This is a Layer 2 discovery method.
ProSafe 16 AP Wireless Management System WMS5316 Reference Manual To use Auto Discovery: 1. On the Configuration tab select Access Point Discovery. 2. Click Search. • The wireless management system searches for NETGEAR products on the LAN based on MAC address, and then identifies which are access points. • A list of the access points located through discovery is displayed on the screen. 3. Check the discovery results to make sure that all the access points are listed. See Discovery Results on page 15.
ProSafe 16 AP Wireless Management System WMS5316 Reference Manual To use IP Discovery: 1. On the Configuration tab select Access Point Discovery, and then click the IP Discovery tab: 2. To specify the range of IP addresses, fill in the Start IP and End IP fields. 3. Click Search. • The wireless management system locates devices on the LAN within the range of IP addresses that you specified. • The devices are displayed in a list. 4.
ProSafe 16 AP Wireless Management System WMS5316 Reference Manual For a list of compatible access point models and their supported firmware, see Appendix A, Access Point Firmware Compatibility. • If a new NETGEAR access point is not discovered, it might have a MAC address that the wireless management system does not recognize, though this is not common. See Using Discovery OUI on page 57.
3. Wireless Configuration 3 You can configure centralized RF management and specify wireless settings in the Basic RF Management screen. If you use access point groups, you can use the Advanced Wireless Settings screen to customize wireless settings for each group. Configuring Centralized RF Management In this screen you can specify RF management settings.
ProSafe 16 AP Wireless Management System WMS5316 Reference Manual • Client aware RF Management: If this Enable radio button is selected, the wireless management system does not modify the channel for an access point with associated clients that would be impacted by the channel change. The wireless management system waits for the next scheduled channel allocation to adjust the channel.
ProSafe 16 AP Wireless Management System WMS5316 Reference Manual 2. On the Configuration tab, select Advanced > Wireless Settings: 3. Specify the settings in this screen (see Table 1, Advanced Wireless Settings for a description of the fields). 4. Click Apply so that your changes take effect. Table 1. Advanced Wireless Settings Turn Radio On Disable this option to disable wireless access for the selected mode. To disable all wireless access through this access point, you must turn off the 802.
ProSafe 16 AP Wireless Management System WMS5316 Reference Manual Table 1. Advanced Wireless Settings (Continued) Output Power Select the available transmit power of the access point. This option sets the transmit signal strength of the access point. Increasing the power improves performance, but if two or more access points are operating in the same area, on the same channel, it can cause interference. RTS Threshold (0-2347) The transmission mechanism (CSMA/CA or CSMA/CD) for the packets.
ProSafe 16 AP Wireless Management System WMS5316 Reference Manual Configuring QoS You can use QoS to enable WMM for both upstream traffic from the station to the access point and downstream traffic from the access point to the client station.You can use basic QoS settings for access points or advanced QoS settings for access point groups. These settings are applied only to NETGEAR ProSafe access points that support QoS.
ProSafe 16 AP Wireless Management System WMS5316 Reference Manual 5. Click Apply. Advanced QoS Settings for Access Point Groups Most QoS settings can be controlled from the Basic QoS Settings screen. If you use access point groups and want to use different QoS settings for specific groups, use the Advanced QoS Settings screen. To specify advanced QoS settings: 1. On the Configuration tab, select Wireless > Advanced > QoS Settings: 2. Click a tab to select an access point group. 3. Select either the 802.
ProSafe 16 AP Wireless Management System WMS5316 Reference Manual Load Balancing for Managed Access Points On the Configuration tab select Wireless > Basic > Load Balancing. • Apply to all groups: Select this check box to apply the settings to all managed access points regardless of group. • Enable Load Balancing: Select this check box to allow the wireless management system to distribute access point clients equally among access points.
4. Security Configuration 4 Security Profiles Lists Details of each wireless network are contained in a security profile. You can use the basic profile settings for access points, or the advanced profile settings for access point groups. Security Profiles List for Access Points This screen lets you edit up to eight security profiles per managed access point, depending on the number of profiles each access point supports. Separate profiles are applied to 802.11 b/bg/ng and 802.11a/na mode radios.
ProSafe 16 AP Wireless Management System WMS5316 Reference Manual • Security: The security standard, such as WPA-PSK, associated with the profile. 3. Select the check box to enable (or disable) the corresponding profile. 4. To change the settings of a security profile, select its radio button and click the Edit button.
ProSafe 16 AP Wireless Management System WMS5316 Reference Manual The following table shows the data encryption options based on network authentication. Table 2. Network Authentication and Data Encryption Network Authentication Data Encryption Description Open None. WEP. No encryption. Shared Key WEP. • 64-bit WEP encryption uses 40/64 bit encryption. • 128-bit WEP encryption uses 104/128 bit encryption.
ProSafe 16 AP Wireless Management System WMS5316 Reference Manual To view or change security profiles for a specific access point group: 1. On the Configuration tab select Security > Advanced > Profile Settings: 2. Each security profile specifies: • Profile Name: The unique profile name. This value can be up to 31 alphanumeric characters. • SSID: The SSID associated with this profile. • Security: The security standard, such as WPA-PSK, associated with the profile.
ProSafe 16 AP Wireless Management System WMS5316 Reference Manual To detect rogue access points: 1. On the Configuration tab select Security > Basic > Rogue Access Points: The wireless management system can support up to 512 total rogue access points from the Known and Unknown lists combined. 2. Enter the following information: • Import AP List from a file: This field allows you to import a list of approved access points from a saved file.
ProSafe 16 AP Wireless Management System WMS5316 Reference Manual MAC Authentication for Access Points To set up MAC authentication: 1. On the Configuration tab, select Security > Basic > MAC Authentication: A maxiumum of 512 MAC addresses can be supported. 2. Select the Apply to all groups check box to apply the settings to all managed access points regardless of group. 3.
ProSafe 16 AP Wireless Management System WMS5316 Reference Manual Note: Most networks do not require access point groups. See Chapter 1, Getting Started for more information about basic settings and advanced settings for access point groups. To set up MAC authentication for only the selected access point group: 1. On the Configuration tab, select Security >Advanced > MAC Authentication:. 2. Click a group tab to select the access point group that will use access control. 3.
ProSafe 16 AP Wireless Management System WMS5316 Reference Manual Radius Server Settings If you are using a RADIUS server in your network for authentication, you must configure Radius settings. You can configure four types of servers: • Primary Authentication Server: The primary authentication server is the main RADIUS server used for authentication.
ProSafe 16 AP Wireless Management System WMS5316 Reference Manual 4. Enter the authentication settings. • Re-authentication Time (Seconds): This is the time interval in seconds after which the supplicant will be authenticated again with the RADIUS server. The default interval is 3600 seconds. • Update Global Key Every (Seconds): Enable this option to have the global key changed according to the time interval specified. If enabled, enter the time interval you want to use. This option is enabled by default.
ProSafe 16 AP Wireless Management System WMS5316 Reference Manual • Preview: Click this button to display how the redirection screen will look. 3. Click Apply so that your changes take effect. Guest Access Show When guest access is configured, the wireless management system redirects the first HTTP (TCP, port 80) request to the default guest access screen. The last 512 IP accesses and entered email address are recorded. This screen displays the collected information.
5. Monitoring 5 Monitoring Summary This screen displays a read-only summary of the current managed access point status, rogue access points detected, current wireless stations connected, wireless management system information, and network usage. Clicking the individual sections leads to a new screen showing greater detail. Access Point Status This section displays status of managed access points. • Total Configured: Total number of managed access points.
ProSafe 16 AP Wireless Management System WMS5316 Reference Manual • Healthy: Managed access points are running correctly. Rogue Access Points This section displays the count of rogue or neighboring access points discovered by managed access points. • Rogue AP current: The number of unique rogue or neighboring access point BSSID that can be observed now. • Rogue AP count 24hrs: The number of unique rogue or neighboring access point BSSID observed over the last 24 hours.
ProSafe 16 AP Wireless Management System WMS5316 Reference Manual Network Usage You can scroll down to view network usage: This section displays a graph of the average data traffic received and transmitted per managed access point over the last 24 hours. Access Point Status On the Monitoring tab select Summary > Advanced > Access Point Status: The access point status screen displays a read-only status summary of managed access points.
ProSafe 16 AP Wireless Management System WMS5316 Reference Manual • A clients: The number of client stations connected to the access point using the 5 GHz channel. Click Refresh to update the displayed status of access points. Click Details to display detailed status of specific managed access points. Access Point Status Details From the Access Point Status screen, click the Details button to display this screen: Click the Refresh button to update access point statistics and information.
ProSafe 16 AP Wireless Management System WMS5316 Reference Manual Profile Information The section displays configured and enabled security profiles on the access point. • Type: 802.11 b/bg/ng or 802.11 a/na mode for the security profile. • SSID: Wireless network name. • Security: The mode of security configured for the profile. • VLAN: VLAN configured for the security profile. Client Information This section displays client station information for the access point.
ProSafe 16 AP Wireless Management System WMS5316 Reference Manual • Click the Refresh button to update the list of available wireless stations. • Click the Details button to get details of a selected wireless station. Network Usage You can use this screen to view network usage statistics or network topology. Network Usage Statistics On the Monitoring tab select Summary > Advanced > Network Usage to display this screen: Scroll down to view wireless statistics.
ProSafe 16 AP Wireless Management System WMS5316 Reference Manual topology background and their locations saved for later displays. • Background Image File: Specify the image file that you want to use for the floor map. The image should be 800 x 600 in size and can be in either jpg or gif format. When the image is uploaded it is displayed as the topology background. • Click the Refresh button to update the connectivity status.
ProSafe 16 AP Wireless Management System WMS5316 Reference Manual To display the list of unknown rogue access points, On the Monitoring tab, select Rogue Access Point> Unknown: Click Refresh to update the access point list, or click Export to save the list to a file. To display the list of known rogue access points, on the Monitoring tab select Rogue Access Point > Known: Click Refresh to update the access point list, or click Export to save the list to a file.
6. Configuring Access Point Groups 6 Most networks do not need access point groups. Access point groups are useful if completely separate networks share a single LAN. For example, a shopping mall might need access point groups if several businesses share a LAN, but each business has its own network. Managed Access Point List On the Configuration tab, select Access Point Groups to display the Managed Access Point List: This screen shows details of each controlled access point.
ProSafe 16 AP Wireless Management System WMS5316 Reference Manual To change the settings of an access point, select it and click the Edit button. You can use the Edit screen for each access point to change its IP settings, VLAN settings, and password. Table 3. Status Field Definitions Status Implies How to Correct Connected Normal operation. The wireless N/A management system is able to contact the access point and manage it.
ProSafe 16 AP Wireless Management System WMS5316 Reference Manual IP Settings This screen lets you configure the management IP address settings of managed access points. • DHCP Client: Enables the DHCP client on the access point. Do not enable this unless a DHCP server is configured to provide access points the same IP address every time. The WMS5316 will not recognize the access point as the same if its IP address changes. • IP Address: This is the IP address of the managed access point.
7. Maintenance 7 User Management The User Management screen lets you add and remove users. The user name admin is the default user name with administrative privileges and cannot be removed. On the Maintenance tab select User Management: 1. Fill in the following fields: • User Name: Add the name of the user. • Password: Type a new user password. • Retype Password: Retype the new user password to confirm.
ProSafe 16 AP Wireless Management System WMS5316 Reference Manual Changing Passwords This screen enables you to change the access point administrator’s password. On the Maintenance tab, select Password: To change the password: 1. Type the old password. (The default password for the user name admin is password.) 2. Type a new password, and type it again in the Repeat New Password field to confirm it. 3. Be sure to record it in a secure location. 4.
ProSafe 16 AP Wireless Management System WMS5316 Reference Manual Restoring Factory Default Settings You can restore the factory default settings (listed in Appendix B, Factory Default Settings) to the wireless management system. Note: Restoring the factory default settings of the wireless management system does not restore the settings of the access points that are managed by the wireless management system. To restore the wireless management system settings to factory defaults: 1. Select Yes. 2.
ProSafe 16 AP Wireless Management System WMS5316 Reference Manual Rebooting an Access Point Group On the Maintenance tab select Reset > Access Points > Reboot: 1. Select the group of access points to be rebooted using the tabs. Access points not assigned to a specific group belong to Group 1. 2. Select the Yes radio button. 3. Click Apply to reboot the access points in the selected group. SNMP You can use SNMP for the wireless management system or advanced SNMP for access point groups.
ProSafe 16 AP Wireless Management System WMS5316 Reference Manual • Trap Community Name: The community name that is associated with the IP address to receive traps. • IP address to Receive Traps: The IP address at which the SNMP manager receives traps sent from the wireless management system. • Trap Port: The port on which the SNMP manager receives traps sent from the wireless management system. The default setting is port 162.
ProSafe 16 AP Wireless Management System WMS5316 Reference Manual Remote Management You can enable SSH or Telnet in order to remotely log in to the controller or access point groups. Remote Console for the Wireless Management System From the Maintenance tab select Remote Management > System > Remote Console: 1. Select the radio button for SSH or Telnet: • Secure Shell (SSH): If set to Enable, the wireless management system will allow remote access by using Secure Shell.
ProSafe 16 AP Wireless Management System WMS5316 Reference Manual Session Timeout If a session times out, the user is redirected to the login window for password verification. To specify the length of the session timeout for the wireless management system: 1. In the Timeout (minutes) field, specify number of minutes before an active HTTP/HTTPS login session expires. 2. Click Apply to save your change.
ProSafe 16 AP Wireless Management System WMS5316 Reference Manual 3. On the Maintenance tab select Upgrade > System Upgrade: 4. On the Upgrade screen, click Browse. 5. Locate and select the file you downloaded. 6. Click Apply to send the software to the wireless management system. This loads the new software into the wireless management system and causes the wireless management system to restart.
ProSafe 16 AP Wireless Management System WMS5316 Reference Manual To upgrade the access point software: 1. Go to the NETGEAR website at www.NETGEAR.com customer service downloads section to get new versions of the access point software for supported models. After downloading an upgrade file, you might need to unzip (uncompress) it before upgrading the access point. WARNING! Once you click Upload, do not interrupt the process of sending the software to the access point and restarting the access point. 2.
ProSafe 16 AP Wireless Management System WMS5316 Reference Manual Backing Up Configuration Settings Once you have the wireless management system working correctly, you should back up the information to have it available if something goes wrong. When you back up the settings, they are saved as a file on your computer. To back up the wireless management system settings: 1. On the Maintenance tab select Upgrade > Backup: 2. Click the Backup button to create a backup file of the current settings: 3.
ProSafe 16 AP Wireless Management System WMS5316 Reference Manual WARNING! Do not try to go online, turn off the wireless management system, shut down the computer, or do anything else until it finishes restarting! When the Test light turns off, wait a few more seconds before doing anything with the wireless management system. Downloading Wireless Management System Logs You can download logs collected on the wireless management system.
ProSafe 16 AP Wireless Management System WMS5316 Reference Manual Access Point Logs The Access Points Log screen displays managed access point system activity. Select one of the managed access points to display the system log. Note: Access point system logs are not supported for access point model WG602v4. If you try to display system logs for that model access point, the display screen is empty. You can refresh the screen by using the Refresh button.
ProSafe 16 AP Wireless Management System WMS5316 Reference Manual 1. Specify the number of pings to be tried in the Ping Count field. 2. Click Start to begin pinging the selected access point. 3. When you are finished, click Cancel to stop the pinging. Using Discovery OUI The wireless management system discovers NETGEAR access points on the LAN from the OUI (Organizationally Unique Identifier) of their unique MAC addresses. The first half of the MAC address is the OUI.
A. Access Point Firmware Compatibility A Compatible Access Point Supported Firmware Versions Access Point Model Supported Firmware Security Profiles per Radio Max Station Load Balancing Auto Channel WNDAP330 WNDAP330_V3.0.4 8 Yes Yes WNDAP350 WNDAP350_V2.0 8 Yes Yes WNAP210 WNAP210_2.0.8 8 Yes Yes WG302v2 5.2.3 8 No Yes WG103 WG103_2.0 8 Yes No WN802Tv2 WN802Tv2_V3.1.2 1 No Limited to channel distribution without neighbor map WG602v4 V1.1.
ProSafe 16 AP Wireless Management System WMS5316 Reference Manual Controller Features and Access Point Compatibility Access Topology Point Model VLAN Config Rogue Access Points Remote Access SSH Telnet Guest Access Client Syslog Separation NTP (Time Server) WNDAP330 Yes Yes Yes Yes No Yes Yes Yes WNDAP350 Yes Yes Yes Yes Yes Yes Yes Yes WNAP210 Yes Yes Yes Yes Yes Yes SNS Yes WG302v2 Yes Yes Yes Yes No Yes Yes Yes WG103 Yes Yes Yes Yes Yes Yes Yes Yes WN8
B. Factory Default Settings B You can use Reset option to restore the wireless management system to its factory default settings (see Restoring Factory Default Settings on page 47). The wireless management system will return to the factory configuration settings shown in the following table. Table 4. Factory Default Settings Feature Login Local network (LAN) Default Behavior User login URL http:192.168.0.250 User name (case-sensitive) admin Login password (case-sensitive) password LAN IP 192.
C. Notification of Compliance NETGEAR Wired Products C Certificate of the Manufacturer/Importer It is hereby certified that the ProSafe™ 16 AP Wireless Management System WMS5316 has been suppressed in accordance with the conditions set out in the BMPT-AmtsblVfg 243/1991 and Vfg 46/1992. The operation of some equipment (for example, test transmitters) in accordance with the regulations may, however, be subject to certain restrictions. Please refer to the notes in the operating instructions.
ProSafe 16 AP Wireless Management System WMS5316 Reference Manual For complete DoC please visit the NETGEAR EU Declarations of Conformity website at: http://kb.netgear.com/app/answers/detail/a_id/11621/ EDOC in Languages of the European Community Cesky [Czech] NETGEAR Inc. tímto prohlašuje, že tento Radiolan je ve shode se základními požadavky a dalšími príslušnými ustanoveními smernice 1999/5/ES. Dansk [Danish] Undertegnede NETGEAR Inc.
ProSafe 16 AP Wireless Management System WMS5316 Reference Manual EDOC in Languages of the European Community Polski [Polish] Niniejszym NETGEAR Inc. oświadcza, że Radiolan jest zgodny z zasadniczymi wymogami oraz pozostałymi stosownymi postanowieniami Dyrektywy 1999/5/EC. Português [Portuguese] NETGEAR Inc. declara que este Radiolan está conforme com os requisitos essenciais e outras disposições da Directiva 1999/5/CE. Slovensko [Slovenian] NETGEAR Inc.
ProSafe 16 AP Wireless Management System WMS5316 Reference Manual interference to radio or television reception, which can be determined by turning the equipment off and on, the user is encouraged to try to correct the interference by one or more of the following methods: • • • • Reorient or relocate the receiving antenna. Increase the separation between the equipment and the receiver. Connect the equipment into an electrical outlet on a circuit different from that which the radio receiver is connected.
Index A access point groups 44 WLAN settings 18 access point system logs 56 access points adding 16 discovery 13, 14 discovery results 15 passwords 16 rogue 27, 35 status 34, 36, 37 supported firmware 58 upgrading firmware 52 access, guest 32 adding access points 16 authentication, MAC 28 Auto Discovery 13 B backing up 54 C centralized RF management 17 clients, status 38 compliance 61 configuration settings 54 access point supported 58 upgrading 51 upgrading access point firmware 52 G general settings 7
ProSafe 16 AP Wireless Management System WMS5316 Reference Manual network usage statistics 39 timeout 51 trademarks 2 O OUI Discovery 57 U P untagged VLANs 10 upgrading firmware 51 passwords 7 changing 46 for access points 16 ping 56 Q QoS 21, 22 R RADIUS server configuration 31, 32 rebooting 46, 48 remote console 50 remote console for access point groups 50 remote management 50 resetting 46 restoring configuration settings from a file 54 factory default settings 47 RF management, centralized 17 ro