N300 WiFi Range Extender Model WN3100RPv2 User Manual February 2015 202-11455-01 350 East Plumeria Drive San Jose, CA 95134 USA
N300 WiFi Range Extender Support Thank you for selecting NETGEAR products. After installing your device, locate the serial number on the label of your product and use it to register your product at https://my.netgear.com. You must register your product before you can use NETGEAR telephone support. NETGEAR recommends registering your product through the NETGEAR website. For product updates and web support, visit http://support.netgear.com. Phone (US & Canada only): 1-888-NETGEAR.
Contents Chapter 1 Overview Meet Your Extender . . . . . . . . . . . . . . . . . . . . . . . . . . . . . . . . . . . . . . . . . . . . . . . . . . 6 When to Use Your Extender. . . . . . . . . . . . . . . . . . . . . . . . . . . . . . . . . . . . . . . . . . . . 7 How the Extender Works . . . . . . . . . . . . . . . . . . . . . . . . . . . . . . . . . . . . . . . . . . . . . . 7 Chapter 2 Get Started Use the Extender in Extender Mode. . . . . . . . . . . . . . . . . . . . . . . . . . . . . . . . . . . .
N300 WiFi Range Extender Back Up the Configuration Settings. . . . . . . . . . . . . . . . . . . . . . . . . . . . . . . . . . Restore the Configuration Settings . . . . . . . . . . . . . . . . . . . . . . . . . . . . . . . . . . Return the Extender to Its Factory Default Settings . . . . . . . . . . . . . . . . . . . . . . Use the Factory Reset Button . . . . . . . . . . . . . . . . . . . . . . . . . . . . . . . . . . . . . . . Log In and Reset the Extender to Factory Settings . . . . . . . . . . . . . .
1. 1 Overview The WiFi Range Extender boosts your existing network range and speed, delivering dual-band WiFi. You can also use the extender in access point mode as a WiFi access point and create a new WiFi hotspot by using a wired Ethernet connection. This chapter covers the following topics: • Meet Your Extender • When to Use Your Extender • How the Extender Works Note: For more information about the topics covered in this manual, visit the support website at support.netgear.com.
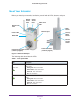
N300 WiFi Range Extender Meet Your Extender Before you install your extender, familiarize yourself with its LEDs, buttons, and port. Router Arrow LED Client Arrow LED Router Link LED Client Link LED WPS button Ethernet port Power LED WPS LED Factory Reset button Device On/Off switch Power connector (varies by region) Pass-through power socket (varies by region) Figure 1. LEDs and USB port The following table describes the LEDs. Table 1.
N300 WiFi Range Extender Table 1. Front panel LEDs (continued) LED Description Power • • • Solid amber. The extender is booting. Solid green. The extender is powered on. Off. The extender is powered off. WPS • • • Solid green. WiFi security is enabled (WPA or WPA2). Blinking green. A WPS connection is being established. Off. WiFi security is not enabled. Note: If the Router Arrow LED or Client Arrow LED blinks, see Find the Best Location on page 13.
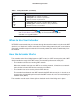
N300 WiFi Range Extender WiFi Range Extender Boosts the range of your existing WiFi and creates a stronger signal in hard-to-reach areas. Existing WiFi Sometimes your router does not provide the WiFi coverage that you need. Figure 2.
2.
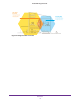
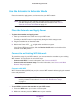
N300 WiFi Range Extender Use the Extender in Extender Mode Place the extender, apply power, and connect it to your WiFi network. Note: You can also use the extender as a WiFi access point and create a new WiFi hotspot by using a wired Ethernet connection. See Use the Extender in Access Point Mode on page 14. Place the Extender and Apply Power To place the extender and apply power: 1. Place your extender in the same room as your WiFi router.
N300 WiFi Range Extender The WPS LED lights solid green, the Router Link LED connects to your existing WiFi network. lights, and the extender If the Router Link LED does not light, try again. If it still does not light, see Connect with Web Browser Setup on page 11. 3. Find the new extender network name on your computer or WiFi device. The extender’s wireless network name (SSID) changes to your existing WiFi network name, with _EXT at the end of the name, for example: • Existing WiFi network name.
N300 WiFi Range Extender The first time that you log in to the extender, the Create Account screen displays. If the Create Account screen does not display, go to www.mywifiext.net. 4. Complete the fields and click the NEXT button. 5. When prompted, select your country or region from the Regional Settings menu and click the NEXT button. 6. Click the WIFI RANGE EXTENDER button. The extender scans for WiFi signals and finds the WiFi networks in your area and displays a list. 7.
N300 WiFi Range Extender Repeat this step for all of your computers and WiFi devices. 11. Click the CONTINUE button. A message displays confirming that the extender is connected to the new extended WiFi network. 12. Click the NEXT button. The registration screen displays. 13. Complete the registration fields and click the FINISH button to complete the setup. If you do not want to register your extender, click the Skip Registration link.
N300 WiFi Range Extender Connect an Ethernet-Enabled Device After the extender is connected to your existing WiFi network, you can connect a wired device to the extender using an Ethernet cable. The device can then access your existing network through the extender’s WiFi connection. Figure 3. Rear panel Ethernet LAN port Use the Extender in Access Point Mode You use the extender as a WiFi access point, which creates a new WiFi hotpsot by using a wired Ethernet connection. Figure 4.
N300 WiFi Range Extender To use the extender in access point mode: 1. Plug the extender into an electrical outlet. 2. Wait for the Power LED to light amber and then turn green. If the Power LED does not light, slide the Device On/Off switch on the side of the extender to the On position. 3. Use an Ethernet cable to connect the extender to the router Ethernet LAN port or the remote Ethernet LAN jack with LAN access. The extender joins the LAN and creates a WiFi hotspot. 4.
N300 WiFi Range Extender 9. Click the ACCESS POINT button. The extender checks for an Internet connection through the router that you connected to the extender. 10. Set the network name (SSID), security option, and password, and click the NEXT button. Your settings are applied and the extender is ready to be used as an access point. 11. Use a WiFi network manager on the computer or WiFi device to connect to the new access point network. 12. Repeat this step for all of your computers and WiFi devices. 13.
N300 WiFi Range Extender Run Smart Setup Installation You can use Smart Setup to change the extender settings. This is an easy way to connect the extender to a different router or to change the extender WiFi network name (SSID) or WiFi password. To run Smart Setup: 1. Use a WiFi network manager on a computer or WiFi device to find and connect to the new extended WiFi network. After the connection with the computer or WiFi device is established, the Client Link LED lights solid green. 2.
3.
N300 WiFi Range Extender Adjust the WiFi Coverage You can set the extender’s WiFi coverage depending on how large you want your coverage area to be. To adjust the WiFi coverage: 1. On a computer or WiFi device that is connected to the extender network, launch a web browser. 2. In the address field of your browser, enter www.mywifiext.net. You are prompted to enter a user name and password. 3. Enter your email address and password. 4. Click the Menu icon . The extender menu displays. 5.
N300 WiFi Range Extender 4. Click the Menu icon . The extender menu displays. 5. Select Settings > Wireless > Connected Devices. View WiFi Settings To view the WiFi settings: 1. On a computer or WiFi device that is connected to the extender network, launch a web browser. 2. In the address field of your browser, enter www.mywifiext.net. You are prompted to enter a user name and password. 3. Enter your email address and password. 4. Click the Menu icon . The extender menu displays. 5.
N300 WiFi Range Extender Change the WiFi Network Name To change the WiFi network name: 1. On a computer or WiFi device that is connected to the extender network, launch a web browser. 2. In the address field of your browser, enter www.mywifiext.net. You are prompted to enter a user name and password. 3. Enter your email address and password. 4. Click the Menu icon . The extender menu displays. 5. Select Settings > Wireless. 6. In the Network Name (SSID) field, type a network name. 7.
N300 WiFi Range Extender To turn off the SSID broadcast to create a hidden network: 1. On a computer or WiFi device that is connected to the extender network, launch a web browser. 2. In the address field of your browser, enter www.mywifiext.net. You are prompted to enter a user name and password. 3. Enter your email address and password. 4. Click the Menu icon . The extender menu displays. 5. Select Settings > Wireless. 6. Clear the Broadcast Network Name (SSID) check box. 7. Click the SAVE button.
N300 WiFi Range Extender You are prompted to enter a user name and password. 3. Enter your email address and password. 4. Click the Menu icon . The extender menu displays. 5. Select Settings > Wireless. 6. Select or clear the Enable 2.4 GHz WiFi check box. 7. Click the SAVE button. Your settings are saved. Change the WiFi Speed To change the WiFi speed: 1. On a computer or WiFi device that is connected to the extender network, launch a web browser. 2. In the address field of your browser, enter www.
N300 WiFi Range Extender 5. Select Settings > Wireless. 6. In the WiFi Speed menu, select a speed. 7. Click the SAVE button. Your settings are saved. Use WPS to Add a Computer to the Extender’s WiFi Network WPS (WiFi Protected Setup) lets you connect a computer or WiFi device to the extender’s network without entering the WiFi network passphrase or key. Instead, you use a WPS button or enter a PIN to connect.
N300 WiFi Range Extender Use WPS with the Push Button Method To use the push button method to connect a WiFi device to the extender’s WiFi network, the WiFi device that you are trying to connect must have a physical button or a software button. To use WPS to add a computer or WiFi device to the extender’s WiFi network: 1. On a computer or WiFi device that is connected to the extender network, launch a web browser. 2. In the address field of your browser, enter www.mywifiext.net.
N300 WiFi Range Extender To add a computer or WiFi device to the extender’s WiFi network: 1. On a computer or WiFi device that is connected to the extender network, launch a web browser. 2. In the address field of your browser, enter www.mywifiext.net. You are prompted to enter a user name and password. 3. Enter your email address and password. 4. Click the Menu icon . The extender menu displays. 5. Select Settings > Do More > Connect Devices (WPS). The Connect Devices (WPS) screen displays. 6.
N300 WiFi Range Extender To specify WPS settings: 1. On a computer or WiFi device that is connected to the extender network, launch a web browser. 2. In the address field of your browser, enter www.mywifiext.net. You are prompted to enter a user name and password. 3. Enter your email address and password. 4. Click the Menu icon . The extender menu displays. 5. Select Settings > Wireless. The Wireless screen displays. 6. Scroll down to the Connect Devices (WPS) section: 7. Adjust the settings. 8.
N300 WiFi Range Extender To use WiFi access control to deny access: 1. On a computer or WiFi device that is connected to the extender network, launch a web browser. 2. In the address field of your browser, enter www.mywifiext.net. You are prompted to enter a user name and password. 3. Enter your email address and password. 4. Click the Menu icon . The extender menu displays. 5. Select Settings > Wireless > Connected Devices. 6. In the WiFi Devices section, select the Enable Access Control check box.
N300 WiFi Range Extender Set Up an Access Schedule You can control access to all users during specific periods of the day. You can set up an access schedule that prevents Internet access through the extender network based on the times that you set. To set up an access schedule: 1. On a computer or WiFi device that is connected to the extender network, launch a web browser. 2. In the address field of your browser, enter www.mywifiext.net. You are prompted to enter a user name and password. 3.
N300 WiFi Range Extender Set Up the Extender to Use a Static IP Address The extender comes set up to use a dynamic IP address, which is the correct setting for most home networks. To set up the extender to use a static IP address: 1. On a computer or WiFi device that is connected to the extender network, launch a web browser. 2. In the address field of your browser, enter www.mywifiext.net. You are prompted to enter a user name and password. 3. Enter your email address and password. 4.
4.
N300 WiFi Range Extender Change the Extender User Name and Password You can change the user name and password to log in to the extender. To add an extender user: 1. On a computer or WiFi device that is connected to the extender network, launch a web browser. 2. In the address field of your browser, enter www.mywifiext.net. You are prompted to enter a user name and password. 3. Enter your email address and password. 4. Click the Menu icon . The extender menu displays. 5. Select Settings > Password. 6.
N300 WiFi Range Extender Turn Password Protection Off and On NETGEAR recommends that you leave password protection on to help keep your network secure. You can turn password protection off and on. To turn password protection off and on: 1. On a computer or WiFi device that is connected to the extender network, launch a web browser. 2. In the address field of your browser, enter www.mywifiext.net. A login prompt displays. 3. Enter your email address and password. 4. Click the Menu icon .
N300 WiFi Range Extender Automatically Adjust for Daylight Saving Time To set up the extender to automatically adjust for daylight saving time: 1. On a computer or WiFi device that is connected to the extender network, launch a web browser. 2. In the address field of your browser, enter www.mywifiext.net. You are prompted to enter a user name and password. 3. Enter your email address and password. 4. Click the Menu icon . The extender menu displays. 5. Select Do More > Access Schedule.
N300 WiFi Range Extender Back Up and Manage the Extender Configuration When the extender works correctly after initial setup, NETGEAR recommends that you back up the extender configuration settings. After you back up the settings, if you change the extender configuration settings but are not content with the new settings, you can restore the extender configuration to the backed-up settings. Back Up the Configuration Settings You can back up the configuration file of the extender.
N300 WiFi Range Extender To restore the extender configuration settings: 1. On a computer or WiFi device that is connected to the extender network, launch a web browser. 2. In the address field of your browser, enter www.mywifiext.net. You are prompted to enter a user name and password. 3. Enter your email address and password. 4. Click the Menu icon . The extender menu displays. 5. Select Settings > Other. 6. Click the BROWSE button. 7. Locate and select the previously saved backup file.
N300 WiFi Range Extender Return the Extender to Its Factory Default Settings Under some circumstances (for example, if you lose track of the changes that you made to the extender settings), you might want to erase the configuration and reset the extender to factory default settings. To reset the extender to factory default settings, you can either use the Factory Reset button on the side panel or log in to the extender and reset it.
N300 WiFi Range Extender Log In and Reset the Extender to Factory Settings CAUTION: This process erases any settings that you configured in the extender. To log in to the extender and reset the extender to factory default settings: 1. On a computer or WiFi device that is connected to the extender network, launch a web browser. 2. In the address field of your browser, enter www.mywifiext.net. You are prompted to enter a user name and password. 3. Enter your email address and password. 4.
N300 WiFi Range Extender Update the Firmware Unless you changed the settings in the Firmware Update screen previously, the extender is set up to check for new firmware automatically at login. To check manually for new firmware and, if available, update the firmware: 1. On a computer or WiFi device that is connected to the extender network, launch a web browser. 2. In the address field of your browser, enter www.mywifiext.net. You are prompted to enter a user name and password. 3.
N300 WiFi Range Extender Restart the Extender Remotely You can log in to the extender and restart it. When the extender restarts, all computers and WiFi devices that are connected to its WiFi network are automatically disconnected. To restart the extender remotely: 1. On a computer or WiFi device that is connected to the extender network, launch a web browser. 2. In the address field of your browser, enter www.mywifiext.net. You are prompted to enter a user name and password. 3.
5.
N300 WiFi Range Extender FAQs This section provides answers for difficulties you might experience with the extender. The web browser setup guide keeps asking me for my network password (passphrase) or security key, and I am sure that I entered the correct password. What can I do? The extender is probably placed at the borderline of the range covered by the router or access point. To improve your signal strength, move your extender closer to your router and lights solid amber or green.
N300 WiFi Range Extender My router security is WEP, and I entered the wrong passphrase or security key on the extender. I cannot access the extender anymore. What can I do? The extender cannot check to see if the WEP passphrase is correct. If you entered the wrong passphrase, your wireless device is not able to get the IP address from the extender. You must reset the extender to its factory default settings to get the IP address back. See Factory Default Settings on page 48.
N300 WiFi Range Extender The Wireless screen displays. 6. Scroll down and select Connected Devices. The Connected Devices section displays the MAC addresses and virtual MAC addresses for computers and WiFi devices that are connected to the extender network. 7. On the router, add all of the virtual MAC addresses from your extender to your router’s MAC filter table. 8. Unplug the extender and look on the product label to find the extender’s MAC 1 and MAC 2 addresses. 9.
N300 WiFi Range Extender Hexadecimal Values Binary Numbers E 1110 F 1111 b. Toggle the second-to-last digit of the binary code to 1 or 0. If the second-to-last digit is 1, toggle it to 0. If the second-to-last digit is 0, toggle it to 1. For example, if the binary code is 1100/0100, the new binary code is 1100/0110. c. Convert the new binary code back to a hexadecimal value. For example, if the binary code is 1100/0110, the new hexadecimal value is C6.
N300 WiFi Range Extender Cannot Connect to the Extender If you cannot connect to the extender, determine what prevents you from connecting: • If you forgot your user name or password, click the Username & Password Help link. For more information, see FAQs on page 42. • If your browser displays an error page, include http:// in the address field of your browser by typing http://www.mywifiext.net.
A.
N300 WiFi Range Extender Factory Default Settings To reset the extender to factory default settings, you can use either the Factory Reset button on the side panel or you can log in to the extender and use its ERASE feature. For more information, see Return the Extender to Its Factory Default Settings on page 37. The following table shows the factory default settings. Table 2.