ProSafe Wireless-N Access Point WNAP210 User Manual 350 East Plumeria Drive San Jose, CA 95134 USA December 2011 202-10474-02 1.
ProSafe Wireless-N Access Point WNAP210 © 2011 NETGEAR, Inc. All rights reserved No part of this publication may be reproduced, transmitted, transcribed, stored in a retrieval system, or translated into any language in any form or by any means without the written permission of NETGEAR, Inc. Technical Support Thank you for choosing NETGEAR.
Contents Chapter 1 Getting Started System Requirements . . . . . . . . . . . . . . . . . . . . . . . . . . . . . . . . . . . . . . . . . 6 What Is In the Box . . . . . . . . . . . . . . . . . . . . . . . . . . . . . . . . . . . . . . . . . . . . 6 Hardware Description . . . . . . . . . . . . . . . . . . . . . . . . . . . . . . . . . . . . . . . . . . 7 Front Panel . . . . . . . . . . . . . . . . . . . . . . . . . . . . . . . . . . . . . . . . . . . . . . . . 7 Rear Panel . . . . . . . . . . . . . . . . .
ProSafe Wireless-N Access Point WNAP210 Chapter 4 Monitoring System Information . . . . . . . . . . . . . . . . . . . . . . . . . . . . . . . . . . . . . . . . . . 40 Wireless Stations . . . . . . . . . . . . . . . . . . . . . . . . . . . . . . . . . . . . . . . . . . . . 41 Enable Rogue AP Detection. . . . . . . . . . . . . . . . . . . . . . . . . . . . . . . . . . . . 41 Import a Rogue AP List from a File . . . . . . . . . . . . . . . . . . . . . . . . . . . . 42 View and Save AP Lists . . . . . . . . .
1. Getting Started 1 The ProSafe Wireless-N Access Point WNAP210 is the basic building block of a wireless LAN infrastructure. It provides connectivity between Ethernet wired networks and radio-equipped wireless computers, wireless devices, print servers, and other devices. This chapter covers the following topics: • System Requirements • What Is In the Box • Hardware Description For more information about the topics covered in this manual, visit the support website at http://support.netgear.com.
ProSafe Wireless-N Access Point WNAP210 System Requirements Before installing the access point, make sure that your system has the following: • A 10/100/1000 Mbps local area network device such as a hub or switch • The Category 5 UTP straight-through Ethernet cable with RJ-45 connector included in the package, or one like it • A 100–120 V, 50–60 Hz AC power source • A web browser for configuration such as Microsoft Internet Explorer 5.0 or later, or Mozilla 3.
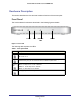
ProSafe Wireless-N Access Point WNAP210 Hardware Description This section describes the front and rear hardware functions of the access point. Front Panel The front hardware functions are described in the following figure and table. Power Test Ethernet LAN WLAN Figure 1. Front view The following table explains the LEDs: Table 1. Front panel LEDs LED Description Power • Off. Power is off. • On. Power is on. Test Blinking. The device is running a self-test or is loading software.
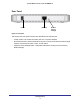
ProSafe Wireless-N Access Point WNAP210 Rear Panel Power Ethernet Restore Factory Settings Figure 2. Rear panel The access point rear panel functions are described in the following list: • Power socket. This socket connects to the 12V 1.0A power adapter. • RJ-45 Ethernet port. Use the Ethernet RJ-45 port to connect to an Ethernet LAN through a device such as a hub, switch, router, or PoE switch. • Restore Factory Settings button.
2. Installation and Configuration 2 This chapter describes how to set up your access point for wireless connectivity to your LAN. This basic configuration will enable computers with 802.11b/g/n wireless adapters to connect to the Internet, or access printers and files on your LAN.
ProSafe Wireless-N Access Point WNAP210 Wireless Equipment Placement and Range Guidelines The operating distance or range of your wireless connection can vary significantly based on the physical placement of the access point. The latency, data throughput performance, and notebook power consumption of wireless adapters also vary depending on your configuration choices.
ProSafe Wireless-N Access Point WNAP210 Connect to the Access Point Tip: Before mounting the access point in a high location, set up and test the access point to verify wireless network connectivity. To connect the access point: 1. Prepare a computer with an Ethernet adapter. If this computer is already part of your network, record its TCP/IP settings. 2. Turn on your computer and configure it with a static IP address of 192.168.0.210 and a subnet mask of 255.255.255.0. 3.
ProSafe Wireless-N Access Point WNAP210 3. The login screen displays. Enter admin for the user name and password for the password, both in lower case letters. 4. Click Login. Your web browser should automatically find the access point and display the General screen. Configure LAN Settings When you log in, the General screen displays: To configure the LAN settings: 1. Enter the access point name. This unique name is the access point NetBIOS name.
ProSafe Wireless-N Access Point WNAP210 3. Select Configuration > System > Basic > Time. 4. Adjust the following fields: • Time Zone. From the drop-down list, select the local time zone for your access point from a list of all available time zones. The default is USA-Pacific. The access point will get the current time from the connecting computer. • NTP Client. Enable the NTP client to synchronize the time of the access point with an NTP server. The default is Enable.
ProSafe Wireless-N Access Point WNAP210 To configure the basic IP settings of your access point: 1. Select Configuration > IP. The IP Settings screen displays: 2. If necessary, edit the IP address fields described in IP Settings Fields on page 14. 3. Click Apply to save your basic IP settings. If you change the default subnet of the LAN IP address, you will be disconnected from the access point user interface.
ProSafe Wireless-N Access Point WNAP210 Set Up and Test Basic Wireless Connectivity Follow the instructions in this section to set up and test basic wireless connectivity. Once you have established basic wireless connectivity, you can enable security settings appropriate for your needs. Note: If you connect wirelessly to the access point and you change the SSID, channel, or security profile settings, you will lose your wireless connection when you click Apply.
ProSafe Wireless-N Access Point WNAP210 5. Click Apply to save any changes. 6. Select Security. For initial configuration and testing, the Security field for Profile 1 (the default profile) is set to Open System and the SSID is set to NETGEAR_11ng (for information about hot to configure a profile, see Security Profiles on page 21). Note: The SSID of any wireless client has to match the SSID you configured in the access point. If they do not match, you cannot get a wireless connection. 7.
ProSafe Wireless-N Access Point WNAP210 Channel/Frequency The wireless channel in use can be from 1 to 11 for the United States and Canada, or 1 to 13 for Europe and Australia. The default is Auto. Do not change the wireless channel unless you experience interference (shown by lost connections or slow data transfers). Should this happen, you might need to experiment with different channels to see which is the best.
ProSafe Wireless-N Access Point WNAP210 Output Power This is the transmit power of the access point. The options are Full, Half, Quarter, Eighth, and Minimum. Decrease the transmit power if two or more access points are close together and use the same channel frequency. The default is Full. (The transmit power might vary depending on the local regulatory regulations. QoS Settings Wireless Multimedia (WMM) is a subset of the 802.11e standard.
ProSafe Wireless-N Access Point WNAP210 To deploy the access point: 1. Disconnect the access point from the computer you used to configure it, and put the access point where it will be deployed. The best location is elevated, such as on a wall or ceiling or on the top of a cubicle, at the center of your wireless coverage area, and within line of sight of all the mobile devices. 2. Connect an Ethernet cable from your access point to a LAN port on your router, switch, or hub. 3.
ProSafe Wireless-N Access Point WNAP210 Wireless Security Options Anyone wih a compatible wireless adapter can receive your wireless data transmissions well beyond your walls. For this reason, use the security features of your wireless equipment. The access point provides highly effective security features, which are covered in detail in this chapter. Deploy the security features appropriate for your needs.
ProSafe Wireless-N Access Point WNAP210 Security Profiles Security profiles let you set up unique security settings for each SSID. You can configure up to eight unique 802.11b/g/n wireless security profiles on the access point. Select Configuration > Security > Profile Settings to display the Profile Settings screen: If you are using a RADIUS server, configure the RADIUS settings first, as described in the RADIUS Server Settings on page 24.
ProSafe Wireless-N Access Point WNAP210 Network Authentication Settings The access point is set by default as an open system with no authentication. When setting up network authentication, bear in mind the following: • If you are using access point mode, then all options are available. In other modes such as repeater or bridge, some options might be unavailable. • Not all legacy wireless adapters support WPA or WPA2.
ProSafe Wireless-N Access Point WNAP210 Data Encryption The available options depend on the network authentication setting selected (see Table 2); otherwise, the default is None. The Data Encryption settings are explained in the follokwing table: Table 3. Data Encryption settings Data Encryption Type Description None No encryption is used. 64 bits WEP Standard WEP encryption, using 40/64 bit encryption. 128 bits WEP Standard WEP encryption, using 104/128 bit encryption.
ProSafe Wireless-N Access Point WNAP210 RADIUS Server Settings You can set up or modify the RADIUS server settings to compliment network authentication security options. The RADIUS server needs to be used with Legacy 802.1x, and can be used with WPA and WPA2 network authentication. When using a RADIUS server, specify the RADIUS server settings before completing the network authentication security profile. The RADIUS server settings apply to all profiles.
ProSafe Wireless-N Access Point WNAP210 Change or Edit a Security Profile The access point allows you to set up eight different security profiles. You can configure each profile with a different security option for network authentication. To set up a security profile: If you are using a RADIUS server, configure the RADIUS settings first, as described in the RADIUS Server Settings on page 24. 1. Select Configuration > Security > Profile Settings. The profile settings you selected display. 2.
ProSafe Wireless-N Access Point WNAP210 7. Leave Wireless Client Security Separation set to No (it is disabled by default). If this feature is enabled, the associated wireless clients will not be able to communicate with each other. 8. If the hubs and switches on your LAN support the VLAN (802.1Q) standard and this feature has been enabled, the default VLAN ID for WNAP210 is associated with each profile. The default profile VLAN ID has to match the IDs used by other network devices. 9.
ProSafe Wireless-N Access Point WNAP210 4. Select the radio button of the security profile you want to modify, and click Edit.. 5. In the Network Authentication field, select one of the following: • WPA2 with Radius • WPA with Radius • WPA2 & WPA with Radius The encryption type displayed in the Data Encryption field is automatically updated based on your selection in the Network Authentication list. 6. Leave the Wireless Client Security Separation radio button set to No (it is selected by default).
ProSafe Wireless-N Access Point WNAP210 3. In the Network Authentication field, select one of the following: • WPA2-PSK • WPA-PSK • WPA2-PSK & WPA-PSK The Data Encryption field automatically updates based on your selection: • WPA2-PSK is set to AES. • WPA-PSK is set to TKIP. • WPA2-PSK & WPA-PSK is set to TKIP+AES. 4. Enter the preshared key passphrase (network key). 5. Leave the Wireless Client Security Separation radio button set to No (it is selected by default).
ProSafe Wireless-N Access Point WNAP210 5. You manually or automatically program the four data encryption keys. These values have to be identical on all wireless clients and access points in your network. Select either: - Automatic. Enter a word or group of printable characters in the Passphrase box and click the Generate Keys button. The four fields are automatically populated with key values. - Manual.
ProSafe Wireless-N Access Point WNAP210 2. Select Configuration > Security > Advanced > MAC Authetication. The MAC Authetication screen displays. 3. Select the Turn Access Control On check box to enable the access control feature. 4. Select the access control database options. The options are: • Local MAC Address Database. The access point will use the local MAC address table for access control. This is the default. • RADIUS MAC Address Database.
3.
ProSafe Wireless-N Access Point WNAP210 Change the Password The default password for the user name admin is password. You should change this to a more secure password You cannot change the admin user name. To change the administrator password: 1. Select Maintenance > Password > Change Password to display the Change Password screen: 2. Enter the password in the Current Password field. 3. Then enter the new password twice, once in the New Password field and again in the Repeat New Password field. 4.
ProSafe Wireless-N Access Point WNAP210 To set up an SNMP management interface: 1. Select Maintenance > Remote Management > SNMP. The SNMP screen displays, as shown in the following figure: 2. Enter the following information in the SNMP fields: • SNMP. Enable SNMP to allow the SNMP network management software, such as HP OpenView, to manage the wireless access point through SNMPv1/v2 protocol. • Read-Only Community Name.
ProSafe Wireless-N Access Point WNAP210 Remote Console 1. Select Maintenance > Remote Management > Remote Console. 2. Enter the following information in the Remote Console screen. • Secure Shell (SSH). If set to Enable, the wireless access point allows remote access only through Secure Shell and Secure Telnet. The default is Enable. • Telnet. If set to Enable, the wireless access point allows remote access through Telnet. The default is Disable.
ProSafe Wireless-N Access Point WNAP210 Upgrade the Access Point Firmware The firmware is stored in flash memory, and can be upgraded as NETGEAR releases new firmware . You can download upgrade files from the NETGEAR website. If the upgrade file is compressed (.zip file), you need to first extract the image (.rmt) file before sending it to the access point. You can send the upgrade file using your browser. Note: Use a web browser such as Microsoft Internet Explorer 6.0 or later, or Netscape Navigator 4.
ProSafe Wireless-N Access Point WNAP210 Save or Restore the Configuration File The access point settings are stored in the access point in a configuration file. This file can be saved (backed up) or restored. You can also restore the factory settings as described in Enable the Syslog Server on page 37. To save your settings in a configuration file: 1. Select Maintenance > Upgrade > Backup Settings to back up your current settings.The Backup Settings screen displays. 2. Click Backup.
ProSafe Wireless-N Access Point WNAP210 Enable the Syslog Server The Syslog screen allows you to enable the syslog option if you have a syslog server on your LAN. To enable a syslog server: 1. Select Configuration > System > Advanced > SysLog to display the Syslog screen. 2. Specify the following settings: • Enable Syslog. Enable this option if you have a syslog server on your LAN.
ProSafe Wireless-N Access Point WNAP210 To restore the factory settings: 1. Select Maintenance > Reset > Restore Defaults. The Restore Defaults screen displays: 2. Select the Yes radio button. 3. Click Apply. The access point password is password, the access point DHCP client is disabled, the default LAN IP address is 192.168.0.236, and the access point name is reset to the name printed on the label on the bottom of the unit.
4.
ProSafe Wireless-N Access Point WNAP210 System Information The System screen you access from the Monitoring tab provides a summary of the current access point configuration settings, including current IP settings and current wireless settings. This information is read-only, so any changes have to be made on other screens. To access the System screen, select Monitoring > System. This screen shows the following information: • Access Point Name. The NetBIOS name. The default name can be changed.
ProSafe Wireless-N Access Point WNAP210 Wireless Stations This screen shows all IP devices associated with this access point in the wireless network defined by the wireless network name (SSID). For each device, the screen shows the station ID, MAC address, IP address, BSSID, SSID, AID, channel rate, status (whether or not the station is allowed to communicate with the access point), type, mode, and state.
ProSafe Wireless-N Access Point WNAP210 To enable rogue AP detection: 1. Select Configuration > Security > Advanced > Rogue AP. The Rogue AP screen displays: 2. Click Refresh to discover the APs. See the following section for more information. 3. Click Move to add APs in the Unknown AP List to the Known AP List. 4. Click Delete to remove APs from the Known AP List back to the Unknown AP List. 5. Select the Turn Rogue AP Detection On check box, and click Apply.
ProSafe Wireless-N Access Point WNAP210 View and Save AP Lists The access point detects nearby access points and wireless stations and maintains them in a list. You can use this list to prevent wireless stations from connecting to the access point. 1. Select Monitoring > Rogue AP. Select Unknown AP List or Known AP List as required. The respective screens display: 2. In the Unknown AP List or the Known AP List screen, click Refresh to update the corresponding list. 3.
ProSafe Wireless-N Access Point WNAP210 Activity Log The Activity Log screen displays the access point system activity. 1. Select Monitoring > Logs. The Logs screen displays: 2. Click Refresh to update the display, click Clear to clear the log content, or click Save As to save the log contents into a file on your computer or to save the file to a disk drive. Network Traffic Statistics The Statistics screen displays information for both wired (LAN) and wireless (WLAN) interface network traffic.
ProSafe Wireless-N Access Point WNAP210 You can click Refresh to update the statistics information for each interface. The following information fields are displayed on the Statistics screen. • Packets. The number of packets sent and received since the access point was restarted. • Bytes. The number of bytes sent and received since the access point was restarted. • Unicast Packets. The unicast packets sent and received since the access point was restarted. • Multicast Packets.
5. Advanced Configuration This chapter describes how to configure the advanced features of your access point. This chapter includes the following sections: • 802.
ProSafe Wireless-N Access Point WNAP210 802.1Q VLAN The 802.1Q VLAN protocol on the access point logically separates traffic on the same physical network. Select Configuration > System > General to display the following screen: Untagged VLANs When the Untagged VLAN check box is selected, one VLAN can be configured as an untagged VLAN. When the access point sends frames associated with the untagged VLAN out the LAN (Ethernet) interface, those frames are untagged.
ProSafe Wireless-N Access Point WNAP210 Hotspot Settings If you want the access point to capture and redirect all HTTP (TCP, port 80) requests, use this feature to redirect the requests to the specified URL. For example, a hotel might want all wireless connections to go to its server to start a billing transaction. Note: The redirection occurs only the first time a wireless client opens a web browser. To set up a hotspot server: 1. Select Configuration > System > Advanced > Hotspot.
ProSafe Wireless-N Access Point WNAP210 To configure advanced wireless settings: 1. Select Configuration > Wireless > Advanced > Wireless Settings. The Wireless Settings screen displays: 2. Enter the appropriate information in the following fields: 3. Click Apply to enable the wireless settings. Advanced Wireless Settings Fields The following fields are available in the advanced Wireless Settings screen: • RTS Threshold (0–2347). Request to Send Threshold.
ProSafe Wireless-N Access Point WNAP210 • RIFS Transmission. Reduced interframe space. RIFS transmissions are shorter than other interframe spaces, and if this feature is enabled, the access point allows transmission of successive frames at different transmit powers. The default is disabled. • DTIM Interval. The delivery traffic indication message. Specifies the data beacon rate between 1 and 255. The default is 3. • Preamble Type.
ProSafe Wireless-N Access Point WNAP210 The following table describes the settings for QoS queues. Table 4. QoS queues and parameters QoS queue Description Data 0 (Voice) High-priority queue, minimum delay. Time-sensitive data such as VoIP and streaming media are automatically sent to this queue. Data 1 (Video) High-priority queue, minimum delay. Time-sensitive video data is automatically sent to this queue. Data 2 (Best Effort) Medium-priority queue, medium throughput and delay.
ProSafe Wireless-N Access Point WNAP210 Select the access point mode you want to use for your environment: • Wireless Point-to-Point Bridge. In this mode, the access point can communicate with another bridge-mode wireless station and with wireless clients if you select the Enable Wireless Client Association check box.
ProSafe Wireless-N Access Point WNAP210 Point-to-Point Bridge AP 1 APs in point-to-point bridge mode AP 2 Hub or switch Router LAN Segment 2 LAN Segment 1 Figure 3. Point-to-point bridge mode To configure a point-to-point bridge: 1. Select Configuration > Wireless Bridge > Bridging and Repeating. The Bridging and Repeating screen displays. 2. Select the Enable Wireless Bridging and Repeating check box. This allows you to select a bridging mode. 3.
ProSafe Wireless-N Access Point WNAP210 5. Configure the other access point (AP 2) on LAN Segment 2 in point-to-point bridge mode. AP 1 needs to have AP 2’s MAC address in its Remote MAC Address field, and AP 2 needs to have AP 1’s MAC address in its Remote MAC Address field. 6. Configure and verify the following parameters for both access points: • Verify that both access points are configured to operate in the same LAN network address range as the LAN devices.
ProSafe Wireless-N Access Point WNAP210 To configure a point-to-multi-point wireless bridge: 1. For the first access point (AP 1) on LAN Segment 1, select Configuration > Wireless Bridge > Bridging and Repeating. The Bridging and Repeating screen displays. 2. Select the Enable Wireless Bridging and Repeating check box. This allows you to select a bridging mode. 3. Select Wireless Point-to-Point Bridge, and configure enter the remote MAC address of AP 2. Click Apply. 4.
ProSafe Wireless-N Access Point WNAP210 Wireless Repeater AP 1 All APs in repeater mode AP 3 AP 2 Router Router LAN Segment 1 LAN Segment 2 Figure 5. Wireless repeater To configure the access point as a wireless repeater: 1. For the first access point (AP 1) on LAN Segment 1, select Configuration > Wireless Bridge > Bridging and Repeating. The Bridging and Repeating screen displays. 2. Select the Enable Wireless Bridging and Repeating check box. This allows you to select a bridging mode. 3.
ProSafe Wireless-N Access Point WNAP210 A computer on any LAN segment should be able to connect to the Internet or share files and printers with computers or servers connected to any of the three WLAN segments. 8. Click Apply to save your settings. You can extend repeating by adding up to two additional access points configured in repeater mode. However, since repeater configurations communicate in half-duplex mode, the bandwidth decreases as you add repeaters to the network.
6. Troubleshooting and Debugging This chapter includes the following sections: • Troubleshooting with the LEDs • Cannot Connect to the Access Point to Configure It • Wireless Access to the Network • Time-Out Error for URL or IP Address Note: For up-to-date WNAP210 installation details and troubleshooting guidance, visit http://support.netgear.com.
ProSafe Wireless-N Access Point WNAP210 Troubleshooting with the LEDs All LEDs Are Off It takes a few seconds for the Power LED to light. Wait a minute and check the Power LED on the access point. If the access point has no power: • Make sure that the power cord is connected to the access point. • Make sure that the power adapter is connected to a functioning power outlet. If it is in a power strip, make sure that the power strip is turned on.
ProSafe Wireless-N Access Point WNAP210 Cannot Connect to the Access Point to Configure It Check these items: • The access point is installed correctly, LAN connections are OK, and it is powered on. Check that the LAN port LED is green to verify that the Ethernet connection is OK. • The default configuration of the access point is for a static IP address of 192.168.0.236 and a subnet mask of 255.255.255.0 with DHCP disabled. Make sure that your network configuration settings are correct.
ProSafe Wireless-N Access Point WNAP210 • If the access point is configured correctly, check your Internet connection (DSL or cable modem, and so on.) to make sure that it is working correctly. • Try again.
A.
ProSafe Wireless-N Access Point WNAP210 Factory Default Settings You can use the Restore Factory Settings button on the rear panel to reset all settings to their factory defaults. This is called a hard reset. Pressing this button for a shorter period of time simply causes your device to reboot. Restore Factory Settings To perform a hard reset: 1.
ProSafe Wireless-N Access Point WNAP210 Table 5. Access point default configuration settings (continued) Feature Default setting Spanning Tree Protocol Disabled Secure Telnet Enabled Wireless operating mode Access Point Access point name netgearxxxxxx, where xxxxxx represents the last 6 digits of the wireless access point MAC address.
ProSafe Wireless-N Access Point WNAP210 Technical Specifications Table 6. Technical specifications Feature Description 802.11g data rates 1, 2, 5.5, 6, 9, 11, 12, 18, 24, 36, 48, & 54 Mbps (Auto-rate capable) 802.11ng data rates, channel width Best, 7.2 Mbps, 14.4 Mbps, 21.7 Mbps, 28.9 Mbps, 43.3 Mbps, 57.8 20 MHz and Guard Interval short Mbps, 65 Mbps, 72.2 Mbps, 14.44 Mbps, 28.88 Mbps, 43.33 Mbps, (400 ms) 57.77 Mbps, 86.66 Mbps, 115.56 Mbps, 130 Mbps, 144.44 Mbps 802.
B. Command Line Reference B The ProSafe Wireless-N Access Point WNAP210 (AP) can be configured through either the command-line interface (CLI), a web browser, or a MIB browser. The CLI allows viewing and modification of the configuration from a terminal or computer through a Telnet connection.
ProSafe Wireless-N Access Point WNAP210 | | | | |-macacl-add --add wireless access control (ACL) | | | | |-macacl-database --delete wireless access control (ACL) database | | | | |-macacl-del --delete wireless access control (ACL) | | | | |-mcsrate --transmit data rate | | | | |-mode --enable wireless access control (ACL) | | | | |-operation-mode --wireless operation mode | | | | |-power --wireless transmit power | | | | |-preamble --wireless preamble (only effect on 802.
ProSafe Wireless-N Access Point WNAP210 | | | | | | |-key3 --wireless wep key 3 | | | | | | |-key4 --wireless wep key 4 | | | | | | |-keyno --key number | | | | | | |-name --profile name | | | | | | |-presharedkey --pre-shared key | | | | | | |-security-separation --disable associated wireless client communication | | | | | | |-ssid --network name (1-32 chars) | | | | | | |-status --profile status | | | | | | |-vlan-id --VLAN id | | | | | | |-wep-pass-phrase --wireless wep passphrase key | | | | | | |-wepk
ProSafe Wireless-N Access Point WNAP210 | | | | | | |-presharedkey --pre-shared key | | | | | | |-security-separation --disable associated wireless client communication | | | | | | |-ssid --network name (1-32 chars) | | | | | | |-status --profile status | | | | | | |-vlan-id --VLAN id | | | | | | |-wep-pass-phrase --wireless wep passphrase key | | | | | | |-wepkeytype --wireless wep key type | | | | | | | | | | | |-5> --5th security profile | | | | | | |-authentication --authentication type | | | | | | |-e
ProSafe Wireless-N Access Point WNAP210 | | | | | | |-status --profile status | | | | | | |-vlan-id --VLAN id | | | | | | |-wep-pass-phrase --wireless wep passphrase key | | | | | | |-wepkeytype --wireless wep key type | | | | | | | | | | | |-7> --7th security profile | | | | | | |-authentication --authentication type | | | | | | |-encryption --data encryption | | | | | | |-hide-network-name --hide network name | | | | | | |-key1 --wireless wep key 1 | | | | | | |-key2 --wireless wep key 2 | | | | | | |-ke
ProSafe Wireless-N Access Point WNAP210 | | | | | | | | | | | | | | | | | | | | | | | | | | | | | | | | | | | | | | | | | | | | | | | | | | | | | | | | | | | | | | | | | | | | | | | | | | | | | | | | | | | | | | | | | | | | | | | | | | | | | | | | | | | | | | | | | | | | | | | | | | | | | | | | | | | | | | | | | | | | | | | | | | | | | | | | | | | | | | | |-wireless-bridge> | |-security-profile> | | |-1> | | | |-authentication | | | |-encryption | | | |-name | | | |-presharedkey | | | |-remote-mac | |
ProSafe Wireless-N Access Point WNAP210 | | | | | | | |-remote-mac --remote MAC | | | | | | | |-status --profile status | | | | | | | |-wep-pass-phrase --wireless wep passphrase key | | | | | | | |-wepkey --wireless wep key | | | | | | | |-wepkeytype --wireless wep key type | | | | | | | | | | | | | | | | | | | | | | |-wmm> --wmm settings | | | | | |-ap-data0-best-effort --access point best effort voice data | | | | | |-ap-data1-background --access point low-priority data | | | | | |-ap-data2-video --acces
ProSafe Wireless-N Access Point WNAP210 | | |-authentication-server-primary --primary authentication server | | |-authentication-server-primary-port --primary system accounting server shared secret | | |-authentication-server-primary-sharedsecret --primary authentication server shared secret | | |-authentication-server-secondary --secondary authentication server | | |-authentication-server-secondary-port --secondary authentication server port | | |-authentication-server-secondary-sharedsecret --secondary a
ProSafe Wireless-N Access Point WNAP210 |-restore-default-password |-show> | |-configuration | |-interface> | | |-eth> | | | |-statistics | | | | | |-wlan> | | | |-2.
C. Notification of Compliance NETGEAR Wireless Routers, Gateways, APs C Regulatory Compliance Information Note: This section includes user requirements for operating this product in accordance with National laws for usage of radio spectrum and operation of radio devices. Failure of the end-user to comply with the applicable requirements may result in unlawful operation and adverse action against the end-user by the applicable National regulatory authority.
ProSafe Wireless-N Access Point WNAP210 Español [Spanish] Por medio de la presente NETGEAR Inc. declara que el Radiolan cumple con los requisitos esenciales y cualesquiera otras disposiciones aplicables o exigibles de la Directiva 1999/5/CE. Ελληνική [Greek] ΜΕ ΤΗΝ ΠΑΡΟΥΣΑ NETGEAR Inc. ΔΗΛΩΝΕΙ ΟΤΙ Radiolan ΣΥΜΜΟΡΦΩΝΕΤΑΙ ΠΡΟΣ ΤΙΣ ΟΥΣΙΩΔΕΙΣ ΑΠΑΙΤΗΣΕΙΣ ΚΑΙ ΤΙΣ ΛΟΙΠΕΣ ΣΧΕΤΙΚΕΣ ΔΙΑΤΑΞΕΙΣ ΤΗΣ ΟΔΗΓΙΑΣ 1999/5/ΕΚ. Français [French] Par la présente NETGEAR Inc.
ProSafe Wireless-N Access Point WNAP210 Íslenska [Icelandic] Hér með lýsir NETGEAR Inc. yfir því að Radiolan er í samræmi við grunnkröfur og aðrar kröfur, sem gerðar eru í tilskipun 1999/5/EC. Norsk [Norwegian] NETGEAR Inc. erklærer herved at utstyret Radiolan er i samsvar med de grunnleggende krav og øvrige relevante krav i direktiv 1999/5/EF. This device is a 2.
ProSafe Wireless-N Access Point WNAP210 • For product available in the USA market, only channel 1~11 can be operated. Selection of other channels is not possible. • This device and its antenna(s) must not be co-located or operation in conjunction with any other antenna or transmitter.
ProSafe Wireless-N Access Point WNAP210 Interference Reduction Table The following table shows the recommended minimum distance between NETGEAR equipment and household appliances to reduce interference (in feet and meters).
Index DHCP client 14, 40 DTIM interval 50 dynamic IP addresses, enabling 14, 18 Numerics 192.168.0.210, static IP address 11 255.255.255.
ProSafe Wireless-N Access Point WNAP210 LEDs 7 LEDs, troubleshooting with 59 logs, activity 44 logs, syslog 37 restricting access by MAC address 29 RIFS transmission 50 rogue AP detection 41, 42 RTS threshold 49 M S MAC address 11, 12, 40 restricting access 20, 29 MAC authentication 30 MCS Index 17 output power 18 secondary DNS server 14 security options 20 security options, described 20 security profiles 21 authentication settings 22 definition 21 SNMP, default setting 33 SSID 16 SSID broadcast, dis
ProSafe Wireless-N Access Point WNAP210 wireless network name 16 wireless radio, turning off and on 16 wireless range 10 wireless repeater, configuring 56 wireless security options 20 wireless settings, advanced 49 wireless stations 41 wireless stations, trusted 30 WPA with RADIUS 27 82