Wireless Router Setup Manual NETGEAR, Inc. 4500 Great America Parkway Santa Clara, CA 95054 USA April 2007 208-10070-02 v2.
Trademarks NETGEAR and the NETGEAR logo are registered trademarks, and RangeMax and Smart Wizard are trademarks of NETGEAR. Inc. Microsoft, Windows, and Windows NT are registered trademarks of Microsoft Corporation. Other brand and product names are registered trademarks or trademarks of their respective holders.
Contents Getting to Know Your Wireless Router ................................................................................ 1 Unpacking Your New Router ............................................................................................. 1 Hardware Features ............................................................................................................ 3 Positioning Your Wireless Router ......................................................................................
Related Documents.............................................................................................................. 39 Registration and Certifications............................................................................................
Getting to Know Your Wireless Router Congratulations on your purchase of a NETGEAR® high-speed wireless router, the RangeMax NEXT Wireless-N Router Model WNR834Bv2. Before you begin installing your router, check the package contents (see “Unpacking Your New Router” on page 1). Become familiar with the front and back panels of your router—especially the LEDs—and the important information on the router label (see “Unpacking Your New Router” on page 1).
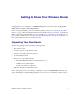
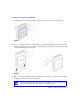
To prepare your router for installation: 1. Carefully peel off the protective film covering both sides of your router (see Figure 1). Figure 1 2. Set up your wireless router by inserting the tabs of the stand (supplied with your router) into the slots on the bottom of your router as shown in Figure 2. Then, remove the protective film covering the LED panel of the router. Figure 2 3.
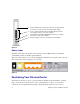
Hardware Features Before you install and connect your router, take a moment to become familiar with the front and back panels of the router—especially the LEDs on the front panel. Front Panel The lights on the front panel indicate the operating status of the router. A description of LED behavior is included in Figure 3.
1. Factory Default Restore setting. Press Restore for approximately 5 seconds to reset the router to the factory default settings. 2. Four Local Area Network (LAN) 10/100 Mbps Ethernet ports for connecting the router to your local computers. 3. Internet/Wide Area Network (WAN) Ethernet port for connecting the router to a cable or DSL modem. 4. AC power adapter outlet for connecting the power adapter.
example, the thickness and number of walls the wireless signal must pass through may limit the range. For best results, place your router: • Near the center of the area where your computers and other devices will operate, preferably within line of sight to your wireless devices. • Accessible to an AC power outlet and near Ethernet cables for wired computers.
– Smart Wizard requires a PC running Microsoft Windows.. Before running the Smart Wizard on a corporate PC to set up your home router, check with your company’s network support staff. Corporate network settings or Virtual Private Network (VPN) client software may conflict with the default settings of a home router. If you are unsure about whether there might be a conflict, use a different computer.
These options are discussed later in “Accessing Your Router After Installation and Checking for New Firmware” on page 10.
8 Getting to Know Your Wireless Router
Installing Your Router Using the Smart Wizard To use the Smart Wizard, you must be using a PC with Windows Vista, or Windows 2000 or Windows XP with Service Pack 2. The Smart Wizard setup procedure should take about 15 minutes to complete. Before using the Smart Wizard to set up your router, ensure that: • You have an Internet service connection through an Internet Service Provider (ISP). • You have the configuration information provided by your ISP.
you can always access the router’s user interface later to select a security option (see “Accessing Your Router After Installation and Checking for New Firmware”). To ensure optimum performance of your high-speed wireless router, the wireless adapter card for each computer in your network should support the same technology as your router (see the online User Manual for more information).
Figure 6 2. When prompted, enter the default User Name and Password (admin for the router User Name and password for the router Password), both in lowercase letters. If you changed the User Name and Password from the defaults, then enter your new User Name and Password. The router User Name and Password are unique to the router and are not the same as any other User Name or Password you may use to log in to your Internet connection. The Firmware Upgrade Assistant screen will display. 3.
To upgrade your router: 1. If the Router Upgrade screen does not display automatically, select Router Upgrade under Maintenance on the main menu. The Router Upgrade screen will then display. 2. Click Browse and locate the unzipped firmware image that you downloaded to your PC (the file will end in .img or .chk). 3. Once you have selected the file, click Upload to send the software to the router. The upload process will take several minutes.
6. Under Downloads, check the most recent Firmware Version offered against the Firmware Version shown on your Router Status screen. 7. If the version on the NETGEAR website is more recent, click on the version number. Then, click Right-click and Save to Download and save the file to a location on your hard disk. 8. Follow the procedure in “To upgrade your router:” to complete the upgrade process.
14 Installing Your Router Using the Smart Wizard
Installing Your Router Manually (Advanced, Mac, and Linux Users) Before installing and connecting your router manually, review the list below and make sure that you have all of the necessary information. • Internet service connection through an Internet Service Provider (ISP). • The configuration information your ISP gave you.
of your computer. If you are unsure about this, refer to the documentation for your computer or see the link to TCP/IP Addressing in “Related Documents” on page 39. If you are replacing an existing router, disconnect it completely from your network and set it aside before starting to install your new router. To connect the wireless router, the computer, and the modem: 1. Turn off your computer. 2. Turn off and unplug the cable or DSL broadband modem. 3.
C Figure 8 6. Locate the Ethernet cable (D) that is attached to your computer (see Step 3). Securely insert that cable into a LAN port on the router, such as LAN port 1 (E), as shown in Figure 9. E D Figure 9 7. Connect any additional wired PCs to your router by inserting an Ethernet cable from a PC into one of the three remaining LAN ports. When your network cables are connected as shown in Figure 9, you are ready to start your network. Start your network in the correct sequence, as described below.
To start your network: 1. Plug in and turn on the cable or DSL modem. Wait 2 minutes. 2. Plug the power cord into your wireless router and into a power outlet. Wait 1 minute. 3. Turn on your computer. It will take several minutes for your router to establish a connection with your computer and your Internet provider. For DSL customers, if software logs you in to the Internet, do not run that software.
Setting Up Your Router for Internet Access When configuring your wireless router manually, you must log in to your wireless router to set it up initially and to make any changes to your wireless router’s settings later. The factory default state is reset when you use the Restore Factory Settings button. See “Restoring the Default User Name and Password” on page 36 for more information. To access the router using its login name and password: 1. Type http://www.routerlogin.
3. From the menu options in the left navigation pane, click Setup Wizard. The Setup Wizard screen will display. Figure 12 4. Select one of the following options: • Select Yes to allow the Setup Wizard to detect your Internet connection. When prompted, click Next. The wizard will assist you with configuring your wireless router to access the Internet. If you cannot connect to the wireless router, check the Internet Protocol (TCP/IP) properties in the Network Connections section of your Control Panel.
Checking for New Firmware After installing your router, you must open a browser window and log in to the router to complete your wireless setup. At that time, you will also be prompted to check for new router firmware. To log in to the router after installation: 1. Open a browser window and type http://www.routerlogin.net in the address field of your browser. Press Enter. . You can enter either of these addresses to connect to your wireless router: http://www.routerlogin.net or http://www.routerlogin.com.
the message “No New Firmware Version Available” will display. (If you selected “No,” you can check for new firmware later; see “To manually check for new router firmware:” on page 23.) 5. If new firmware is available, you will be directed to the new firmware version on the NETGEAR website. Click Right-click and Save to Download and save the file to a location on your hard disk. Usually the firmware image is an .img or .
To manually check for new router firmware: 1. Open a browser window and type http://www.routerlogin.net in the address field of your browser. Press Enter. 2. When prompted, enter the default User Name and Password (admin for the router User Name and password for the router Password), both in lowercase letters. If you changed the User Name and Password from the defaults, then enter your new User Name and Password. 3. Select Router Status under the Maintenance menu on your router interface.
Unlike wired network data, your wireless data transmissions can extend beyond your walls and anyone with a compatible adapter can receive them. For this reason, use the security features of your wireless equipment. The wireless router provides highly effective security options which are covered in detail in the User Manual that is available from a link on the Resource CD or by clicking the Documentation link on the main menu of your router.
Setting Up Your Wireless Computers Once you have set up your router, you are ready to configure your wireless computers with the same settings as those you configured on the router. For your wireless computers to work with the router, the settings of each wireless computer must match the wireless router’s settings exactly. To set up your computers for wireless connectivity: 1. Program the wireless adapter of each computer to have the same SSID (Wireless Network Name) as the router. 2.
26 Installing Your Router Manually (Advanced, Mac, and Linux Users)
Troubleshooting If you have difficulties accessing the Internet, use the Basic Setup Checklist to make sure that you have connected and set up your router correctly. If your basic setup is correct, then look for your problem in one of the subsequent sections. Basic Setup Checklist The following items are the most common errors made when initially setting up a router. Carefully review the checklist to make sure that you have followed the recommended procedures.
• Check the router status lights to verify correct router operation. If the Power light does not turn solid green within 2 minutes after turning the router on, reset the router according to the instructions in “Restoring the Default User Name and Password” on page 36. Checking Basic Router Functions After you turn on power to the router, check that the following sequence of events has occurred: 1.
b. Clear the router’s configuration to factory defaults. This will set the router’s IP address to 192.168.1.1. This procedure is explained in “Restoring the Default User Name and Password” on page 36. If the error persists, you might have a hardware problem and should contact technical support. • Internet Light Stays Amber. When the router is turned on, the Internet light turns amber for about 20 seconds and then turns green. If the light does not turn green, the router has a problem.
• Make sure your computer’s IP address is on the same subnet as the router. If your are using the recommended addressing scheme, your computer’s address should be in the range of 192.168.1.2 to 192.168.1.254. Refer to your computer’s documentation or see “Preparing a Computer for Network Access” in “Related Documents” on page 39 for help with configuring your computer. If your computer cannot reach a DHCP server, some operating systems will assign an IP address in the range 169.254.x.x.
you have a static IP address, your wireless router automatically requests an IP address from your service provider. To check the Internet IP address from the browser interface: 1. Log in to the wireless router. 2. Select the Router Status link under the Maintenance heading to check that an IP address is shown for the Internet Port. If 0.0.0.0 is shown, your wireless router has not obtained an IP address from your service provider.
If any of the steps indicate “Failed,” you can attempt to reconnect by clicking Connect. The wireless router will continue to attempt to connect indefinitely. If you cannot connect after several minutes, you may be using an incorrect Service Name, User Name, or Password. There also may be a provisioning problem with your ISP. Unless you connect manually, the wireless router will not authenticate using PPPoE until data is transmitted to the network.
3. Click OK. You should see a message like this one: Pinging www.routerlogin.net with 32 bytes of data If the path is working, you see this message: Reply from www.routerlogin.net: bytes=32 time=NN ms TTL=xxx If the path is not working, you see this message: Request timed out If the path is not working correctly, you could have one of the following problems: • • Wrong physical connections – Make sure the LAN port light is on.
• Check that your PC has the IP address of your router listed as the default gateway. If the IP configuration of your PC is assigned by DHCP, this information will not be visible in your PC’s Network Control Panel. Verify that the IP address of the router is listed as the TCP/IP default gateway. • Check to see that the network address of your PC (the portion of the IP address specified by the netmask) is different from the network address of the remote device.
Default Configuration Default Configuration Settings You can use the Restore Factory Settings button located on the back of your device to reset all configuration settings to their factory defaults. This is called a hard reset. • To perform a hard reset, push and hold the Restore button for approximately 5 seconds (until the POWER LED blinks rapidly). Your device will return to the factory configuration settings shown in Table 1 below.
Table 1.
The factory default settings will be restored so that you can access the router from your web browser using the factory defaults.
38 Default Configuration
Related Documents This section provides links to reference documents that you can use to gain a more complete understanding of the technologies used in your NETGEAR product. Document Link Internet Networking and TCP/IP Addressing http://documentation.netgear.com/reference/enu/tcpip/index.htm Preparing a Computer for Network Access http://documentation.netgear.com/reference/enu/wsdhcp/index.htm Glossary http://documentation.netgear.com/reference/enu/glossary/index.
40 Related Documents
Registration and Certifications Product Registration, Support, and Documentation Register your product at http://www.NETGEAR.com/register. You must register before you can use our telephone support service. Product updates and Web support are always available by going to: http://kbserver.netgear.com/. Setup documentation is available on the CD, on the support website, and on the documentation website.
42