Wireless N 300+ Powerline AV Router WNXR2000 Installation Guide NETGEA R
©2010 NETGEAR, Inc. All rights reserved. Technical Support Thank you for selecting NETGEAR products. Locate the serial number on the label of your product and use it to register your product at http://www.NETGEAR.com/register. Registration is required before you can use the telephone support service. Registration at the NETGEAR website is strongly recommended. Go to http://support.netgear.com for product updates and Web support.
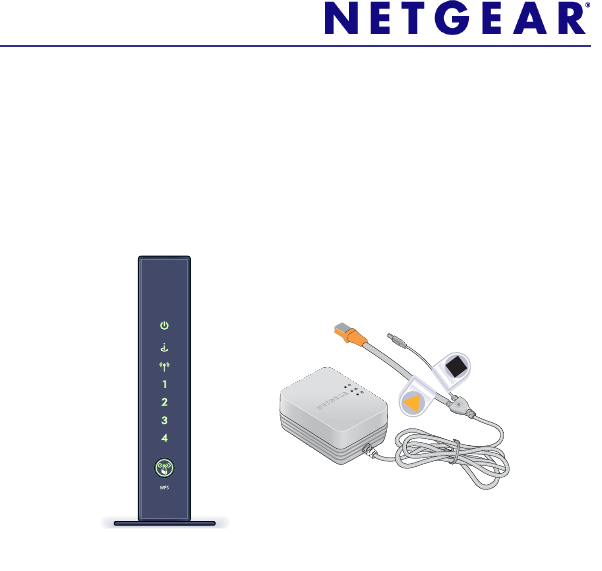
Package Contents NETGEA R Wireless N 300+ Powerline AV Router WNXR2000 Resource CD N300 Wireless Router Ethernet Cable XAVP1000 Y-Cable Adapter 3
About Your WNXR2000 The WNR2000 router works with the XAVP1000 Y-cable adapter to help you create a Powerline and wireless network. To set up your network, do the following: • • Set Up the XAVP1000 Adapter Connect the WNXR2000 Powerline AV Router Set Up the XAVP1000 Adapter Follow these steps to connect the XAVP1000 adapter to the router: 1. Plug the network connector on the Y-cable adapter into one of the orange Ethernet ports on the router. 2.
4. Power on the router using the Power On/Off button on the back of the router. 5. Check that the power lights on both the XAVP1000 adapter and on the router are lit. For more information on the status lights, see “WNXR2000 Router Status Lights” on page 15 and “XAVP1000 Adapter LEDs and Buttons” on page 17. 6.
Step 1: Unplug the power to turn off your modem. Step 2: Connect one end of the yellow cable ( ) to your modem, and connect the other end to your router. DSL or Cable Internet Modem Step 4: Power on your router. Wait until the wireless LED turns on.
Step 3: Power on your modem. Wait until your modem cycles on (approximately 2 minutes). Wireless on/off Note: If you have a modem with a battery-backup, remove and re-insert the battery before connecting your modem to power. (not included) Laptop or Desktop Computer Power on/off N300 Wireless Router Wireless N 300+ Powerline AV Router WNXR2000 Resource CD Step 5: Connect your computer.
Existing Powerline Network — Room 1 (example) This drawing (Room 1) shows how the Y-cable Powerline adapter and WNR2000 router might fit into an existing Powerline network in your house.
Reset Existing Powerline Network — Room 2 (example) (additional Powerline adapters not included) 9
Setting Up Internet Access 1. In the address field of your browser, type http:// www.routerlogin.net and click Enter. 2. Enter the router User Name admin and default Password password to open your router’s main settings page. 3. When the main settings page opens, you will be asked if you want to “Check for Update.” Click Cancel. You can always check for new firmware later after you are connected to the Internet. 4. Select the first menu item on the left: Setup Wizard. Make sure Yes is selected.
Note: If your ISP requires that you enter a User Name or Password, you will be prompted to enter this information. If you do not have this information, contact your ISP. After connecting to the Internet, you can check for firmware updates by selecting Router Upgrade and following the onscreen prompts. Setting Up the Wireless Security You should set up a secure wireless network.
1. From the main menu page, select Wireless Settings.* *Your router menu may display different or additional features not shown 2. First, name your wireless network. Choose a name that is easy for you to remember. You might want to write it down here: ___________________________ (the default name is NETGEAR). 3. Select your security method. NETGEAR recommends WPAPSK (TKIP) +WPA2-PSK (AES). Then, enter a Passphrase. In the example, we entered HomeNetwork.
Note: Both your Network Name (SSID) and Passphrase are case sensitive. Your Network name, Security method and Passphrase must be the same on all the wireless devices connected to your router. 4. Click Apply and close your browser. Connecting Wireless Devices to Your Router Enter your wireless information here: Wireless Network Name (SSID) __________________________________ Wireless Security Passphrase __________________________________ If you don’t remember your Passphrase, type http:// www.routerlogin.
1. Open the wireless software that manages your wireless connections on the wireless device (iPhone, laptop computer, gaming device) that you want to connect to your router. 2. The wireless software will scan for all wireless networks in your area. Look for your network—the one you named when you set up your router. Select it. 3. If you set up security, you will be prompted for a Passphrase or network key. Enter the Passphrase you selected and click Connect.
LED and Button Descriptions WNXR2000 Router Status Lights Item Description Power • Solid Green. The power is on and the router is ready. • Solid Amber. The router is performing the power-on selftest diagnostic. • Off. Power is not being supplied to the router. Internet • Solid Green. The wireless router has acquired an Internet address. • Solid Amber. No IP address acquired. • Off. No Ethernet cable is connected to the modem. Wireless • Solid Blue. The wireless interface is enabled. • Off.
Item Description Ethernet Ports (Ports 1 – 4) • Solid Green. The local port is connected to a 100 Mbps device. • Solid Amber. The local port is connected to a 10 Mbps device. • Off. No link is detected on this port. Push ‘N’ Connect • Solid Green. Indicates that wireless security (WEP, WPA-PSK, or WPA-PSK) is on. • Off. No WPS connection exists.
XAVP1000 Adapter LEDs and Buttons Item Description Power LED • Solid green. The electrical power is on. • Blinking green.The adapter is restarting or setting up security. • Amber. Power saving mode. • Off. There is no electrical power. Powerline LED • Solid. The adapter is connected to a Powerline network. • Blinking. The adapter is sending or receiving data. • Off. The adapter has not found any other compatible Powerline devices using the same encryption key.
Item Description Ethernet LED • Solid. The Ethernet port is linked, but there is no activity. • Blinking. There is traffic on the Ethernet port. • Off. There is no Ethernet connection. Factory Reset Press the Factory Reset button for 1 second, then release to return the Powerline adapter to its factory default settings.
Troubleshooting Tips Power LED is off Make sure that power is supplied to the electrical outlet, and that the Powerline devices are not plugged into an extension cord, power strip, or surge protector. Power LED is amber Power saving mode occurs when the Ethernet LED is off. This can occur when: • the Ethernet cable is unplugged. • the device connected through the Ethernet cable is turned off. • the adapter is idle for 10 minutes. It returns to normal mode within 2 seconds once the Ethernet link is up.
Technical Support Thank you for selecting NETGEAR products. After installing your device, locate the serial number on the label of your product and use it to register your product at http:// www.NETGEAR.com/register. Registration is required before you can use our telephone support service. Registration via our website is strongly recommended. Go to http://kbserver.netgear.com for product updates and Web support.
This symbol was placed in accordance with the European Union Directive 2002/96 on the Waste Electrical and Electronic Equipment (the WEEE Directive). If disposed of within the European Union, this product should be treated and recycled in accordance with the laws of your jurisdiction implementing the WEEE Directive. © 2010 by NETGEAR, Inc. All rights reserved. NETGEAR and the NETGEAR logo are registered trademarks of NETGEAR, Inc. in the United States and/or other countries.
NETGEAR, Inc.